Create a payments page
Integrate Apple Pay and Google Pay with extra code.
Customise all components with CSS.
Note
Refer to your platform profile to determine if either direct charges or destination charges is right for your business.
Destination charges
In this example, the platform is a home-rental marketplace that needs to create payments for homeowners who rent out their properties. You can use destination charges in other applications as well.
Step 1: Create a PaymentIntent Server-side
curl https://api.stripe.com/v1/payment_intents \ -u ":" \ -d amount=1099 \ -d currency=usd \ -d "automatic_payment_methods[enabled]"=truesk_test_4eC39HqLyjWDarjtT1zdp7dc
In the latest version of the API, specifying the automatic_payment_methods parameter is optional because Stripe enables its functionality by default.
Stripe uses a PaymentIntent object to represent your intent to collect payment from a customer, tracking charge attempts and payment state changes throughout the process.
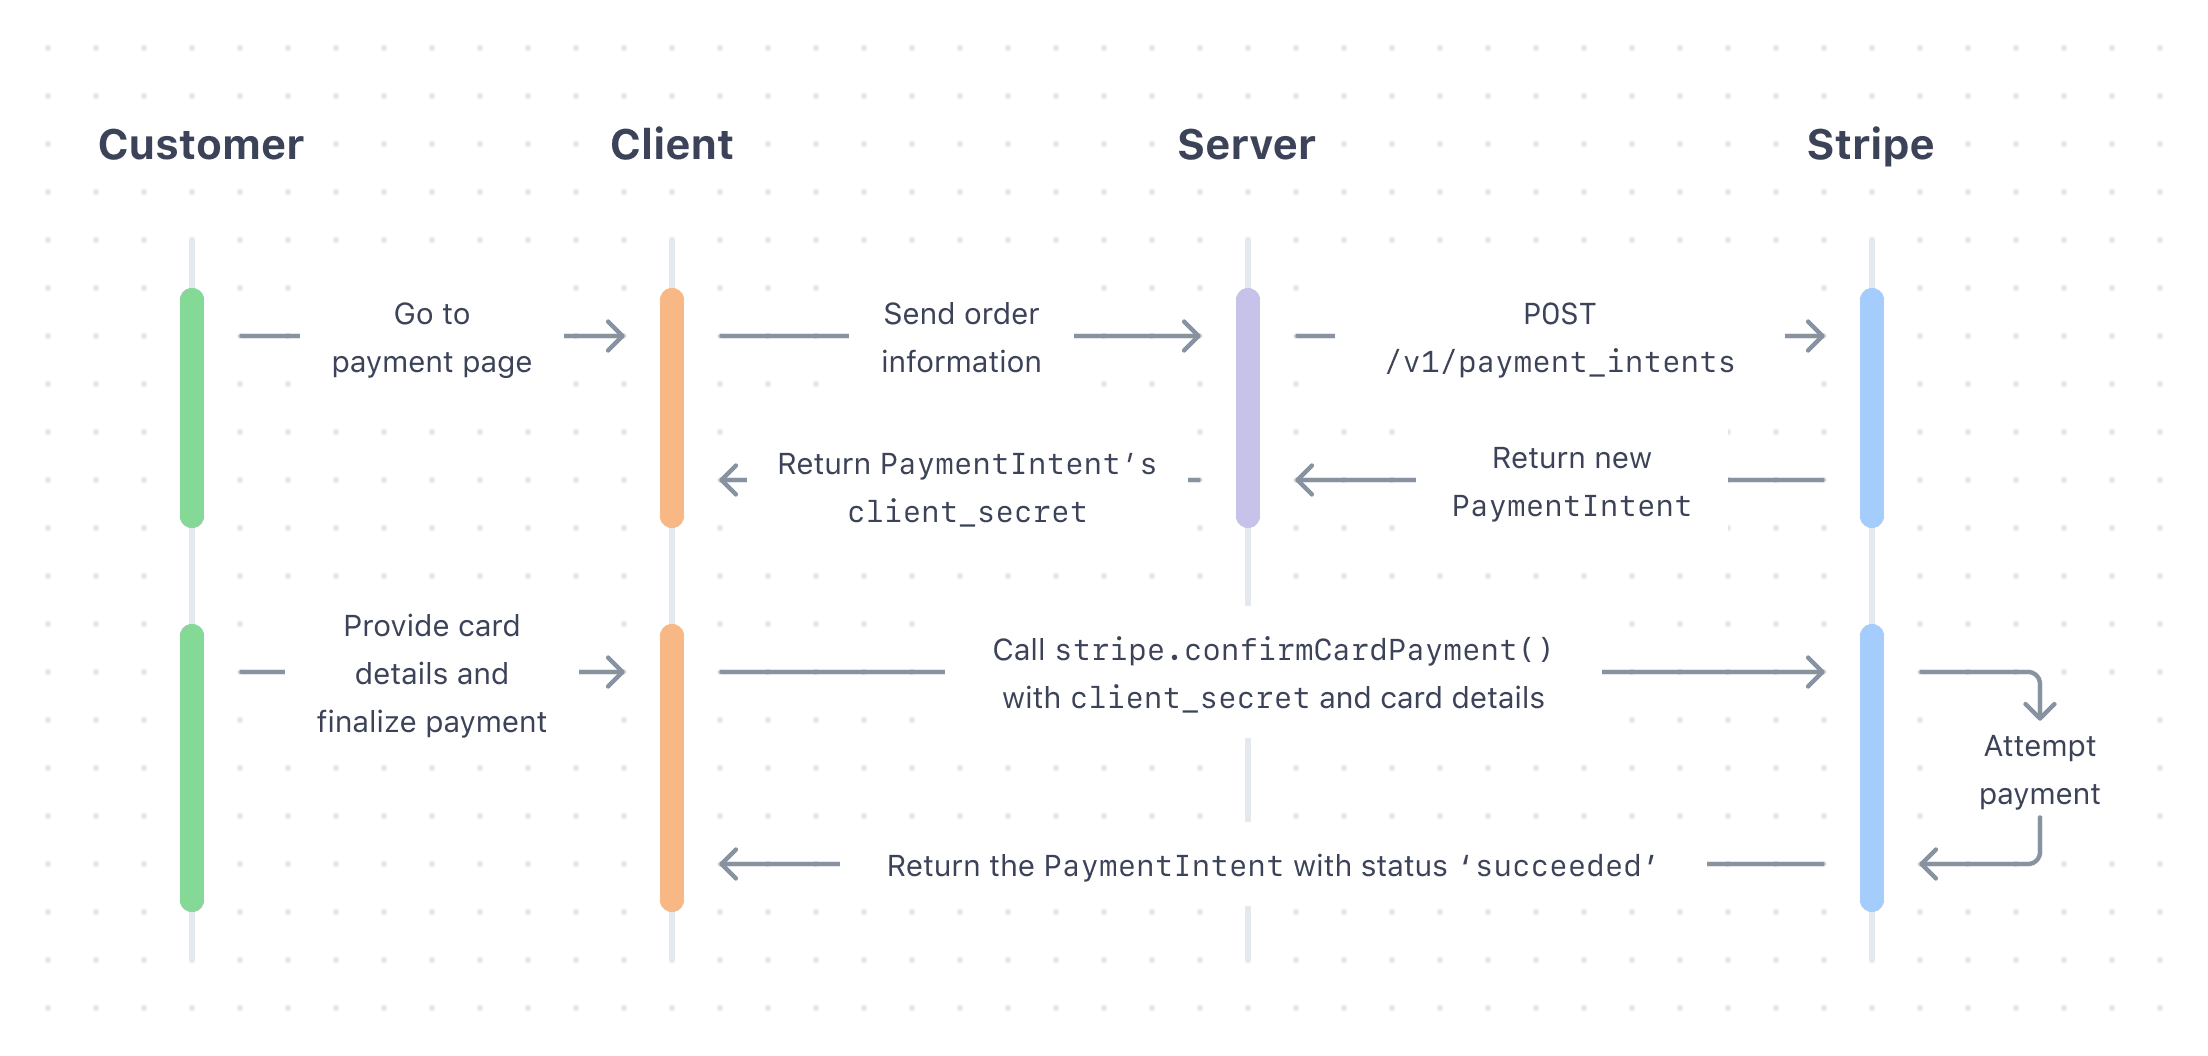
Create a PaymentIntent on your server with an amount and currency. Always decide how much to charge on the server side, a trusted environment, as opposed to the client. This prevents malicious customers from being able to choose their own prices.
curl https://api.stripe.com/v1/payment_intents \ -u: \ -d amount=1000 \ -d currency="usd" \ -d "automatic_payment_methods[enabled]"=true \ -d application_fee_amount="123" \ -d "transfer_data[destination]"=sk_test_4eC39HqLyjWDarjtT1zdp7dc{{CONNECTED_STRIPE_ACCOUNT_ID}}
In our home-rental example, we want to build a business where customers pay for rentals by using our platform, and where we pay homeowners for renting to customers. To set up this business:
- Indicate the rental is a destination charge with
transfer_data[destination]. - Specify how much of the rental amount goes to the platform with
application_fee_amount.
When a rental charge occurs, Stripe transfers the entire amount to the connected account’s pending balance (transfer_data[destination]). Afterward, Stripe transfers the fee amount (application_fee_amount) to the platform’s account, which is the share of the revenue for facilitating the rental. Then, Stripe deducts the Stripe fees from the platform’s fee amount. An illustration of this funds flow is below:

Note
This PaymentIntent creates a destination charge. If you need to control the timing of transfers or need to transfer funds from a single payment to multiple parties, use separate charges and transfers instead.
Retrieve the client secret
The PaymentIntent includes a client secret that the client side uses to securely complete the payment process. You can use different approaches to pass the client secret to the client side.
Retrieve the client secret from an endpoint on your server, using the browser’s fetch function. This approach is best if your client side is a single-page application, particularly one built with a modern front-end framework such as React. Create the server endpoint that serves the client secret:
get '/secret' do
  intent = # ... Create or retrieve the PaymentIntent
  {client_secret: intent.client_secret}.to_json
end
And then fetch the client secret with JavaScript on the client side:
(async () => {
  const response = await fetch('/secret');
  const {client_secret: clientSecret} = await response.json();
  // Render the form using the clientSecret
})();
Step 2: Collect card details Client-side
You’re ready to collect card information on the client with Stripe Elements. Elements is a set of prebuilt UI components for collecting and validating card number, postal code, and expiration date.
A Stripe Element contains an iframe that securely sends the payment information to Stripe over an HTTPS connection. The checkout page address must also start with https:// rather than http:// for your integration to work.
You can test your integration without using HTTPS. Enable it when you’re ready to accept live payments.
Set up Stripe Elements
Stripe Elements is automatically available as a feature of Stripe.js. Include the Stripe.js script on your checkout page by adding it to the head of your HTML file. Always load Stripe.js directly from js.stripe.com to remain PCI compliant. Do not include the script in a bundle or host a copy of it yourself.
<head>
  <title>Checkout</title>
  <script src="https://js.stripe.com/v3/"></script>
</head>
Create an instance of Elements with the following JavaScript on your checkout page:
// Set your publishable key: remember to change this to your live publishable key in production // See your keys here: https://dashboard.stripe.com/apikeys var stripe = Stripe(); var elements = stripe.elements();'pk_test_TYooMQauvdEDq54NiTphI7jx'
Add Elements to your payment page
Your payment form needs to include a place for Elements. Create empty DOM nodes (containers) with unique IDs in your payment form and then pass those IDs to Elements.
<form id="payment-form">
  <div id="card-element">
    <!-- Elements will create input elements here -->
  </div>

  <!-- We'll put the error messages in this element -->
  <div id="card-errors" role="alert"></div>

  <button id="submit">Pay</button>
</form>
When the form above has loaded, create an instance of an Element and mount it to the Element container:
// Set up Stripe.js and Elements to use in checkout form
var elements = stripe.elements();
var style = {
  base: {
    color: "#32325d",
  }
};

var card = elements.create("card", { style: style });
card.mount("#card-element");
The card Element simplifies the form and minimizes the number of required fields by inserting a single, flexible input field that securely collects all necessary card and billing details. Otherwise, combine cardNumber, cardExpiry, and cardCvc Elements for a flexible, multi-input card form.
Note
Always collect a postal code to increase card acceptance rates and reduce fraud.
The single line Card Element automatically collects and sends the customer’s postal code to Stripe. If you build your payment form with split Elements (Card Number, Expiry, CVC), add a separate input field for the customer’s postal code.
For a full list of supported Element types, refer to our Stripe.js reference documentation.
Elements validates user input as it’s typed. To help your customers catch mistakes, listen to change events on the card Element and display any errors:
card.on('change', ({error}) => {
  let displayError = document.getElementById('card-errors');
  if (error) {
    displayError.textContent = error.message;
  } else {
    displayError.textContent = '';
  }
});
Postal code validation depends on your customer’s billing country. Use our international test cards to experiment with other postal code formats.
Step 3: Submit the payment to Stripe Client-side
Rather than sending the entire PaymentIntent object to the client, use its client secret from Step 1. This is different from your API keys that authenticate Stripe API requests.
The client secret should still be handled carefully because it can complete the charge. Do not log it, embed it in URLs, or expose it to anyone but the customer.
To complete the payment when the user clicks, retrieve the client secret from the PaymentIntent you created in Step 1 and call stripe.confirmCardPayment with the client secret.
Pass additional billing details, such as the cardholder name and address, to the billing_details hash. The card Element automatically sends the customer’s postal code information. However, combining cardNumber, cardCvc, and cardExpiry Elements requires you to pass the postal code to billing_details[address][postal_code].
var form = document.getElementById('payment-form');

form.addEventListener('submit', function(ev) {
  ev.preventDefault();
  stripe.confirmCardPayment(clientSecret, {
    payment_method: {
      card: card,
      billing_details: {
        name: 'Jenny Rosen'
      }
    }
  }).then(function(result) {
    if (result.error) {
      // Show error to your customer (for example, insufficient funds)
      console.log(result.error.message);
    } else {
      // The payment has been processed!
      if (result.paymentIntent.status === 'succeeded') {
        // Show a success message to your customer
        // There's a risk of the customer closing the window before callback
        // execution. Set up a webhook or plugin to listen for the
        // payment_intent.succeeded event that handles any business critical
        // post-payment actions.
      }
    }
  });
});
Note
stripe.confirmCardPayment may take several seconds to complete. During that time, disable your form from being resubmitted and show a waiting indicator like a spinner. If you receive an error, show it to the customer, re-enable the form, and hide the waiting indicator.
If the customer must authenticate the card, Stripe.js walks them through that process by showing them a modal. You can see an example of this modal experience by using the test card number with any CVC, future expiration date, and postal code in the demo at the top of the page.
When the payment completes successfully, the value of the returned PaymentIntent’s status property is succeeded. Check the status of a PaymentIntent in the Dashboard or by inspecting the status property on the object. If the payment is not successful, inspect the returned error to determine the cause.
Step 4: Fulfilment Server-side
After the payment is completed, you’ll need to handle any fulfillment necessary on your end. A home-rental company that requires payment upfront, for instance, would connect the homeowner with the renter after a successful payment.
Configure a webhook endpoint (for events from your account) in your dashboard.

Then create an HTTP endpoint on your server to monitor for completed payments to enable your sellers or service providers to fulfill purchases. Make sure to replace the endpoint secret key (whsec_...) in the example with your key.
# Using Sinatra. require 'sinatra' require 'stripe' set :port, 4242 # Set your secret key. Remember to switch to your live secret key in production. # See your keys here: https://dashboard.stripe.com/apikeys Stripe.api_key =# If you are testing your webhook locally with the Stripe CLI you # can find the endpoint's secret by running `stripe listen` # Otherwise, find your endpoint's secret in your webhook settings in # the Developer Dashboard endpoint_secret = 'whsec_...' post '/webhook' do payload = request.body.read sig_header = request.env['HTTP_STRIPE_SIGNATURE'] event = nil # Verify webhook signature and extract the event. # See https://stripe.com/docs/webhooks#verify-events for more information. begin event = Stripe::Webhook.construct_event( payload, sig_header, endpoint_secret ) rescue JSON::ParserError => e # Invalid payload. status 400 return rescue Stripe::SignatureVerificationError => e # Invalid Signature. status 400 return end if event['type'] == 'payment_intent.succeeded' payment_intent = event['data']['object'] handle_successful_payment_intent(payment_intent) end status 200 end def handle_successful_payment_intent(payment_intent) # Fulfill the purchase puts payment_intent.to_s end'sk_test_4eC39HqLyjWDarjtT1zdp7dc'
Learn more in our fulfillment guide for payments.
Testing webhooks locally
Use the Stripe CLI to test webhooks locally.
First, install the Stripe CLI on your machine if you haven’t already.
Then, to log in run
stripe loginin the command line, and follow the instructions.Finally, to allow your local host to receive a simulated event on your connected account run
stripe listen --forward-to localhost:{PORT}/webhookin one terminal window, and runstripe trigger --stripe-account={{CONNECTED_STRIPE_ACCOUNT_ID}} payment_intent.succeeded(or trigger any other supported event) in another.
Step 5: Disputes
As the settlement merchant on charges, your platform is responsible for disputes. Make sure you understand the best practices for responding to disputes.
Enable payment methods
View your payment methods settings and enable the payment methods you want to support. Card payments, Google Pay, and Apple Pay are enabled by default but you can enable and disable payment methods as needed.
Before the payment form is displayed, Stripe evaluates the currency, payment method restrictions, and other parameters to determine the list of supported payment methods. Payment methods that increase conversion and that are most relevant to the currency and customer’s location are prioritized. Lower priority payment methods are hidden in an overflow menu.