Sign in
An image of the Stripe logo
Create account
Sign in
Home
Payments
Business operations
Financial services
Developer tools
Security
All products
Home
Payments
Business operations
Home
Payments
Business operations
Financial services
Developer tools
Support
Overview
Overview
What is Terminal
Design an integration
Example applications
Quickstart
Accept an in-person payment
Set up your reader
Set up your integration
Connect to a reader
Collect payments
Regional considerations
Terminal payments features
Multiparty payments with Connect
Collect tips
Save cards for future use
Refund transactions
Provide receipts
Cart display
Incremental authorizations
Extended authorizations
Deploy at scale
Order hardware
Manage locations
Configure readers
References
API references
Bluetooth readers
Smart readers
SDK migration guide
Testing
Deployment checklist
Stripe Terminal reader product sheets
Testing
No-code options
terminal
·
HomePaymentsIn-person payments

Example applications

Try Stripe Terminal by using the example applications and simulated reader.

For a more immersive guide, check out the sample integration.

A Stripe Terminal integration starts with your point of sale application running at a physical location. Your point of sale application communicates with a reader through the Terminal SDK to collect in-person payments from your customers. Your backend works with your point of sale application to authenticate the Terminal SDK and finalize payments.

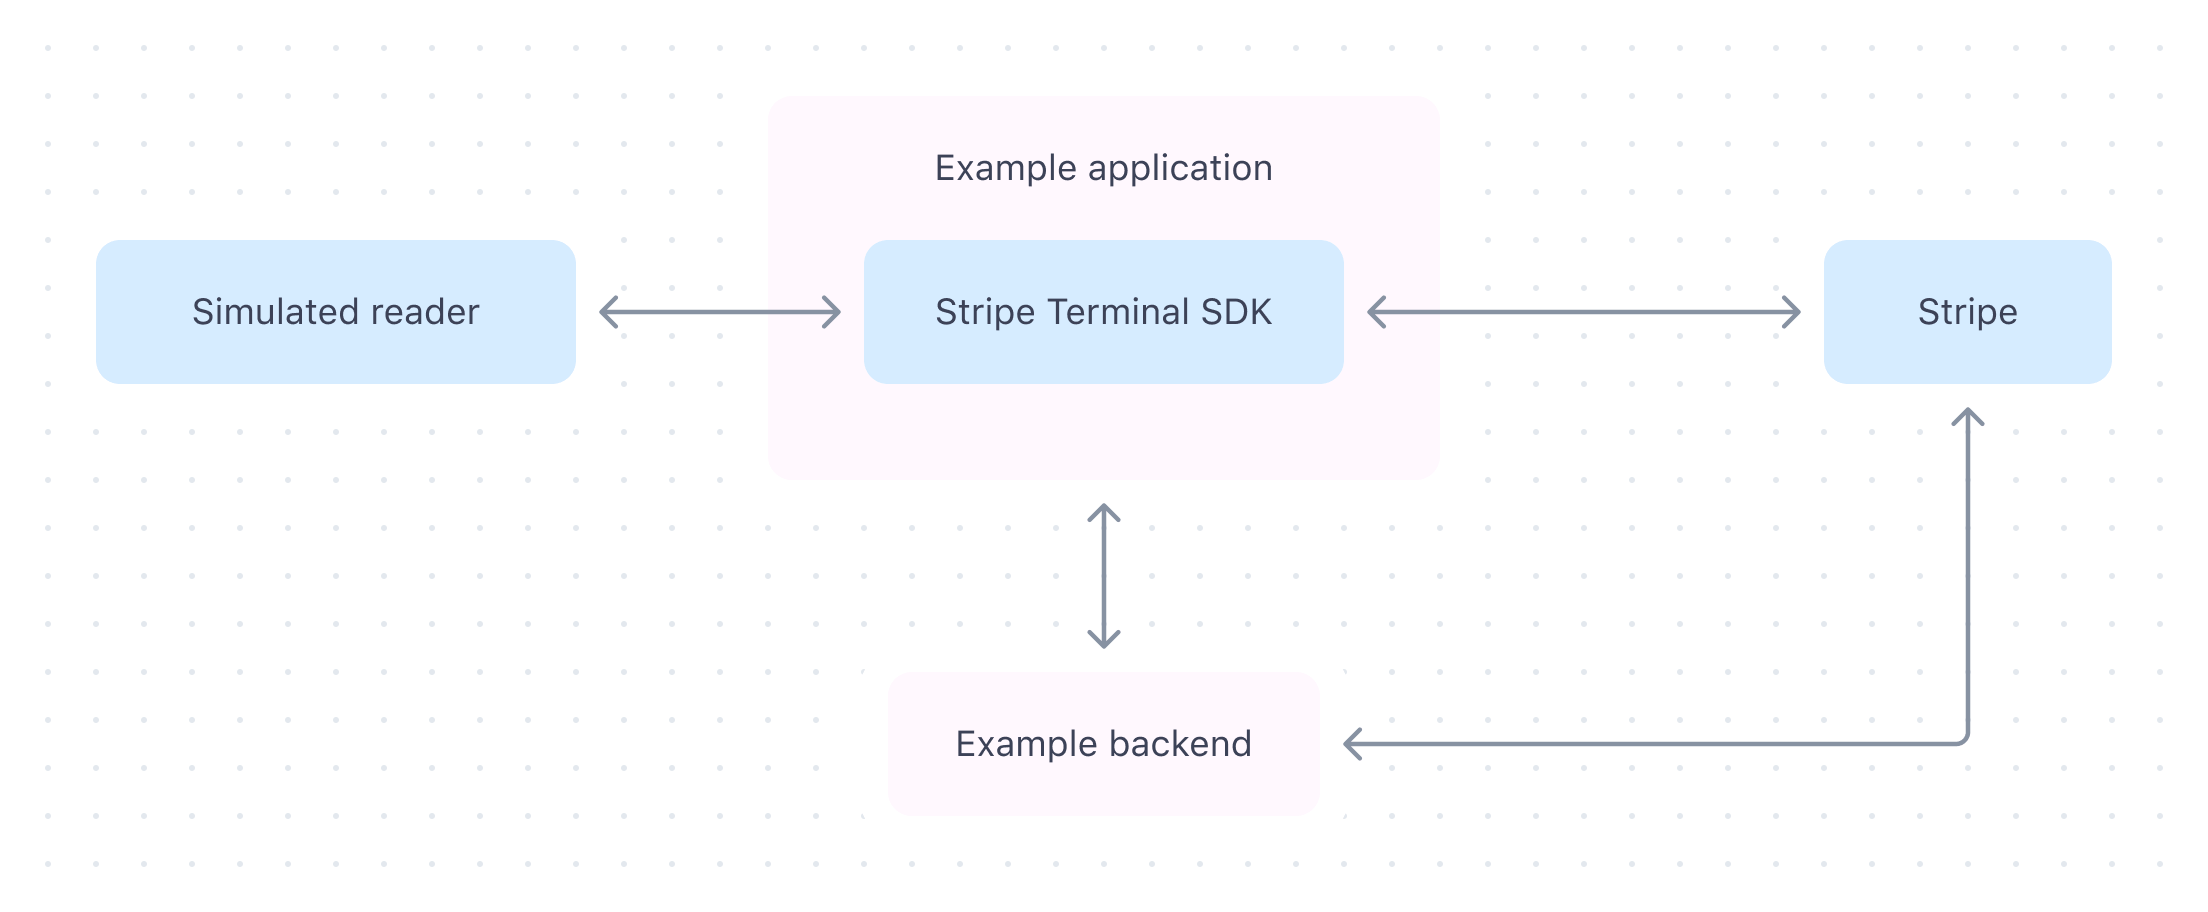
Before starting your own integration, we recommend setting up one of the Terminal example applications. This will give you a better feel for how the components of a Terminal integration fit together and show you the interactions between the SDK, the reader, your point of sale application, and your backend code.

Deploy the example backend

To get started with the example applications, set up the Sinatra-based example backend by following the instructions in the README. You can either run the backend locally or deploy it to Heroku with a free account. The example backend works with the example application to authenticate the Terminal SDK and finalize payments.

Run the example application

Build and run one of the example applications:

  1. Clone the example from GitHub:
Terminal
git clone https://github.com/stripe/stripe-terminal-js-demo.git
  1. Run the following commands to run the example:
Terminal
cd stripe-terminal-js-demo npm install npm run start
  1. In the running example, enter the URL of the example backend that you deployed in step 1.

Connect to a simulated reader

After you have the example running, select Use simulator to connect to a simulated reader.

The JavaScript example app connected to a simulated reader

The simulated reader handles events just like a physical reader, so you can continue to collecting your first payment.

The simulated reader functionality is built into the SDK, so you can use it to develop and test your own point of sale application without connecting to a physical device.

Collect your first payment

Collect your first payment using the example application and a simulated reader. Each of the examples features an event log for you to reference as you integrate Terminal in your own application. As you collect your first payment, you’ll see the following sequence:

  • Create payment: The example application collects a payment method using the SDK.
  • Collect payment method: The simulated reader receives a card.
  • Process and capture: The example application and backend finalize the payment.

Collecting a payment, using the JavaScript example app and a simulated reader

Next steps

  • Design an integration
Was this page helpful?
Questions? Contact us.
View developer tutorials on YouTube.
Check out our product changelog.
Powered by Markdoc
You can unsubscribe at any time. Read our privacy policy.
On this page
Deploy the example backend
Run the example application
Connect to a simulated reader
Collect your first payment
Stripe Shell
Test mode
▗▄ ▄▟█ █▀▀ ▗▟████▙▖ ██████ ███▗▟█ ███ ███▗▟██▙▖ ▗▟█████▙▖ ███▖ ▀▀ ███ ███▀▀▀ ███ ███▀ ███ ███ ███ ▝▜████▙▖ ███ ███ ███ ███ ███ █████████ ▄▄ ▝███ ███ ▄ ███ ███ ███▄ ███ ███ ▄▄ ▝▜████▛▘ ▝▜███▛ ███ ███ ███▝▜██▛▘ ▝▜█████▛▘ ███ ▀▘
Welcome to the Stripe Shell! Stripe Shell is a browser-based shell with the Stripe CLI pre-installed. Login to Stripe docs and press Control + Backtick on your keyboard to start managing your Stripe resources in test mode. - View supported commands: - Find webhook events: - Listen for webhook events: - Call Stripe APIs: stripe [api resource] [operation] (e.g. )
The Stripe Shell is best experienced on desktop.
$