Set up future payments using Elements and Link
This guide walks you through how to accept payments with Link using the Setup Intents API and either the Payment Element or Link Authentication Element.
There are three ways you can secure a customer email address for Link authentication and enrollment:
- Pass in an email address: You can pass an email address to the Payment Element using defaultValues. If you’re already collecting the email address and or customer’s phone number in the checkout flow, we recommend this approach.
- Collect an email address: You can collect an email address directly in the Payment Element. If you’re not collecting the email address anywhere in the checkout flow, we recommend this approach.
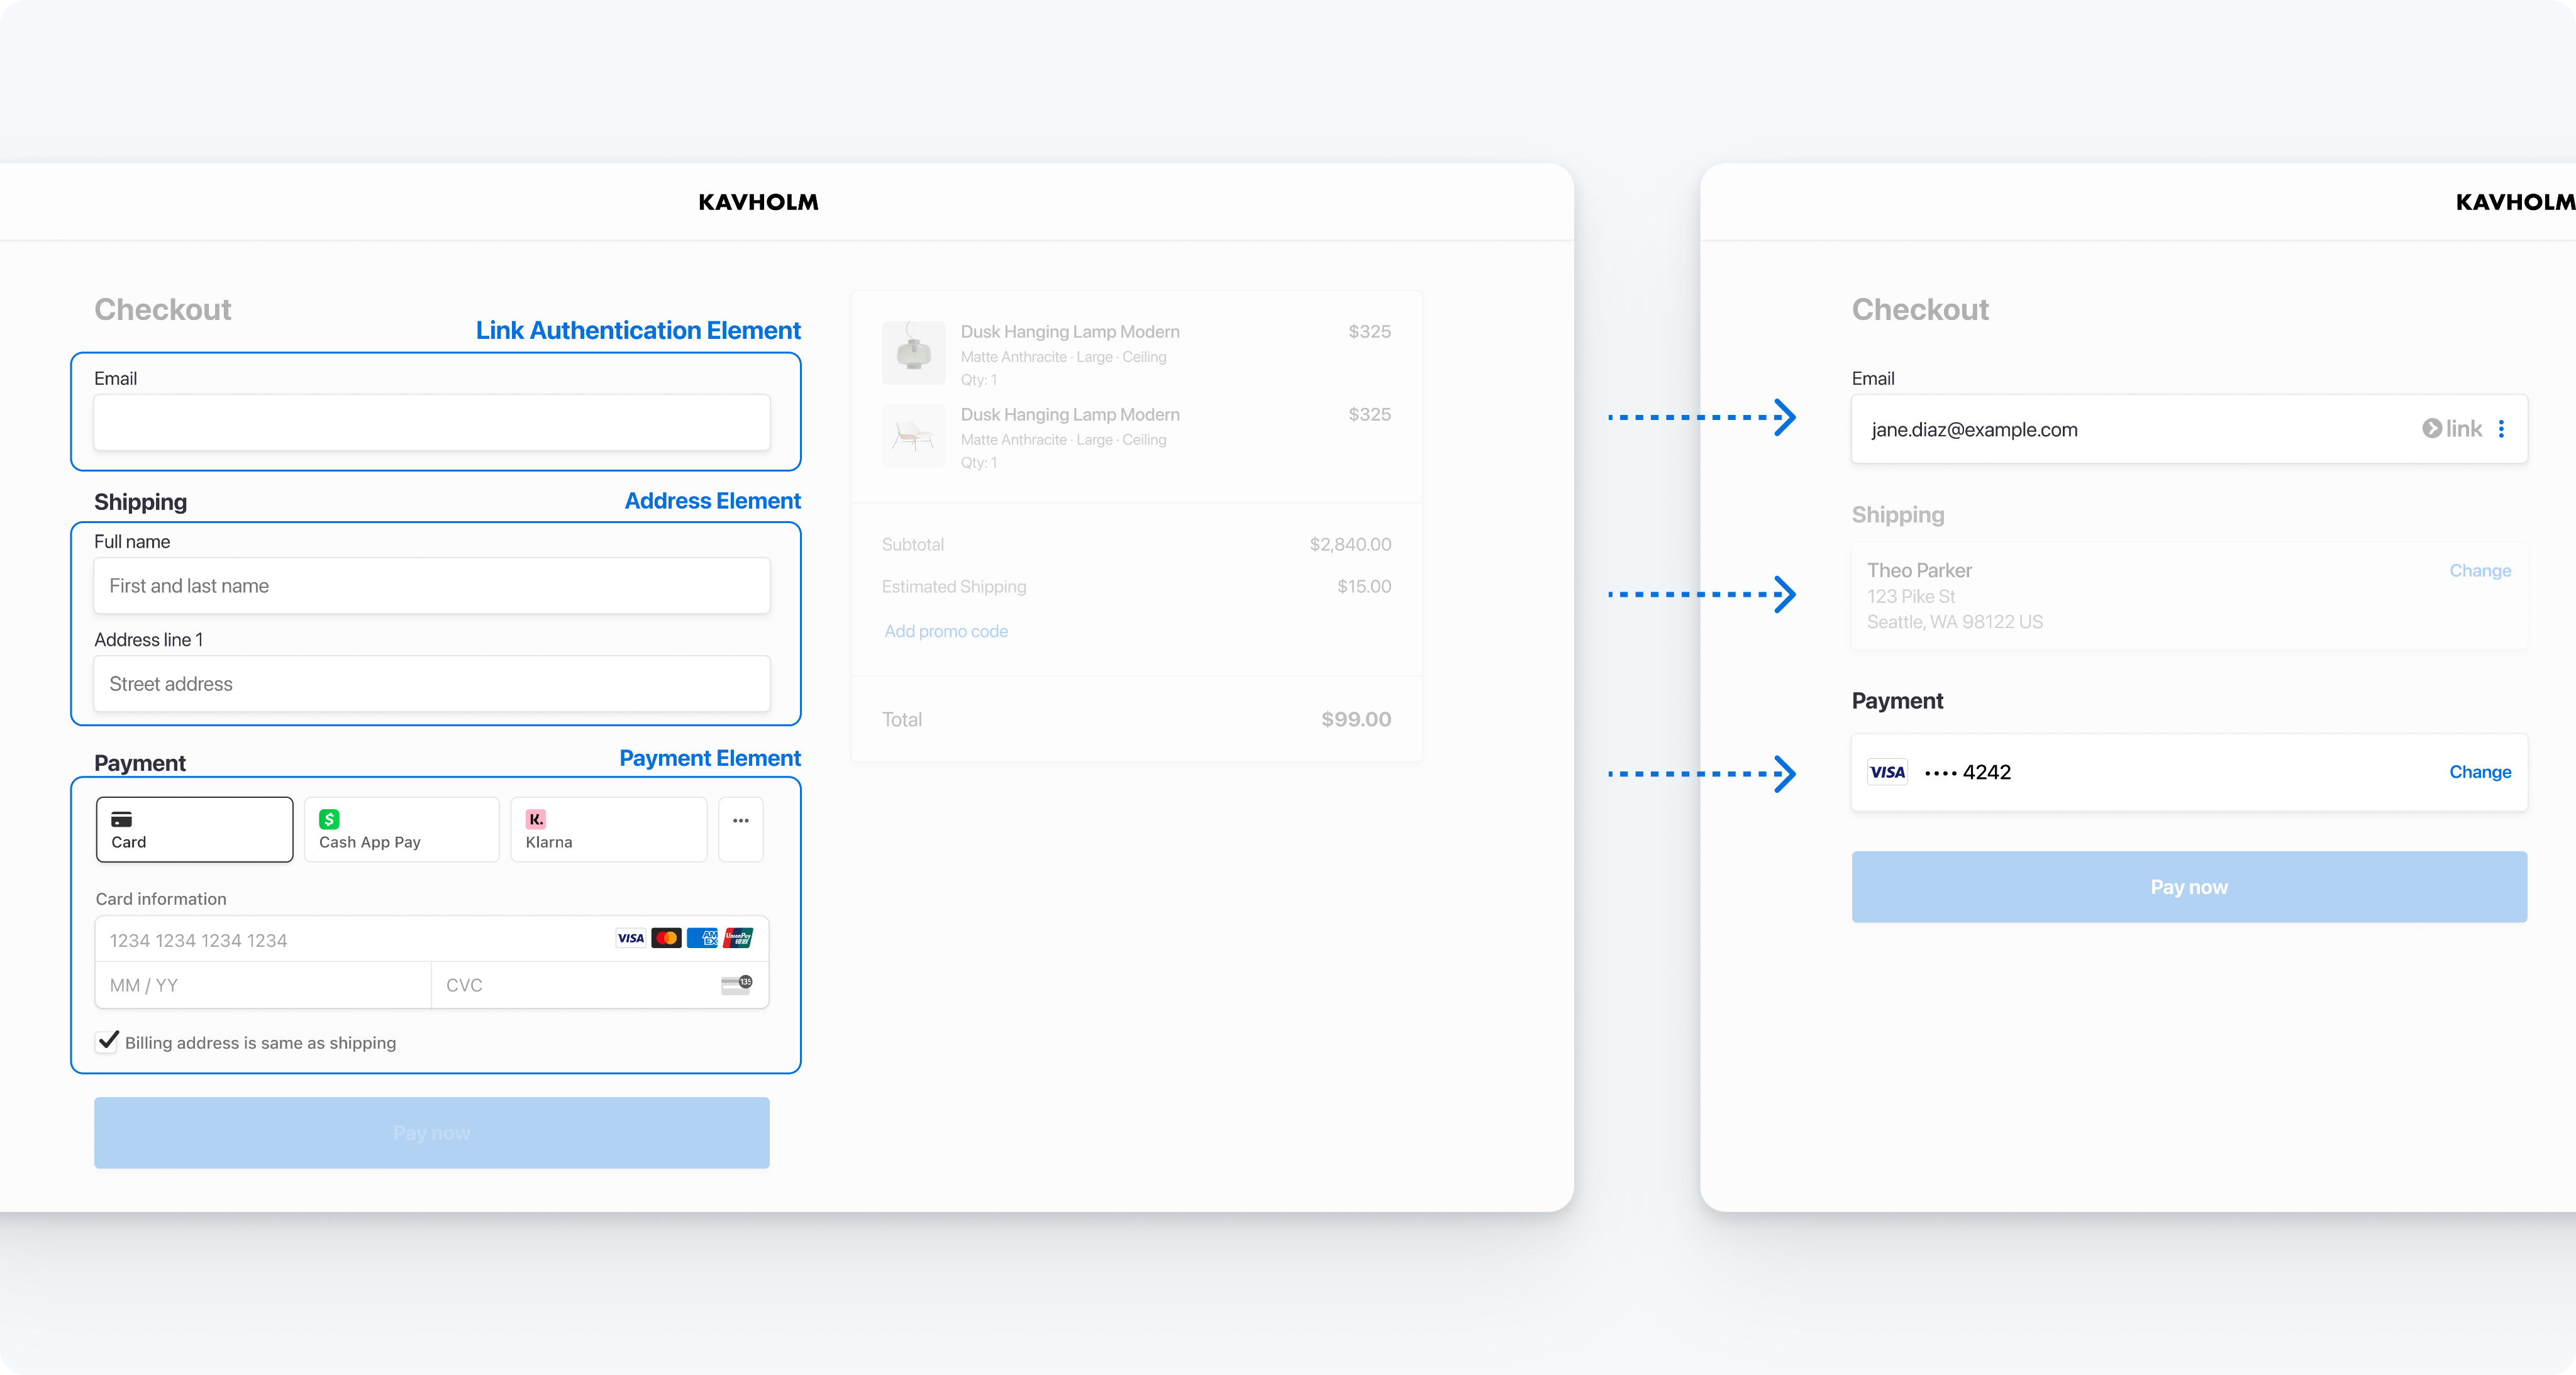
- Link Authentication Element: You can use the Link Authentication Element to create a single email input field for both email collection and Link authentication. We recommend doing this if you use the Address Element.
Collect a customer email address for Link authentication or enrollment
Set up StripeServer-side
First, create a Stripe account or sign in.
Use our official libraries to access the Stripe API from your application:
Create a CustomerServer-side
To set up a payment method for future payments, you must attach it to a Customer. Create a Customer object when your customer creates an account with your business. Customer objects allow for reusing payment methods and tracking across multiple payments.
Create a SetupIntentServer-side
Note
If you want to render the Payment Element without first creating a SetupIntent, see Collect payment details before creating an Intent.
A SetupIntent is an object that represents your intent to set up a customer’s payment method for future payments during a session and tracks the status of that session. Create a SetupIntent on your server with link and the other payment methods you want to support:
To see how to set up other payment methods, see the Set up future payments guide.
Retrieve the client secret
The SetupIntent includes a client secret that the client side uses to securely complete the payment process. You can use different approaches to pass the client secret to the client side.
Collect customer email
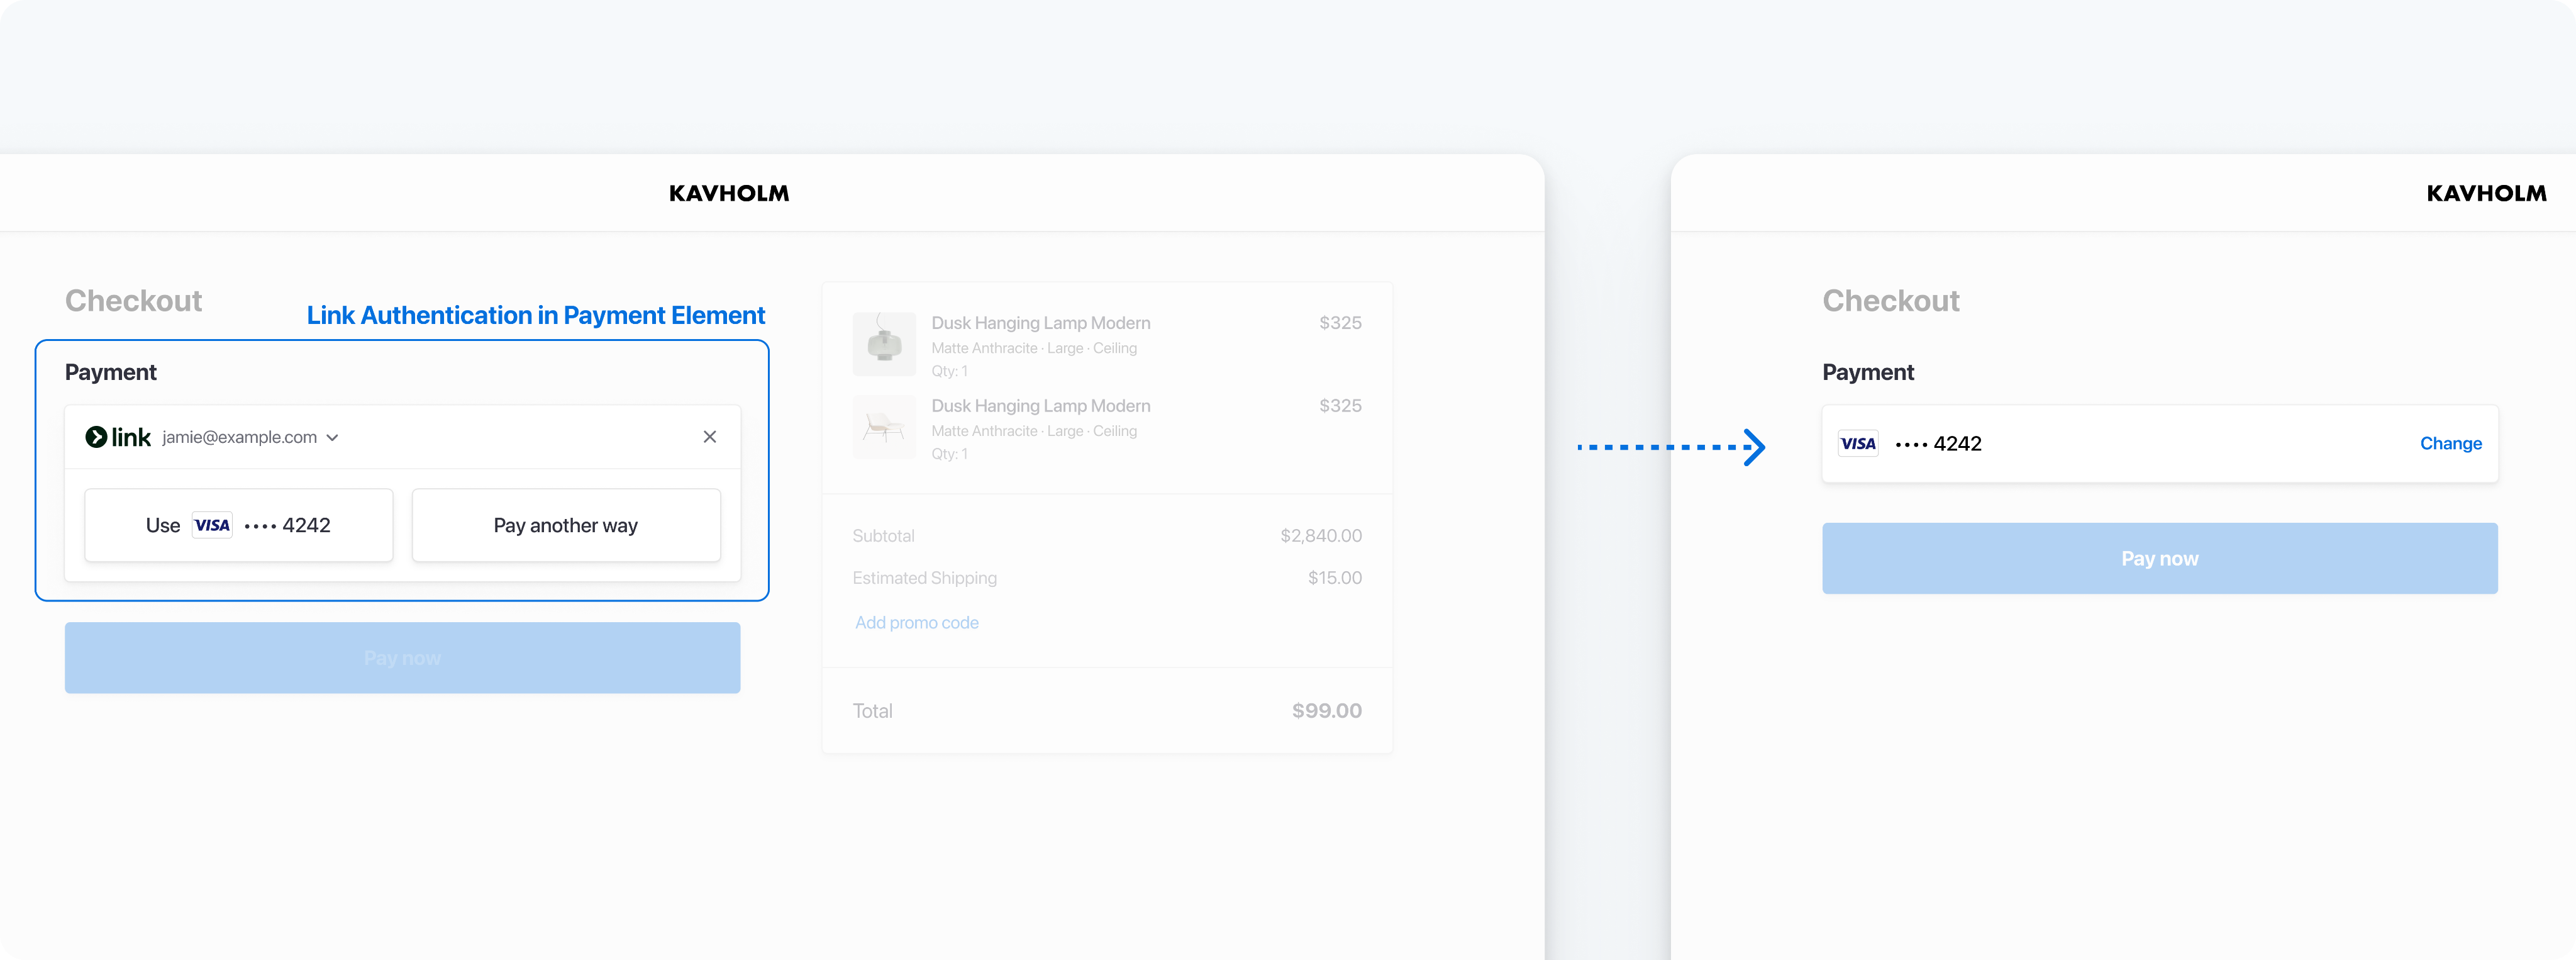
Link authenticates a customer by using their email address. Depending on your checkout flow, you have the following options: pass an email to the Payment Element, collect it directly within the Payment Element, or use the Link Authentication Element. Of these, Stripe recommends passing a customer email address to the Payment Element if available.
Set up your payment formClient-side
Now you can set up your custom payment form with the Elements prebuilt UI components. Your payment page address must start with https:// rather than http:// for your integration to work. You can test your integration without using HTTPS. Enable HTTPS when you’re ready to accept live payments.
Submit the SetupIntentClient-side
Use stripe.confirmSetup to complete the setup with the details you collected. Provide a return_url to this function so that Stripe can redirect users after they complete their setup. When a payment is successful, Stripe immediately redirects Link and card payments to the return_url.
Charge the saved payment method laterServer-side
When you’re ready to charge your customer, use the Customer and PaymentMethod IDs to create a PaymentIntent. To find a payment method to charge, list the payment methods associated with your customer.
When you have the Customer and PaymentMethod IDs, create a PaymentIntent with the amount and currency of the payment with these parameters:
- Set the value of the PaymentIntent’s confirm property to
true, which causes confirmation to occur immediately when the PaymentIntent is created. - Set payment_method to the ID of the PaymentMethod
- Set customer to the ID of the Customer.
- Set off_session to
true. This causes the PaymentIntent to send an error if authentication is required when your customer isn’t actively using your site or app.
Test the integration
Caution
Don’t store real user data in test mode Link accounts. Treat them as if they’re publicly available, because these test accounts are associated with your publishable key.
Currently, Link only works with credit cards, debit cards, and qualified US bank account purchases. Link requires domain registration.
You can create test mode accounts for Link using any valid email address. The following table shows the fixed one-time passcode values that Stripe accepts for authenticating test mode accounts:
| Value | Outcome |
|---|---|
| Any other 6 digits not listed below | Success |
| 000001 | Error, code invalid |
| 000002 | Error, code expired |
| 000003 | Error, max attempts exceeded |
For testing specific payment methods, refer to the Payment Element testing examples.
Multiple funding sources
As Stripe adds additional funding source support, you don’t need to update your integration. Stripe automatically supports them with the same transaction settlement time and guarantees as card and bank account payments.
Card authentication and 3D Secure
Link supports 3D Secure 2 (3DS2) authentication for card payments. 3DS2 requires customers to complete an additional verification step with the card issuer when paying. Payments that have been successfully authenticated using 3D Secure are covered by a liability shift.
To trigger 3DS2 authentication challenge flows with Link in test mode, use the following test card with any CVC, postal code, and future expiration date: .
In test mode, the authentication process displays a mock authentication page. On that page, you can either authorize or cancel the payment. Authorizing the payment simulates successful authentication and redirects you to the specified return URL. Clicking the Failure button simulates an unsuccessful attempt at authentication.
For more details, refer to the 3D Secure authentication page.
Note
When testing 3DS flows, only test cards for 3DS2 will trigger authentication on Link.
Disclose Stripe to your customers
Stripe collects information on customer interactions with Elements to provide services to you, prevent fraud, and improve its services. This includes using cookies and IP addresses to identify which Elements a customer saw during a single checkout session. You’re responsible for disclosing and obtaining all rights and consents necessary for Stripe to use data in these ways. For more information, visit our privacy center.