Accept a payment
Securely accept payments online.
Build a payment form or use a prebuilt checkout page to start accepting online payments.
Redirect to a Stripe-hosted payment page using Stripe Checkout. See how this integration compares to Stripe’s other integration types.

Integration effort
Integration type
Redirect to Stripe-hosted payment page
UI customization
First, register for a Stripe account.
Use our official libraries to access the Stripe API from your application:
Redirect your customer to Stripe CheckoutClient-sideServer-side
Add a checkout button to your website that calls a server-side endpoint to create a Checkout Session.
You can also create a Checkout Session for an existing customer, allowing you to prefill Checkout fields with known contact information and unify your purchase history for that customer.
<html>
  <head>
    <title>Buy cool new product</title>
  </head>
  <body>
    <!-- Use action="/create-checkout-session.php" if your server is PHP based. -->
    <form action="/create-checkout-session" method="POST">
      <button type="submit">Checkout</button>
    </form>
  </body>
</html>
A Checkout Session is the programmatic representation of what your customer sees when they’re redirected to the payment form. You can configure it with options such as:
- Line items to charge
- Currencies to use
You must populate success_ with the URL value of a page on your website that Checkout returns your customer to after they complete the payment. You can optionally also provide a cancel_ value of a page on your website that Checkout returns your customer to if they terminate the payment process before completion.
Note
Checkout Sessions expire 24 hours after creation by default.
After creating a Checkout Session, redirect your customer to the URL returned in the response.
Payment methods
By default, Stripe enables cards and other common payment methods. You can turn individual payment methods on or off in the Stripe Dashboard. In Checkout, Stripe evaluates the currency and any restrictions, then dynamically presents the supported payment methods to the customer.
To see how your payment methods appear to customers, enter a transaction ID or set an order amount and currency in the Dashboard.
You can enable Apple Pay and Google Pay in your payment methods settings. By default, Apple Pay is enabled and Google Pay is disabled. However, in some cases Stripe filters them out even when they’re enabled. We filter Google Pay if you enable automatic tax without collecting a shipping address.
Checkout’s Stripe-hosted pages don’t need integration changes to enable Apple Pay or Google Pay. Stripe handles these payments the same way as other card payments.
Confirm your endpoint
Confirm your endpoint is accessible by starting your web server (for example, localhost:4242) and running the following command:
curl -X POST -is "http://localhost:4242/create-checkout-session" -d ""
You should see a response in your terminal that looks like this:
HTTP/1.1 303 See Other
Location: https://checkout.stripe.com/c/pay/cs_test_...
...
Testing
You should now have a working checkout button that redirects your customer to Stripe Checkout.
- Click the checkout button.
- You’re redirected to the Stripe Checkout payment form.
If your integration isn’t working:
- Open the Network tab in your browser’s developer tools.
- Click the checkout button and confirm it sent an XHR request to your server-side endpoint (
POST /create-checkout-session). - Verify the request is returning a 200 status.
- Use
console.inside your button click listener to confirm the correct data returned.log(session)
Show a success pageClient-sideServer-side
It’s important for your customer to see a success page after they successfully submit the payment form. Host this success page on your site.
Create a minimal success page:
<html>
  <head><title>Thanks for your order!</title></head>
  <body>
    <h1>Thanks for your order!</h1>
    <p>
      We appreciate your business!
      If you have any questions, please email
      <a href="mailto:orders@example.com">orders@example.com</a>.
    </p>
  </body>
</html>
Next, update the Checkout Session creation endpoint to use this new page:
Note
If you want to customize your success page, read the custom success page guide.
Testing
- Click your checkout button.
- Fill out the payment details with the test card information:
- Enter
4242 4242 4242 4242as the card number. - Enter any future date for card expiry.
- Enter any 3-digit number for CVC.
- Enter any billing postal code.
- Enter
- Click Pay.
- You’re redirected to your new success page.
Next, find the new payment in the Stripe Dashboard. Successful payments appear in the Dashboard’s list of payments. When you click a payment, it takes you to the payment details page. The Checkout summary section contains billing information and the list of items purchased, which you can use to manually fulfill the order.
Handle post-payment events
Stripe sends a checkout.session.completed event when a customer completes a Checkout Session payment. Use the Dashboard webhook tool or follow the webhook guide to receive and handle these events, which might trigger you to:
- Send an order confirmation email to your customer.
- Log the sale in a database.
- Start a shipping workflow.
Listen for these events rather than waiting for your customer to be redirected back to your website. Triggering fulfillment only from your Checkout landing page is unreliable. Setting up your integration to listen for asynchronous events allows you to accept different types of payment methods with a single integration.
Learn more in our fulfillment guide for Checkout.
Handle the following events when collecting payments with the Checkout:
| Event | Description | Action |
|---|---|---|
| checkout.session.completed | Sent when a customer successfully completes a Checkout Session. | Send the customer an order confirmation and fulfill their order. |
| checkout.session.async_payment_succeeded | Sent when a payment made with a delayed payment method, such as ACH direct debt, succeeds. | Send the customer an order confirmation and fulfill their order. |
| checkout.session.async_payment_failed | Sent when a payment made with a delayed payment method, such as ACH direct debt, fails. | Notify the customer of the failure and bring them back on-session to attempt payment again. |
Test your integration
To test your Stripe-hosted payment form integration:
- Create a Checkout Session.
- Fill out the payment details with a method from the following table.
- Enter any future date for card expiry.
- Enter any 3-digit number for CVC.
- Enter any billing postal code.
- Click Pay. You’re redirected to your
success_.url - Go to the Dashboard and look for the payment on the Transactions page. If your payment succeeded, you’ll see it in that list.
- Click your payment to see more details, like a Checkout summary with billing information and the list of purchased items. You can use this information to fulfill the order.
Learn more about testing your integration.
See Testing for additional information to test your integration.
Test cards
| Number | Description |
|---|---|
| Succeeds and immediately processes the payment. | |
| Requires 3D Secure 2 authentication for a successful payment. | |
Always fails with a decline code of insufficient_. |
Embed a prebuilt payment form on your site using Stripe Checkout. See how this integration compares to Stripe’s other integration types.


Integration effort
Integration type
Embed prebuilt payment form on your site
UI customization
Use the branding settings in the Stripe Dashboard to match Checkout to your site design.
First, register for a Stripe account.
Use our official libraries to access the Stripe API from your application:
Create a Checkout SessionServer-side
From your server, create a Checkout Session and set the ui_mode to embedded. You can configure the Checkout Session with line items to include and options such as currency.
You can also create a Checkout Session for an existing customer, allowing you to prefill Checkout fields with known contact information and unify your purchase history for that customer.
To return customers to a custom page that you host on your website, specify that page’s URL in the return_url parameter. Include the {CHECKOUT_ template variable in the URL to retrieve the session’s status on the return page. Checkout automatically substitutes the variable with the Checkout Session ID before redirecting.
Read more about configuring the return page and other options for customizing redirect behavior.
After you create the Checkout Session, use the client_ returned in the response to mount Checkout.
Mount CheckoutClient-side
Checkout renders in an iframe that securely sends payment information to Stripe over an HTTPS connection.
Common mistake
Avoid placing Checkout within another iframe because some payment methods require redirecting to another page for payment confirmation.
Customize appearance
Customize Checkout to match the design of your site by setting the background color, button color, border radius, and fonts in your account’s branding settings.
By default, Checkout renders with no external padding or margin. We recommend using a container element such as a div to apply your desired margin (for example, 16px on all sides).
Show a return page
After your customer attempts payment, Stripe redirects them to a return page that you host on your site. When you created the Checkout Session, you specified the URL of the return page in the return_url parameter. Read more about other options for customizing redirect behavior.
When rendering your return page, retrieve the Checkout Session status using the Checkout Session ID in the URL. Handle the result according to the session status as follows:
complete: The payment succeeded. Use the information from the Checkout Session to render a success page.open: The payment failed or was canceled. Remount Checkout so that your customer can try again.
const session = await fetch(`/session_status?session_id=${session_id}`)
if (session.status == 'open') {
  // Remount embedded Checkout
} else if (session.status == 'complete') {
  // Show success page
  // Optionally use session.payment_status or session.customer_email
  // to customize the success page
}
Redirect-based payment methods
During payment, some payment methods redirect the customer to an intermediate page, such as a bank authorization page. When they complete that page, Stripe redirects them to your return page.
Learn more about redirect-based payment methods and redirect behavior.
Handle post-payment events
Stripe sends a checkout.session.completed event when a customer completes a Checkout Session payment. Use the Dashboard webhook tool or follow the webhook guide to receive and handle these events, which might trigger you to:
- Send an order confirmation email to your customer.
- Log the sale in a database.
- Start a shipping workflow.
Listen for these events rather than waiting for your customer to be redirected back to your website. Triggering fulfillment only from your Checkout landing page is unreliable. Setting up your integration to listen for asynchronous events allows you to accept different types of payment methods with a single integration.
Learn more in our fulfillment guide for Checkout.
Handle the following events when collecting payments with the Checkout:
| Event | Description | Action |
|---|---|---|
| checkout.session.completed | Sent when a customer successfully completes a Checkout Session. | Send the customer an order confirmation and fulfill their order. |
| checkout.session.async_payment_succeeded | Sent when a payment made with a delayed payment method, such as ACH direct debt, succeeds. | Send the customer an order confirmation and fulfill their order. |
| checkout.session.async_payment_failed | Sent when a payment made with a delayed payment method, such as ACH direct debt, fails. | Notify the customer of the failure and bring them back on-session to attempt payment again. |
Test your integration
To test your embedded payment form integration:
- Create an embedded Checkout Session and mount Checkout on your page.
- Fill out the payment details with a method from the table below.
- Enter any future date for card expiry.
- Enter any 3-digit number for CVC.
- Enter any billing postal code.
- Click Pay. You’re redirected to your
return_.url - Go to the Dashboard and look for the payment on the Transactions page. If your payment succeeded, you’ll see it in that list.
- Click your payment to see more details, like a Checkout summary with billing information and the list of purchased items. You can use this information to fulfill the order.
Learn more about testing your integration.
See Testing for additional information to test your integration.
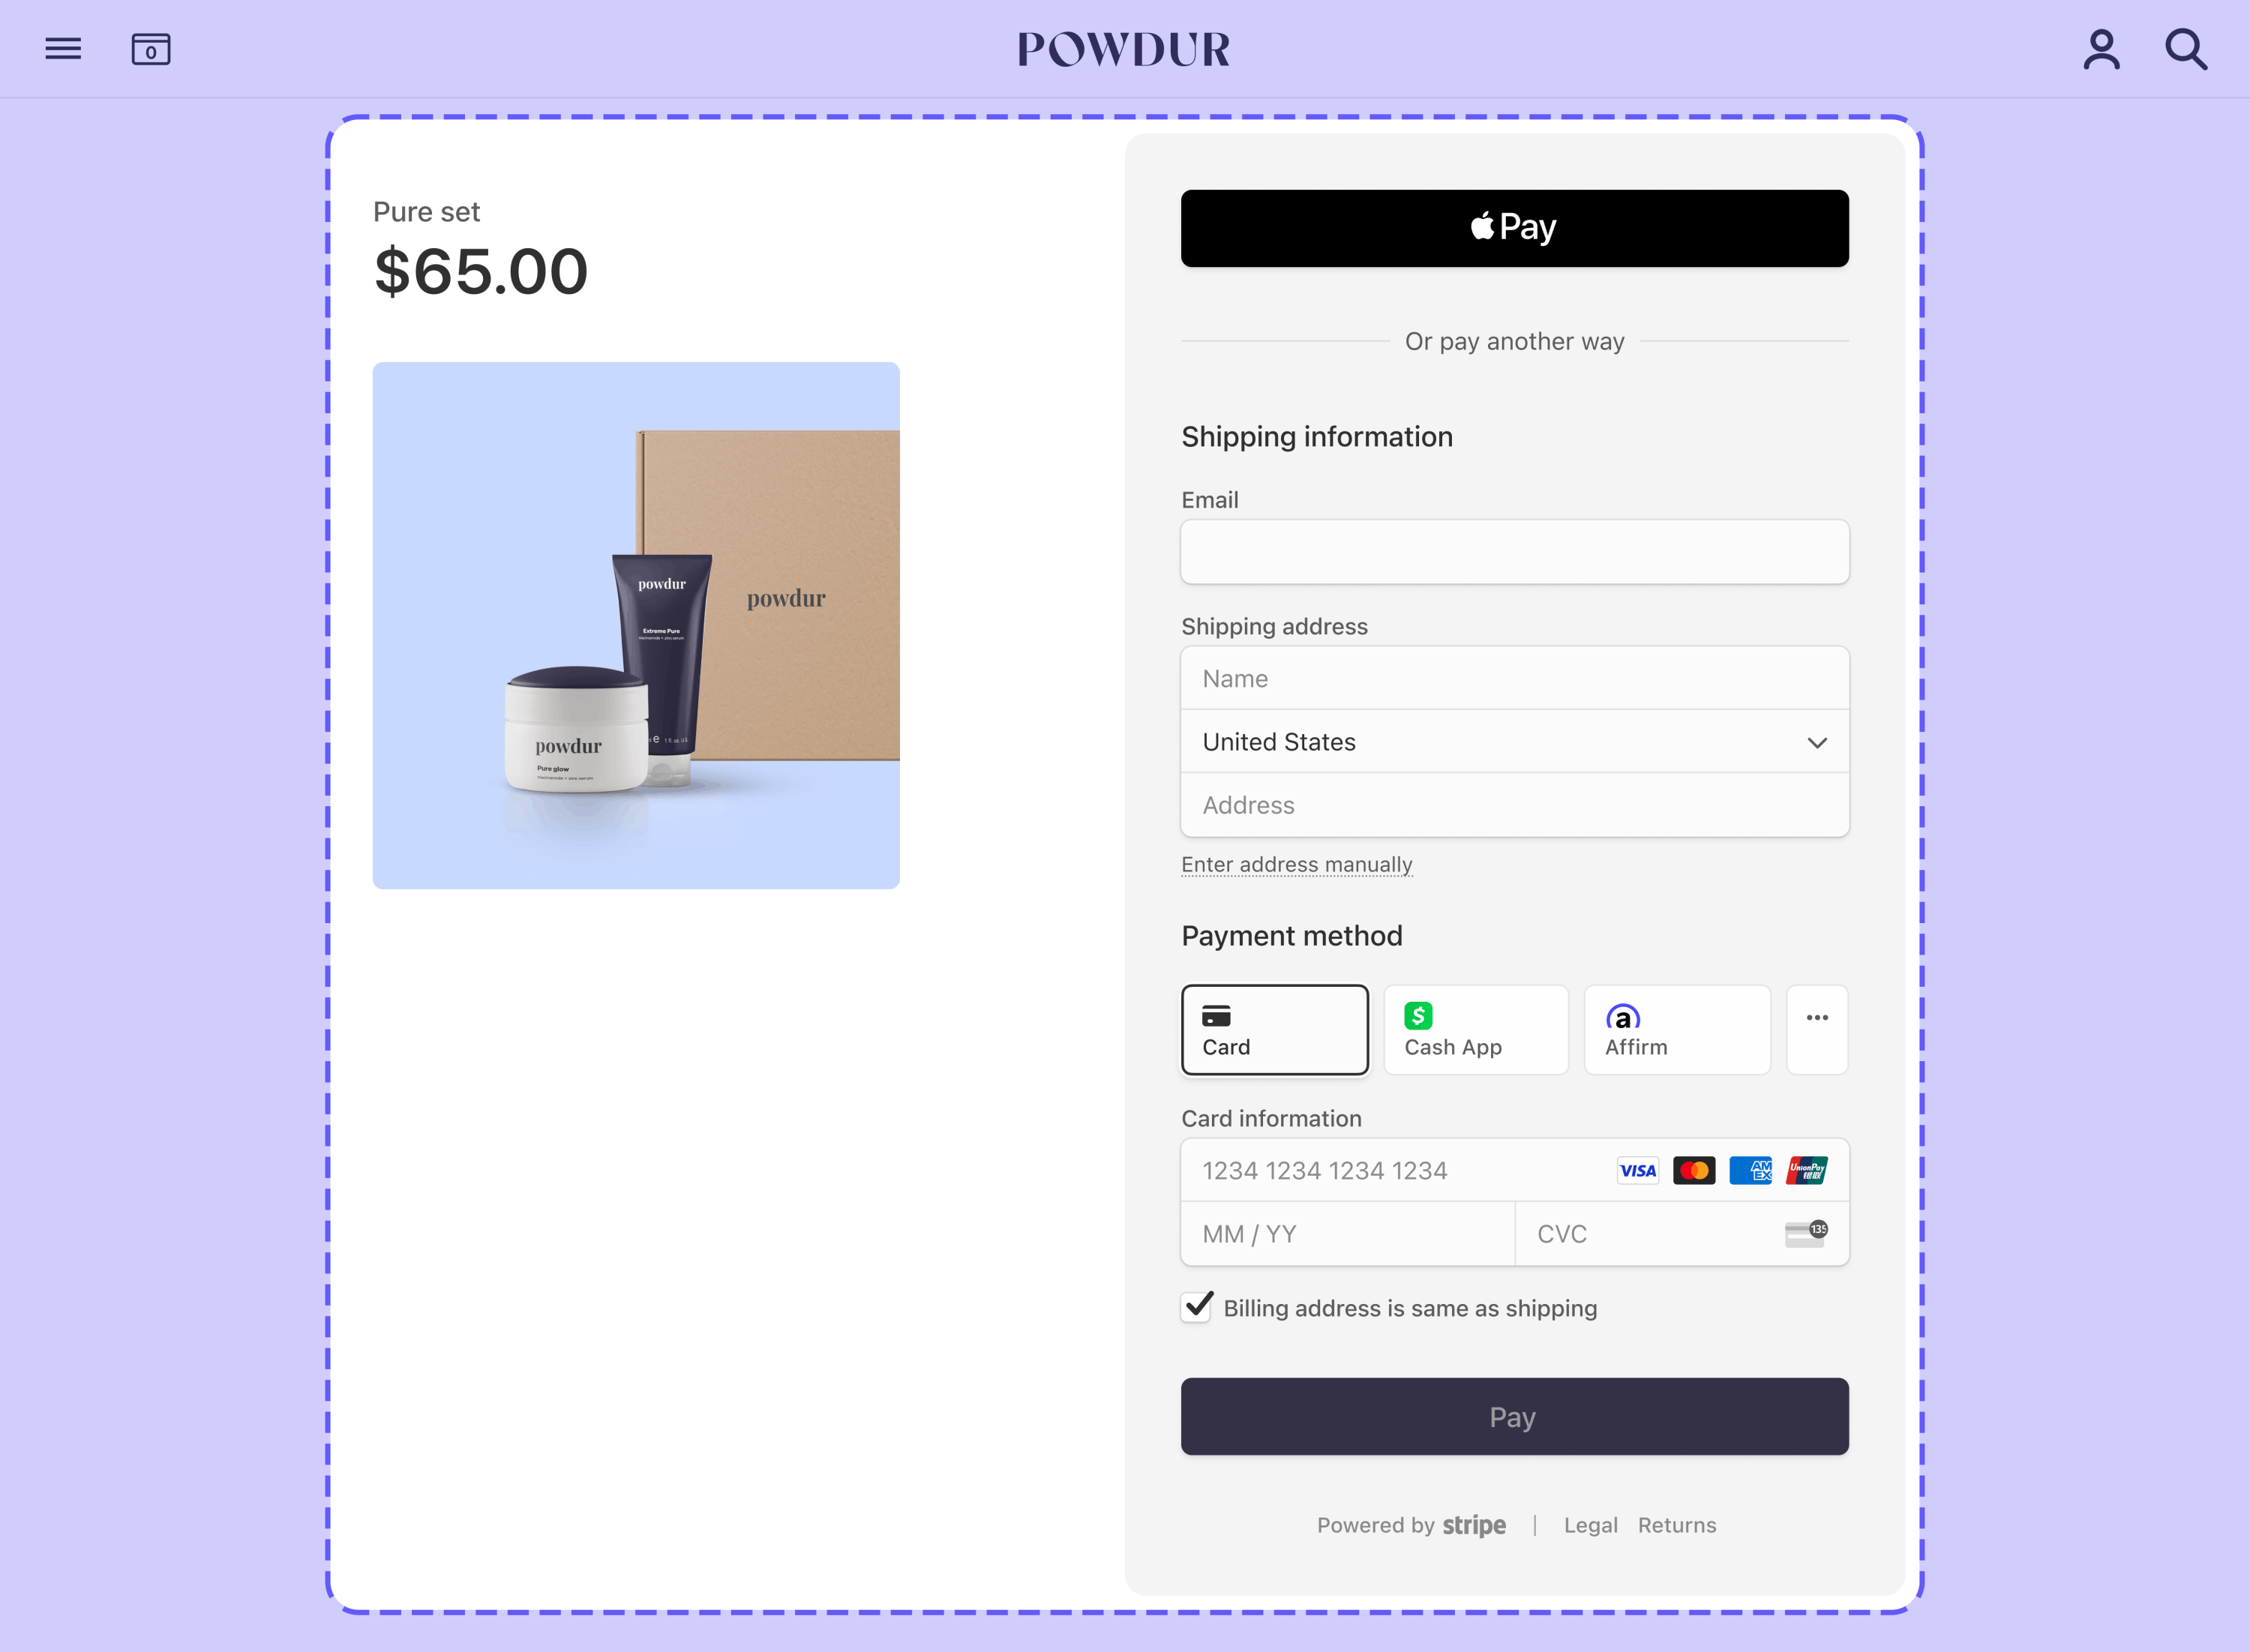
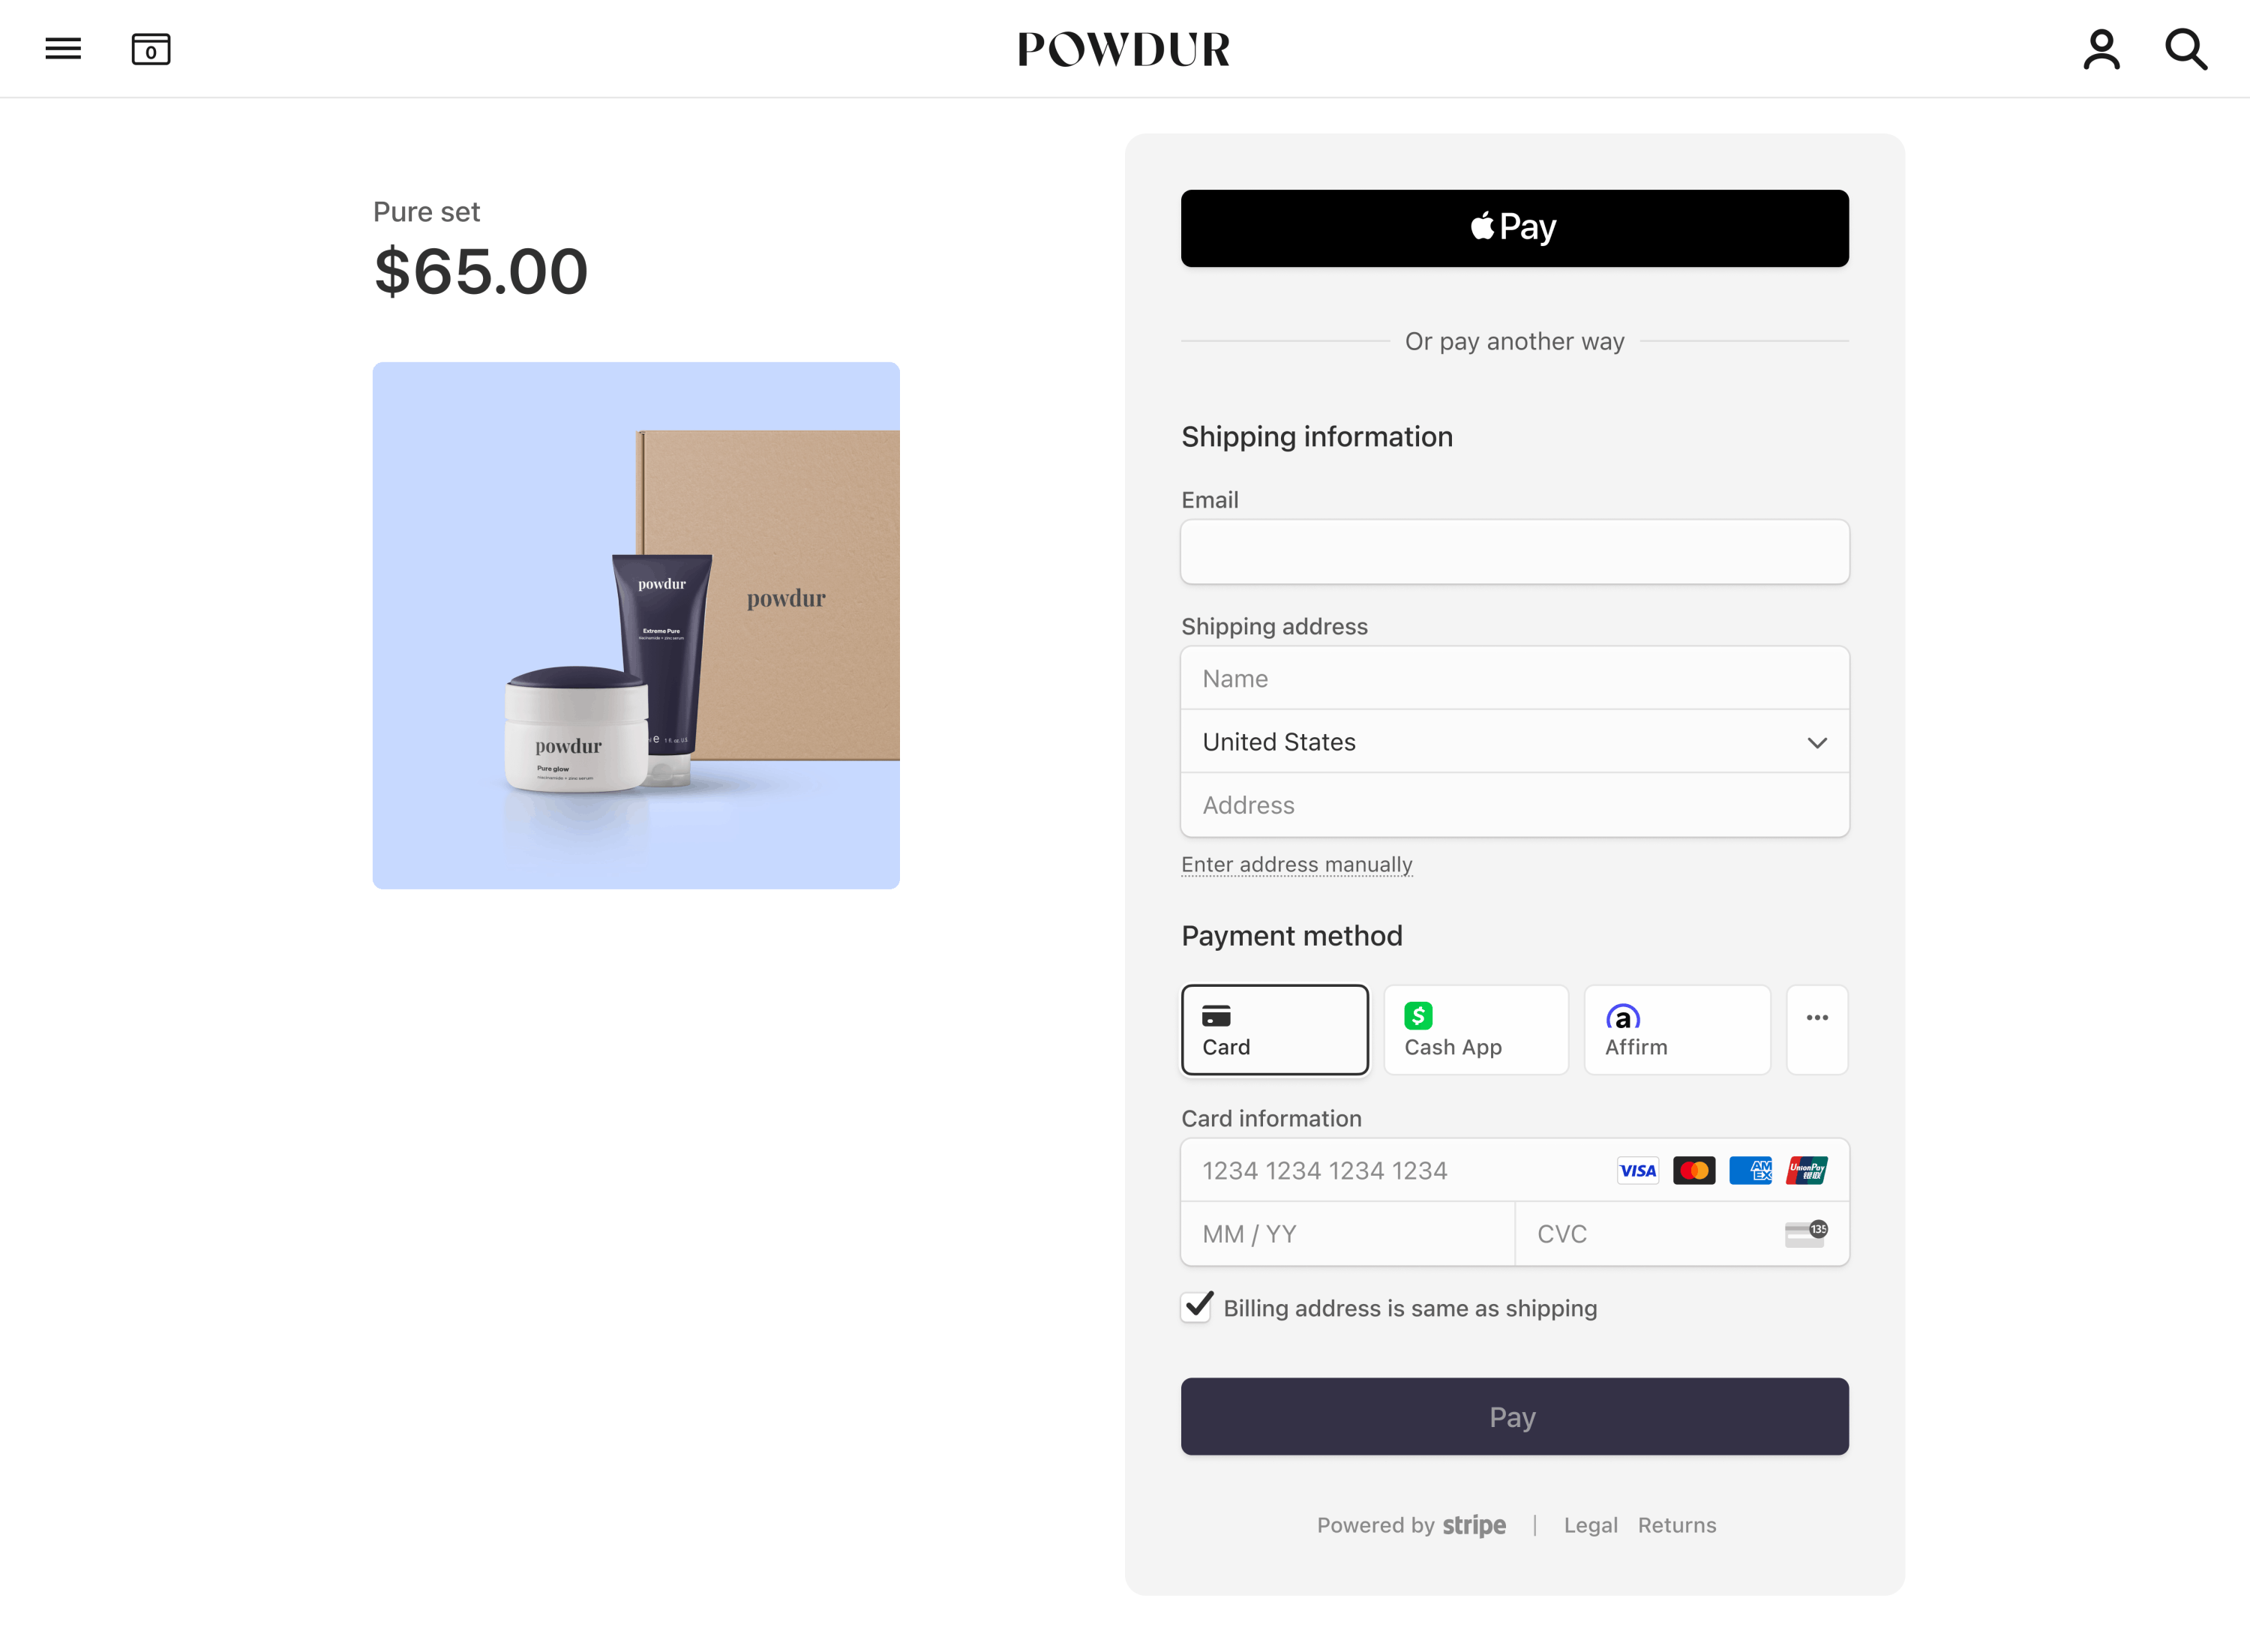
Build a checkout page on your website using Stripe Elements and Checkout Sessions, an integration that manages tax, discounts, shipping rates, and more.
Set up the serverServer-side
Before you begin, you need to register for a Stripe account.
Use the official Stripe libraries to access the API from your application.
Set the SDK to use at least the 2025-03-31. API version.
Create a Checkout SessionServer-side
Add an endpoint on your server that creates a Checkout Session and returns its client secret to your front end. A Checkout Session represents your customer’s session as they pay for one-time purchases or subscriptions. Checkout Sessions expire 24 hours after creation.
Collect payment detailsClient-side
Collect payment details on the client with the Payment Element. The Payment Element is a prebuilt UI component that simplifies collecting payment details for a variety of payment methods.
Test your integration
- Navigate to your checkout page.
- Fill out the payment details with a payment method from the following table. For card payments:
- Enter any future date for card expiry.
- Enter any 3-digit number for CVC.
- Enter any billing postal code.
- Submit the payment to Stripe.
- Go to the Dashboard and look for the payment on the Transactions page. If your payment succeeded, you’ll see it in that list.
- Click your payment to see more details, like billing information and the list of purchased items. You can use this information to fulfill the order.
See Testing for additional information to test your integration.
Build a custom payments integration by embedding UI components on your site, using Stripe Elements. See how this integration compares to Stripe’s other integration types.
The client-side and server-side code builds a checkout form that accepts various payment methods.
Integration effort
Integration type
Combine UI components into a custom payment flow
UI customization
CSS-level customization with the Appearance API
Interested in using Stripe Tax, discounts, shipping, or currency conversion?
Stripe has a Payment Element integration that manages tax, discounts, shipping, and currency conversion for you. See build a checkout page to learn more.
Set up StripeServer-side
First, create a Stripe account or sign in.
Use our official libraries to access the Stripe API from your application:
Create a PaymentIntentServer-side
Note
If you want to render the Payment Element without first creating a PaymentIntent, see Collect payment details before creating an Intent.
The PaymentIntent object represents your intent to collect payment from a customer and tracks charge attempts and state changes throughout the payment process.
Customer
Client
Server
Stripe
Go to payment page
Send order information
POST /v1/payment_
Creates new PaymentIntent
Return new PaymentIntent
Return PaymentIntent client_
Provide billing details and finalize payment
Call stripe. with Elements instance
Attempts payment (may redirect to partner site)
Redirects user to return_ page
Display payment status
Sends webhook event with payment status
Create the PaymentIntent
Create a PaymentIntent on your server with an amount and currency. In the latest version of the API, specifying the automatic_ parameter is optional because Stripe enables its functionality by default. You can manage payment methods from the Dashboard. Stripe handles the return of eligible payment methods based on factors such as the transaction’s amount, currency, and payment flow.
Stripe uses your payment methods settings to display the payment methods you have enabled. To see how your payment methods appear to customers, enter a transaction ID or set an order amount and currency in the Dashboard. To override payment methods, manually list any that you want to enable using the payment_method_types attribute.
Note
Always decide how much to charge on the server side, a trusted environment, as opposed to the client. This prevents malicious customers from being able to choose their own prices.
Retrieve the client secret
The PaymentIntent includes a client secret that the client side uses to securely complete the payment process. You can use different approaches to pass the client secret to the client side.
Collect payment detailsClient-side
Collect payment details on the client with the Payment Element. The Payment Element is a prebuilt UI component that simplifies collecting payment details for a variety of payment methods.
The Payment Element contains an iframe that securely sends payment information to Stripe over an HTTPS connection. Avoid placing the Payment Element within another iframe because some payment methods require redirecting to another page for payment confirmation.
If you do choose to use an iframe and want to accept Apple Pay or Google Pay, the iframe must have the allow attribute set to equal "payment *".
The checkout page address must start with https:// rather than http:// for your integration to work. You can test your integration without using HTTPS, but remember to enable it when you’re ready to accept live payments.
The Payment Element renders a dynamic form that allows your customer to pick a payment method. For each payment method, the form automatically asks the customer to fill in all necessary payment details.
Customize appearance
Customize the Payment Element to match the design of your site by passing the appearance object into options when creating the Elements provider.
Collect addresses
By default, the Payment Element only collects the necessary billing address details. To collect a customer’s full billing address (to calculate the tax for digital goods and services, for example) or shipping address, use the Address Element.
Request Apple Pay merchant token
If you’ve configured your integration to accept Apple Pay payments, we recommend configuring the Apple Pay interface to return a merchant token to enable merchant initiated transactions (MIT). Request the relevant merchant token type in the Payment Element.
Submit the payment to StripeClient-side
Use stripe.confirmPayment to complete the payment using details from the Payment Element. Provide a return_url to this function to indicate where Stripe should redirect the user after they complete the payment. Your user may be first redirected to an intermediate site, like a bank authorization page, before being redirected to the return_. Card payments immediately redirect to the return_ when a payment is successful.
If you don’t want to redirect for card payments after payment completion, you can set redirect to if_. This only redirects customers that check out with redirect-based payment methods.
Make sure the return_ corresponds to a page on your website that provides the status of the payment. When Stripe redirects the customer to the return_, we provide the following URL query parameters:
| Parameter | Description |
|---|---|
payment_ | The unique identifier for the PaymentIntent. |
payment_ | The client secret of the PaymentIntent object. |
Caution
If you have tooling that tracks the customer’s browser session, you might need to add the stripe. domain to the referrer exclude list. Redirects cause some tools to create new sessions, which prevents you from tracking the complete session.
Use one of the query parameters to retrieve the PaymentIntent. Inspect the status of the PaymentIntent to decide what to show your customers. You can also append your own query parameters when providing the return_, which persist through the redirect process.
Handle post-payment eventsServer-side
Stripe sends a payment_intent.succeeded event when the payment completes. Use the Dashboard webhook tool or follow the webhook guide to receive these events and run actions, such as sending an order confirmation email to your customer, logging the sale in a database, or starting a shipping workflow.
Listen for these events rather than waiting on a callback from the client. On the client, the customer could close the browser window or quit the app before the callback executes, and malicious clients could manipulate the response. Setting up your integration to listen for asynchronous events is what enables you to accept different types of payment methods with a single integration.
In addition to handling the payment_ event, we recommend handling these other events when collecting payments with the Payment Element:
| Event | Description | Action |
|---|---|---|
| payment_intent.succeeded | Sent when a customer successfully completes a payment. | Send the customer an order confirmation and fulfill their order. |
| payment_intent.processing | Sent when a customer successfully initiates a payment, but the payment has yet to complete. This event is most commonly sent when the customer initiates a bank debit. It’s followed by either a payment_ or payment_ event in the future. | Send the customer an order confirmation that indicates their payment is pending. For digital goods, you might want to fulfill the order before waiting for payment to complete. |
| payment_intent.payment_failed | Sent when a customer attempts a payment, but the payment fails. | If a payment transitions from processing to payment_, offer the customer another attempt to pay. |
Test your integration
To test your custom payments integration:
- Create a Payment Intent and retrieve the client secret.
- Fill out the payment details with a method from the following table.
- Enter any future date for card expiry.
- Enter any 3-digit number for CVC.
- Enter any billing postal code.
- Submit the payment to Stripe. You’re redirected to your
return_.url - Go to the Dashboard and look for the payment on the Transactions page. If your payment succeeded, you’ll see it in that list.
- Click your payment to see more details, like billing information and the list of purchased items. You can use this information to fulfill the order.
Learn more about testing your integration.
See Testing for additional information to test your integration.
Disclose Stripe to your customers
Stripe collects information on customer interactions with Elements to provide services to you, prevent fraud, and improve its services. This includes using cookies and IP addresses to identify which Elements a customer saw during a single checkout session. You’re responsible for disclosing and obtaining all rights and consents necessary for Stripe to use data in these ways. For more information, visit our privacy center.
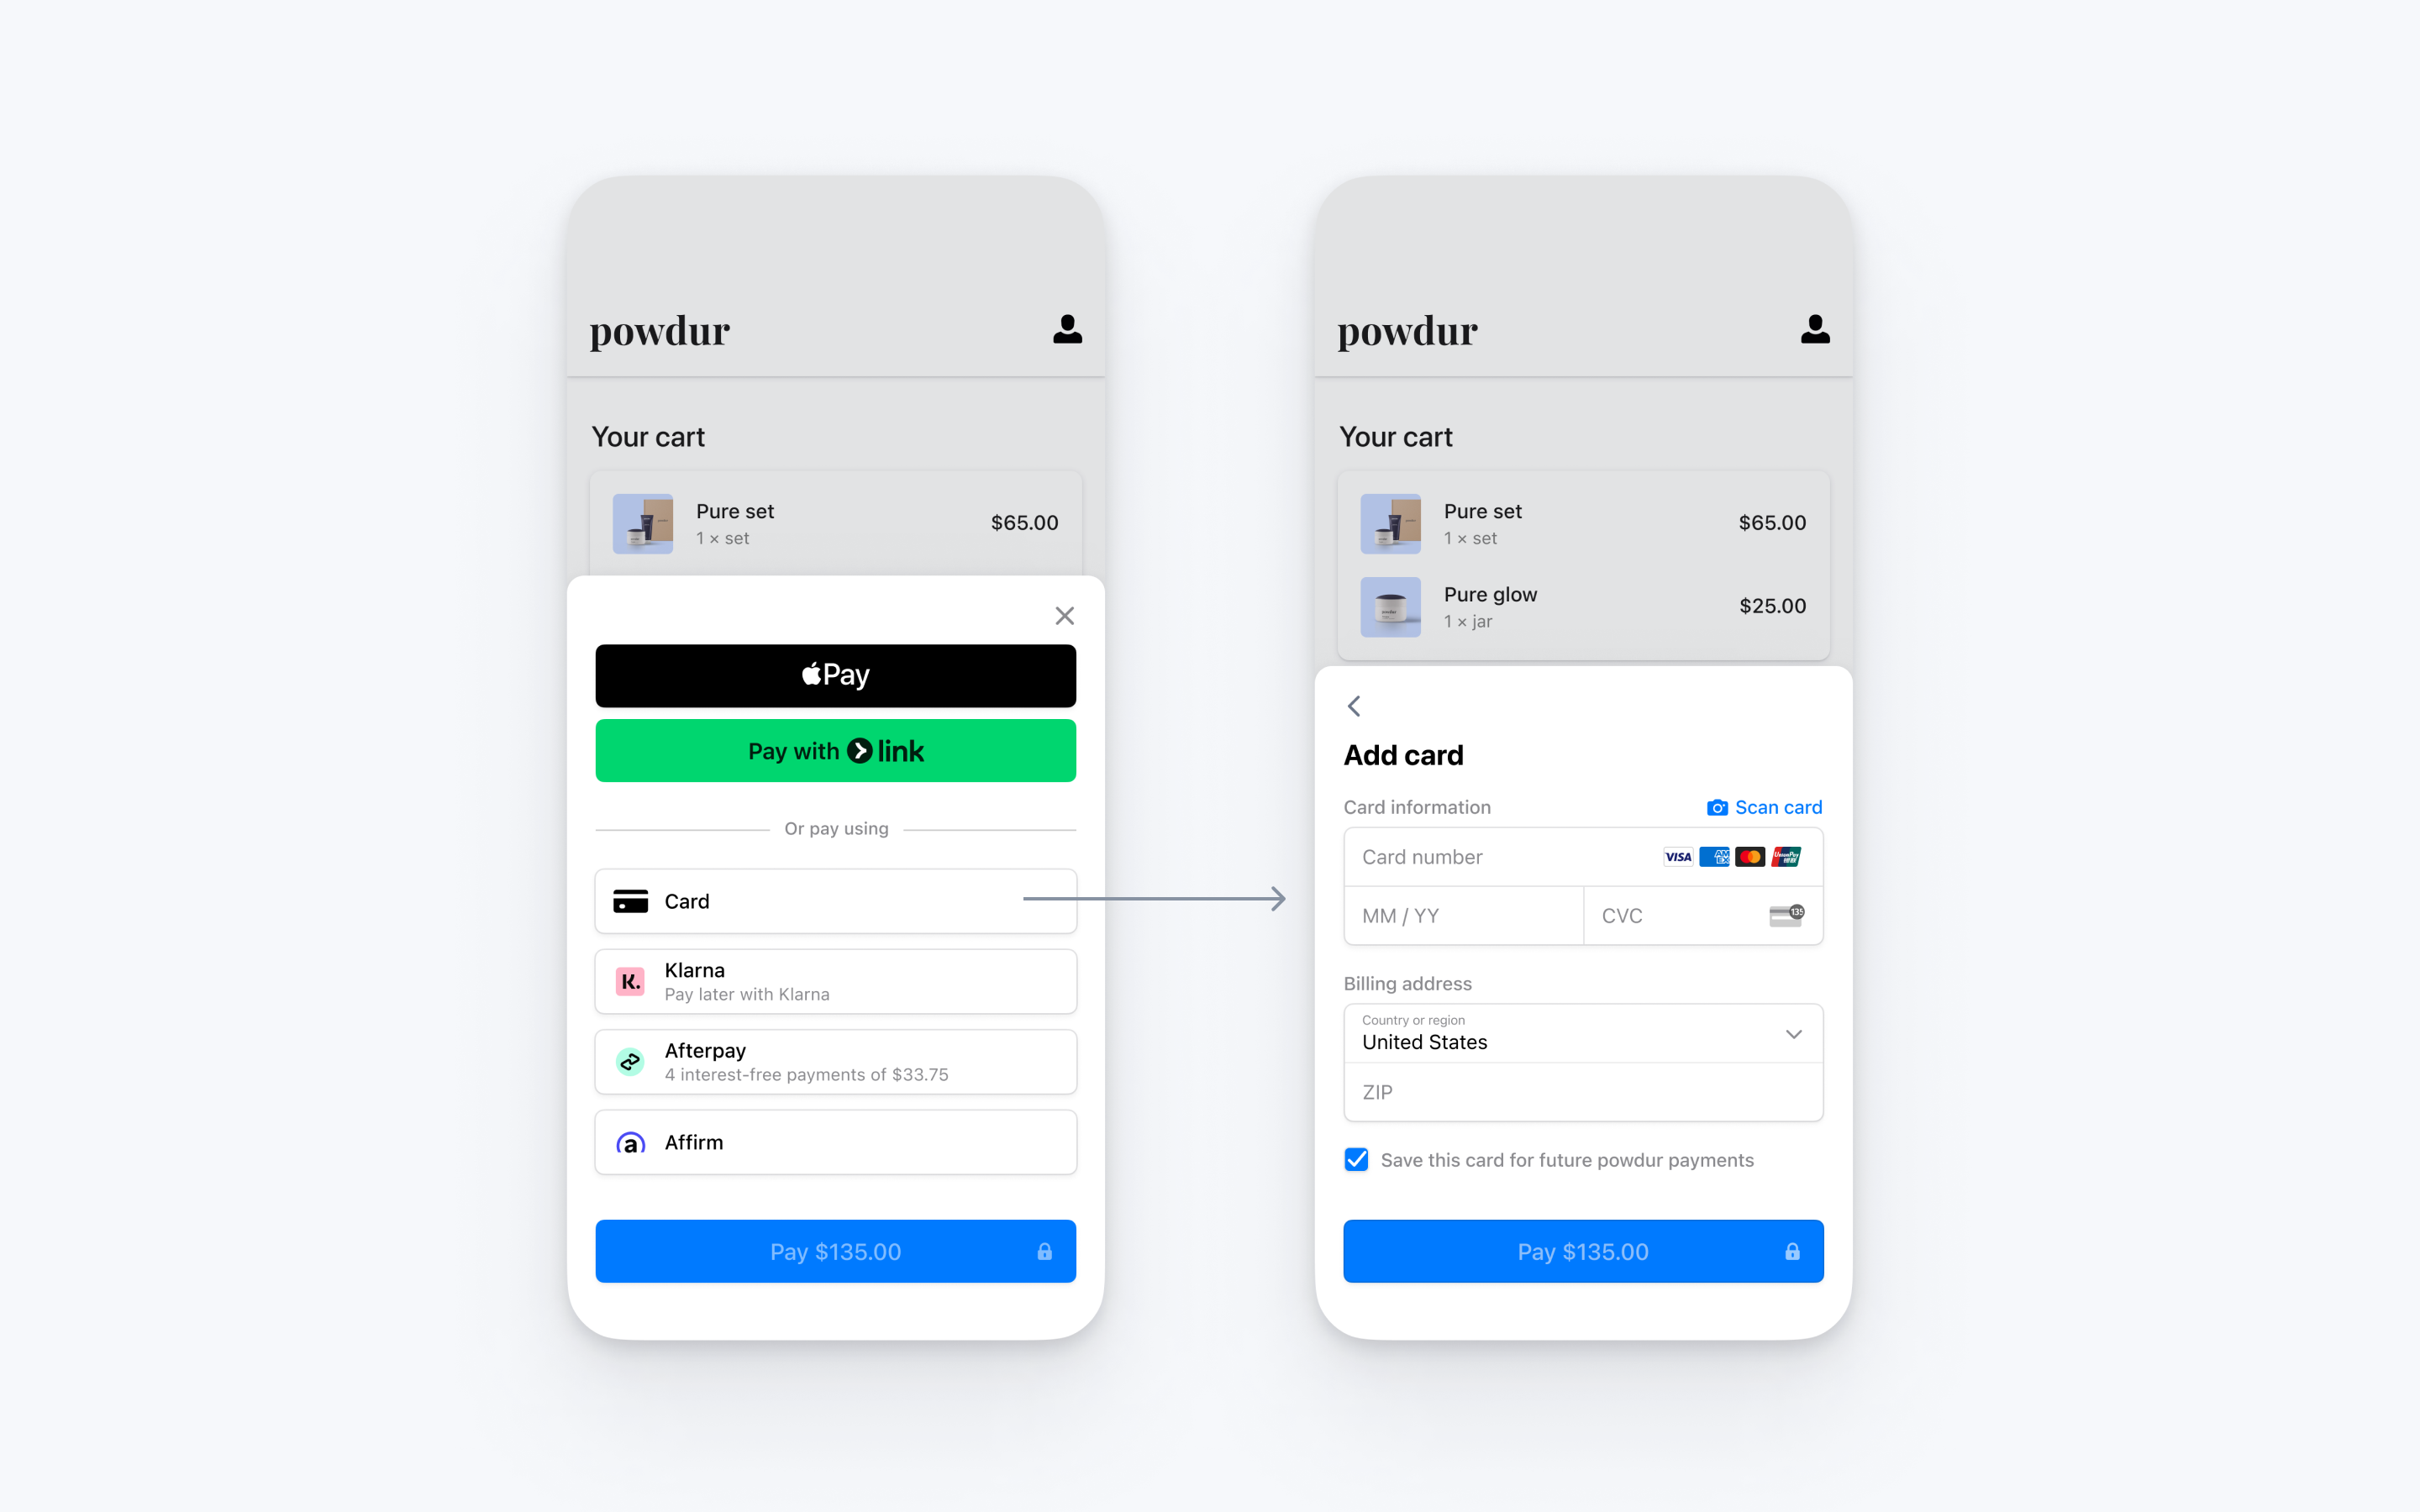
Integrate Stripe’s prebuilt payment UI into the checkout of your iOS app with the PaymentSheet class. See our sample integration on GitHub.
Set up StripeServer-sideClient-side
First, you need a Stripe account. Register now.
Server-side
This integration requires endpoints on your server that talk to the Stripe API. Use our official libraries for access to the Stripe API from your server:
Client-side
The Stripe iOS SDK is open source, fully documented, and compatible with apps supporting iOS 13 or above.
Note
For details on the latest SDK release and past versions, see the Releases page on GitHub. To receive notifications when a new release is published, watch releases for the repository.
Enable payment methods
View your payment methods settings and enable the payment methods you want to support. You need at least one payment method enabled to create a PaymentIntent.
By default, Stripe enables cards and other prevalent payment methods that can help you reach more customers, but we recommend turning on additional payment methods that are relevant for your business and customers. See Payment method support for product and payment method support, and our pricing page for fees.
Add an endpointServer-side
Note
To display the PaymentSheet before you create a PaymentIntent, see Collect payment details before creating an Intent.
This integration uses three Stripe API objects:
PaymentIntent: Stripe uses this to represent your intent to collect payment from a customer, tracking your charge attempts and payment state changes throughout the process.
(Optional) Customer: To set up a payment method for future payments, you must attach it to a Customer. Create a Customer object when your customer creates an account with your business. If your customer is making a payment as a guest, you can create a Customer object before payment and associate it with your own internal representation of the customer’s account later.
(Optional) Customer Ephemeral Key: Information on the Customer object is sensitive, and can’t be retrieved directly from an app. An Ephemeral Key grants the SDK temporary access to the Customer.
Note
If you never save cards to a Customer and don’t allow returning Customers to reuse saved cards, you can omit the Customer and Customer Ephemeral Key objects from your integration.
For security reasons, your app can’t create these objects. Instead, add an endpoint on your server that:
- Retrieves the Customer, or creates a new one.
- Creates an Ephemeral Key for the Customer.
- Creates a PaymentIntent with the amount, currency, and customer. You can also optionally include the
automatic_parameter. Stripe enables its functionality by default in the latest version of the API.payment_ methods - Returns the Payment Intent’s client secret, the Ephemeral Key’s
secret, the Customer’s id, and your publishable key to your app.
The payment methods shown to customers during the checkout process are also included on the PaymentIntent. You can let Stripe pull payment methods from your Dashboard settings or you can list them manually. Regardless of the option you choose, know that the currency passed in the PaymentIntent filters the payment methods shown to the customer. For example, if you pass eur on the PaymentIntent and have OXXO enabled in the Dashboard, OXXO won’t be shown to the customer because OXXO doesn’t support eur payments.
Unless your integration requires a code-based option for offering payment methods, Stripe recommends the automated option. This is because Stripe evaluates the currency, payment method restrictions, and other parameters to determine the list of supported payment methods. Payment methods that increase conversion and that are most relevant to the currency and customer’s location are prioritized.
Collect payment detailsClient-side
To display the mobile Payment Element on your checkout screen, make sure you:
- Display the products the customer is purchasing along with the total amount
- Use the Address Element to collect any required shipping information from the customer
- Add a checkout button to display Stripe’s UI
If PaymentSheetResult is ., inform the user (for example, by displaying an order confirmation screen).
Setting allowsDelayedPaymentMethods to true allows delayed notification payment methods like US bank accounts. For these payment methods, the final payment status isn’t known when the PaymentSheet completes, and instead succeeds or fails later. If you support these types of payment methods, inform the customer their order is confirmed and only fulfill their order (for example, ship their product) when the payment is successful.
Set up a return URLClient-side
The customer might navigate away from your app to authenticate (for example, in Safari or their banking app). To allow them to automatically return to your app after authenticating, configure a custom URL scheme and set up your app delegate to forward the URL to the SDK. Stripe doesn’t support universal links.
Additionally, set the returnURL on your PaymentSheet.Configuration object to the URL for your app.
var configuration = PaymentSheet.Configuration()
configuration.returnURL = "your-app://stripe-redirect"
Handle post-payment eventsServer-side
Stripe sends a payment_intent.succeeded event when the payment completes. Use the Dashboard webhook tool or follow the webhook guide to receive these events and run actions, such as sending an order confirmation email to your customer, logging the sale in a database, or starting a shipping workflow.
Listen for these events rather than waiting on a callback from the client. On the client, the customer could close the browser window or quit the app before the callback executes, and malicious clients could manipulate the response. Setting up your integration to listen for asynchronous events is what enables you to accept different types of payment methods with a single integration.
In addition to handling the payment_ event, we recommend handling these other events when collecting payments with the Payment Element:
| Event | Description | Action |
|---|---|---|
| payment_intent.succeeded | Sent when a customer successfully completes a payment. | Send the customer an order confirmation and fulfill their order. |
| payment_intent.processing | Sent when a customer successfully initiates a payment, but the payment has yet to complete. This event is most commonly sent when the customer initiates a bank debit. It’s followed by either a payment_ or payment_ event in the future. | Send the customer an order confirmation that indicates their payment is pending. For digital goods, you might want to fulfill the order before waiting for payment to complete. |
| payment_intent.payment_failed | Sent when a customer attempts a payment, but the payment fails. | If a payment transitions from processing to payment_, offer the customer another attempt to pay. |
Test the integration
See Testing for additional information to test your integration.

Integrate Stripe’s prebuilt payment UI into the checkout of your Android app with the PaymentSheet class.
Set up StripeServer-sideClient-side
First, you need a Stripe account. Register now.
Server-side
This integration requires endpoints on your server that talk to the Stripe API. Use the official libraries for access to the Stripe API from your server:
Client-side
The Stripe Android SDK is open source and fully documented.
To install the SDK, add stripe-android to the dependencies block of your app/build.gradle file:
Note
For details on the latest SDK release and past versions, see the Releases page on GitHub. To receive notifications when a new release is published, watch releases for the repository.
Enable payment methods
View your payment methods settings and enable the payment methods you want to support. You need at least one payment method enabled to create a PaymentIntent.
By default, Stripe enables cards and other prevalent payment methods that can help you reach more customers, but we recommend turning on additional payment methods that are relevant for your business and customers. See Payment method support for product and payment method support, and our pricing page for fees.
Add an endpointServer-side
Note
To display the PaymentSheet before you create a PaymentIntent, see Collect payment details before creating an Intent.
This integration uses three Stripe API objects:
PaymentIntent: Stripe uses this to represent your intent to collect payment from a customer, tracking your charge attempts and payment state changes throughout the process.
(Optional) Customer: To set up a payment method for future payments, you must attach it to a Customer. Create a Customer object when your customer creates an account with your business. If your customer is making a payment as a guest, you can create a Customer object before payment and associate it with your own internal representation of the customer’s account later.
(Optional) Customer Ephemeral Key: Information on the Customer object is sensitive, and can’t be retrieved directly from an app. An Ephemeral Key grants the SDK temporary access to the Customer.
Note
If you never save cards to a Customer and don’t allow returning Customers to reuse saved cards, you can omit the Customer and Customer Ephemeral Key objects from your integration.
For security reasons, your app can’t create these objects. Instead, add an endpoint on your server that:
- Retrieves the Customer, or creates a new one.
- Creates an Ephemeral Key for the Customer.
- Creates a PaymentIntent with the amount, currency, and customer. You can also optionally include the
automatic_parameter. Stripe enables its functionality by default in the latest version of the API.payment_ methods - Returns the Payment Intent’s client secret, the Ephemeral Key’s
secret, the Customer’s id, and your publishable key to your app.
The payment methods shown to customers during the checkout process are also included on the PaymentIntent. You can let Stripe pull payment methods from your Dashboard settings or you can list them manually. Regardless of the option you choose, know that the currency passed in the PaymentIntent filters the payment methods shown to the customer. For example, if you pass eur on the PaymentIntent and have OXXO enabled in the Dashboard, OXXO won’t be shown to the customer because OXXO doesn’t support eur payments.
Unless your integration requires a code-based option for offering payment methods, Stripe recommends the automated option. This is because Stripe evaluates the currency, payment method restrictions, and other parameters to determine the list of supported payment methods. Payment methods that increase conversion and that are most relevant to the currency and customer’s location are prioritized.
Collect payment detailsClient-side
Before displaying the mobile Payment Element, your checkout page should:
- Show the products being purchased and the total amount
- Collect any required shipping information using the Address Element
- Include a checkout button to present Stripe’s UI
Setting allowsDelayedPaymentMethods to true allows delayed notification payment methods like US bank accounts. For these payment methods, the final payment status isn’t known when the PaymentSheet completes, and instead succeeds or fails later. If you support these types of payment methods, inform the customer their order is confirmed and only fulfill their order (for example, ship their product) when the payment is successful.
Handle post-payment eventsServer-side
Stripe sends a payment_intent.succeeded event when the payment completes. Use the Dashboard webhook tool or follow the webhook guide to receive these events and run actions, such as sending an order confirmation email to your customer, logging the sale in a database, or starting a shipping workflow.
Listen for these events rather than waiting on a callback from the client. On the client, the customer could close the browser window or quit the app before the callback executes, and malicious clients could manipulate the response. Setting up your integration to listen for asynchronous events is what enables you to accept different types of payment methods with a single integration.
In addition to handling the payment_ event, we recommend handling these other events when collecting payments with the Payment Element:
| Event | Description | Action |
|---|---|---|
| payment_intent.succeeded | Sent when a customer successfully completes a payment. | Send the customer an order confirmation and fulfill their order. |
| payment_intent.processing | Sent when a customer successfully initiates a payment, but the payment has yet to complete. This event is most commonly sent when the customer initiates a bank debit. It’s followed by either a payment_ or payment_ event in the future. | Send the customer an order confirmation that indicates their payment is pending. For digital goods, you might want to fulfill the order before waiting for payment to complete. |
| payment_intent.payment_failed | Sent when a customer attempts a payment, but the payment fails. | If a payment transitions from processing to payment_, offer the customer another attempt to pay. |
Test the integration
See Testing for additional information to test your integration.
This integration combines all of the steps required to pay—collecting payment details and confirming the payment—into a single sheet that displays on top of your app.
Set up StripeServer-sideClient-side
First, you need a Stripe account. Register now.
Server-side
This integration requires endpoints on your server that talk to the Stripe API. Use the official libraries for access to the Stripe API from your server:
Client-side
The React Native SDK is open source and fully documented. Internally, it uses the native iOS and Android SDKs. To install Stripe’s React Native SDK, run one of the following commands in your project’s directory (depending on which package manager you use):
Next, install some other necessary dependencies:
- For iOS, navigate to the ios directory and run
pod installto ensure that you also install the required native dependencies. - For Android, there are no more dependencies to install.
Stripe initialization
To initialize Stripe in your React Native app, either wrap your payment screen with the StripeProvider component, or use the initStripe initialization method. Only the API publishable key in publishableKey is required. The following example shows how to initialize Stripe using the StripeProvider component.
import { StripeProvider } from '@stripe/stripe-react-native';

function App() {
  const [publishableKey, setPublishableKey] = useState('');

  const fetchPublishableKey = async () => {
    const key = await fetchKey(); // fetch key from your server here
    setPublishableKey(key);
  };

  useEffect(() => {
    fetchPublishableKey();
  }, []);

  return (
    <StripeProvider
      publishableKey={publishableKey}
      merchantIdentifier="merchant.identifier" // required for Apple Pay
      urlScheme="your-url-scheme" // required for 3D Secure and bank redirects
    >
      // Your app code here
    </StripeProvider>
  );
}
Enable payment methods
View your payment methods settings and enable the payment methods you want to support. You need at least one payment method enabled to create a PaymentIntent.
By default, Stripe enables cards and other prevalent payment methods that can help you reach more customers, but we recommend turning on additional payment methods that are relevant for your business and customers. See Payment method support for product and payment method support, and our pricing page for fees.
Add an endpointServer-side
Note
To display the PaymentSheet before you create a PaymentIntent, see Collect payment details before creating an Intent.
This integration uses three Stripe API objects:
PaymentIntent: Stripe uses this to represent your intent to collect payment from a customer, tracking your charge attempts and payment state changes throughout the process.
(Optional) Customer: To set up a payment method for future payments, you must attach it to a Customer. Create a Customer object when your customer creates an account with your business. If your customer is making a payment as a guest, you can create a Customer object before payment and associate it with your own internal representation of the customer’s account later.
(Optional) Customer Ephemeral Key: Information on the Customer object is sensitive, and can’t be retrieved directly from an app. An Ephemeral Key grants the SDK temporary access to the Customer.
Note
If you never save cards to a Customer and don’t allow returning Customers to reuse saved cards, you can omit the Customer and Customer Ephemeral Key objects from your integration.
For security reasons, your app can’t create these objects. Instead, add an endpoint on your server that:
- Retrieves the Customer, or creates a new one.
- Creates an Ephemeral Key for the Customer.
- Creates a PaymentIntent with the amount, currency, and customer. You can also optionally include the
automatic_parameter. Stripe enables its functionality by default in the latest version of the API.payment_ methods - Returns the Payment Intent’s client secret, the Ephemeral Key’s
secret, the Customer’s id, and your publishable key to your app.
The payment methods shown to customers during the checkout process are also included on the PaymentIntent. You can let Stripe pull payment methods from your Dashboard settings or you can list them manually. Regardless of the option you choose, know that the currency passed in the PaymentIntent filters the payment methods shown to the customer. For example, if you pass eur on the PaymentIntent and have OXXO enabled in the Dashboard, OXXO won’t be shown to the customer because OXXO doesn’t support eur payments.
Unless your integration requires a code-based option for offering payment methods, Stripe recommends the automated option. This is because Stripe evaluates the currency, payment method restrictions, and other parameters to determine the list of supported payment methods. Payment methods that increase conversion and that are most relevant to the currency and customer’s location are prioritized.
Collect payment detailsClient-side
Before displaying the mobile Payment Element, your checkout page should:
- Show the products being purchased and the total amount
- Collect any required shipping information
- Include a checkout button to present Stripe’s UI
In the checkout of your app, make a network request to the backend endpoint you created in the previous step and call initPaymentSheet from the useStripe hook.
export default function CheckoutScreen() {
  const { initPaymentSheet, presentPaymentSheet } = useStripe();
  const [loading, setLoading] = useState(false);

  const fetchPaymentSheetParams = async () => {
    const response = await fetch(`${API_URL}/payment-sheet`, {
      method: 'POST',
      headers: {
        'Content-Type': 'application/json',
      },
    });
    const { paymentIntent, ephemeralKey, customer } = await response.json();

    return {
      paymentIntent,
      ephemeralKey,
      customer,
    };
  };

  const initializePaymentSheet = async () => {
    const {
      paymentIntent,
      ephemeralKey,
      customer,
    } = await fetchPaymentSheetParams();

    const { error } = await initPaymentSheet({
      merchantDisplayName: "Example, Inc.",
      customerId: customer,
      customerEphemeralKeySecret: ephemeralKey,
      paymentIntentClientSecret: paymentIntent,
      // Set `allowsDelayedPaymentMethods` to true if your business can handle payment
      //methods that complete payment after a delay, like SEPA Debit and Sofort.
      allowsDelayedPaymentMethods: true,
      defaultBillingDetails: {
        name: 'Jane Doe',
      }
    });
    if (!error) {
      setLoading(true);
    }
  };

  const openPaymentSheet = async () => {
    // see below
  };

  useEffect(() => {
    initializePaymentSheet();
  }, []);

  return (
    <Screen>
      <Button
        variant="primary"
        disabled={!loading}
        title="Checkout"
        onPress={openPaymentSheet}
      />
    </Screen>
  );
}
When your customer taps the Checkout button, call presentPaymentSheet() to open the sheet. After the customer completes the payment, the sheet is dismissed and the promise resolves with an optional StripeError<PaymentSheetError>.
export default function CheckoutScreen() {
  // continued from above

  const openPaymentSheet = async () => {
    const { error } = await presentPaymentSheet();

    if (error) {
      Alert.alert(`Error code: ${error.code}`, error.message);
    } else {
      Alert.alert('Success', 'Your order is confirmed!');
    }
  };

  return (
    <Screen>
      <Button
        variant="primary"
        disabled={!loading}
        title="Checkout"
        onPress={openPaymentSheet}
      />
    </Screen>
  );
}
If there is no error, inform the user they’re done (for example, by displaying an order confirmation screen).
Setting allowsDelayedPaymentMethods to true allows delayed notification payment methods like US bank accounts. For these payment methods, the final payment status isn’t known when the PaymentSheet completes, and instead succeeds or fails later. If you support these types of payment methods, inform the customer their order is confirmed and only fulfill their order (for example, ship their product) when the payment is successful.
Set up a return URL (iOS only)Client-side
When a customer exits your app, for example to authenticate in Safari or their banking app, provide a way for them to automatically return to your app afterward. Many payment method types require a return URL, so if you fail to provide it, we can’t present those payment methods to your user, even if you’ve enabled them.
To provide a return URL:
- Register a custom URL. Universal links aren’t supported.
- Configure your custom URL.
- Set up your root component to forward the URL to the Stripe SDK as shown below.
Note
If you’re using Expo, set your scheme in the app. file.
import React, { useEffect, useCallback } from 'react';
import { Linking } from 'react-native';
import { useStripe } from '@stripe/stripe-react-native';

export default function MyApp() {
  const { handleURLCallback } = useStripe();

  const handleDeepLink = useCallback(
    async (url: string | null) => {
      if (url) {
        const stripeHandled = await handleURLCallback(url);
        if (stripeHandled) {
          // This was a Stripe URL - you can return or add extra handling here as you see fit
        } else {
          // This was NOT a Stripe URL – handle as you normally would
        }
      }
    },
    [handleURLCallback]
  );

  useEffect(() => {
    const getUrlAsync = async () => {
      const initialUrl = await Linking.getInitialURL();
      handleDeepLink(initialUrl);
    };

    getUrlAsync();

    const deepLinkListener = Linking.addEventListener(
      'url',
      (event: { url: string }) => {
        handleDeepLink(event.url);
      }
    );

    return () => deepLinkListener.remove();
  }, [handleDeepLink]);

  return (
    <View>
      <AwesomeAppComponent />
    </View>
  );
}
Additionally, set the returnURL when you call the initPaymentSheet method:
await initPaymentSheet({
  ...
  returnURL: 'your-app://stripe-redirect',
  ...
});
For more information on native URL schemes, refer to the Android and iOS docs.
Handle post-payment events
Stripe sends a payment_intent.succeeded event when the payment completes. Use the Dashboard webhook tool or follow the webhook guide to receive these events and run actions, such as sending an order confirmation email to your customer, logging the sale in a database, or starting a shipping workflow.
Listen for these events rather than waiting on a callback from the client. On the client, the customer could close the browser window or quit the app before the callback executes, and malicious clients could manipulate the response. Setting up your integration to listen for asynchronous events is what enables you to accept different types of payment methods with a single integration.
In addition to handling the payment_ event, we recommend handling these other events when collecting payments with the Payment Element:
| Event | Description | Action |
|---|---|---|
| payment_intent.succeeded | Sent when a customer successfully completes a payment. | Send the customer an order confirmation and fulfill their order. |
| payment_intent.processing | Sent when a customer successfully initiates a payment, but the payment has yet to complete. This event is most commonly sent when the customer initiates a bank debit. It’s followed by either a payment_ or payment_ event in the future. | Send the customer an order confirmation that indicates their payment is pending. For digital goods, you might want to fulfill the order before waiting for payment to complete. |
| payment_intent.payment_failed | Sent when a customer attempts a payment, but the payment fails. | If a payment transitions from processing to payment_, offer the customer another attempt to pay. |
Test the integration
See Testing for additional information to test your integration.
Collect Stripe payments in whichever publishing or e-commerce platform you use, with a Stripe plugin created by our partners. The Stripe developer community uses Stripe’s APIs to create plugins and extensions.
If you use a third-party platform to build and maintain a website, you can add Stripe payments with a plugin.
Note
All plugins on this page are ready for Strong Customer Authentication (SCA).
Get started
Check out our full list of partners for a solution to your use case.