Set up BBPOS WisePad 3
Learn how to set up the BBPOS WisePad 3.
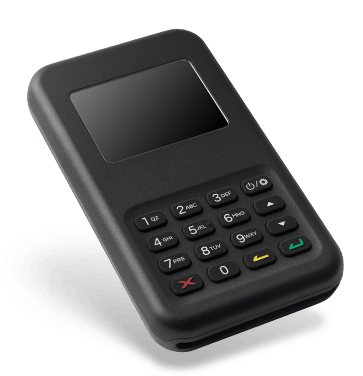
The BBPOS WisePad 3 is a handheld reader for use with mobile applications. It uses Bluetooth Low Energy (BLE) or USB (Android only) to connect to the Stripe Terminal SDK on a mobile device. The WisePad 3 features a display and PIN pad, which facilitates use in countries where PIN-authenticated transactions are more common.
This reader is compatible with our iOS, Android, and React Native SDKs. To view the reader’s parts and features, see the BBPOS WisePad 3 product sheet.
Warning
Stripe readers aren’t liquid-proof and we recommend that users make appropriate efforts to make sure their devices remain dry. If your device has experienced liquid ingress, we recommend that you stop using the device and let it dry thoroughly before attempting to re-use or charge the device. If your device doesn’t properly operate or charge properly after drying, you need to replace it.
Turn the reader on and off 
You can turn on the BBPOS WisePad 3 reader by pressing and holding the power button, located at the top right of the PIN pad. The display powers on and shows the device’s splash screen.
The display dims after a few seconds of inactivity. If inactive and disconnected from your application for more than 5 minutes, it beeps and powers off. Turn off the reader manually by pressing and holding the power button until the LED display shows a “Power off?” prompt, then press the green enter button to confirm.
Note
With typical usage, you generally need to charge the reader once per day. The reader can typically accept approximately 600 contact or 800 contactless transactions in a single charge cycle.
Charge the reader
To charge the BBPOS WisePad 3, use the included cable or a USB-A to USB-C cable.
Default reader language
The BBPOS WisePad 3 supports changing reader language directly in the reader interface. After you have registered your reader to a Location, the reader installs a language pack relevant for your region if one isn’t already in place. To view available language options and to select a language, click the Power / Settings button and scroll down using the arrow keys until you reach the language selection menu. Highlight your desired language and press the green Enter key.
Accessories for the reader
You can design your own accessories for the BBPOS WisePad 3. To download the BBPOS WisePad 3 mechanical design files (.STP), you must first review and accept our Terminal Design File License Agreement. By downloading the file below, you agree to the terms outlined in the license.
The BBPOS and Chipper™ name and logo are trademarks or registered trademarks of BBPOS Limited in the United States and/or other countries. The Verifone® name and logo are either trademarks or registered trademarks of Verifone in the United States and/or other countries. Use of the trademarks does not imply any endorsement by BBPOS or Verifone.