Sign in
An image of the Stripe logo
Create account
Sign in
Home
Payments
Business operations
Financial services
Developer tools
No-code
All products
Home
Payments
Business operations
Home
Payments
Business operations
Financial services
Developer tools
Overview
Online payments
Products and prices
Invoicing
Subscriptions
    Overview
    How subscriptions work
    Recurring pricing models
    Get started
    Quickstart
    Integrate a SaaS business
    Embed a pricing table
    Design an integration
    Build a subscriptions integration
    Migrate subscriptions to Stripe
    Billing resources
    Coupons
    Customers
    Subscriptions
    Subscription invoices
    Manage subscriptions
    Change subscriptions
    Usage-based billing
    Use trial periods
    Set payment methods
    Subscriptions with multiple products
    Set subscription quantities
    Subscription webhooks
    Schedule subscriptions
    Tax
    Sales-led B2B billing
    Integrate with Salesforce
    Manage recurring revenue
    Revenue recognition
    Revenue recovery
    Subscription metrics
    Customer management
    Overview
    Set up the the no-code customer portal
    Set up the customer portal with the API
    Configure the customer portal
    Testing
    Test your integration
    Test clocks
    Strong Customer Authentication (SCA)
    Invoices API updates
Quotes
In-person payments
Multiparty payments
After the payment
Add payment methods
Payment Links
Stripe Checkout
Stripe Elements
About the APIs
Regulation support
Implementation guides
Testing
Billing
·
HomePaymentsSubscriptions

Recurring pricing models

Learn about common pricing models and how to create them.

Pricing models are patterns that represent your business on Stripe. With Product and Price objects, you can model what you sell and how you charge for it.

Flat rate: Good-better-best

Many SaaS businesses offer their customers a choice of escalating service options. This flat-rate pricing model is called good-better-best. Customers choose a service tier (good, better, or best) and pay a flat rate for it.

Imagine a business called Togethere that sells a collaboration platform. They offer three different service levels: basic, starter, and enterprise. For each service level, they offer a monthly and yearly price. Togethere operates in several countries, so they have prices in multiple currencies.

In this example, Togethere has three products: Basic, Starter, Enterprise. Each product has several different prices. The basic level has prices for 10 USD per month and 100 USD per year. Both prices are for the same Basic product, so they share the same product description on the customer’s receipt and invoice.

Here’s what that model looks like on Stripe:

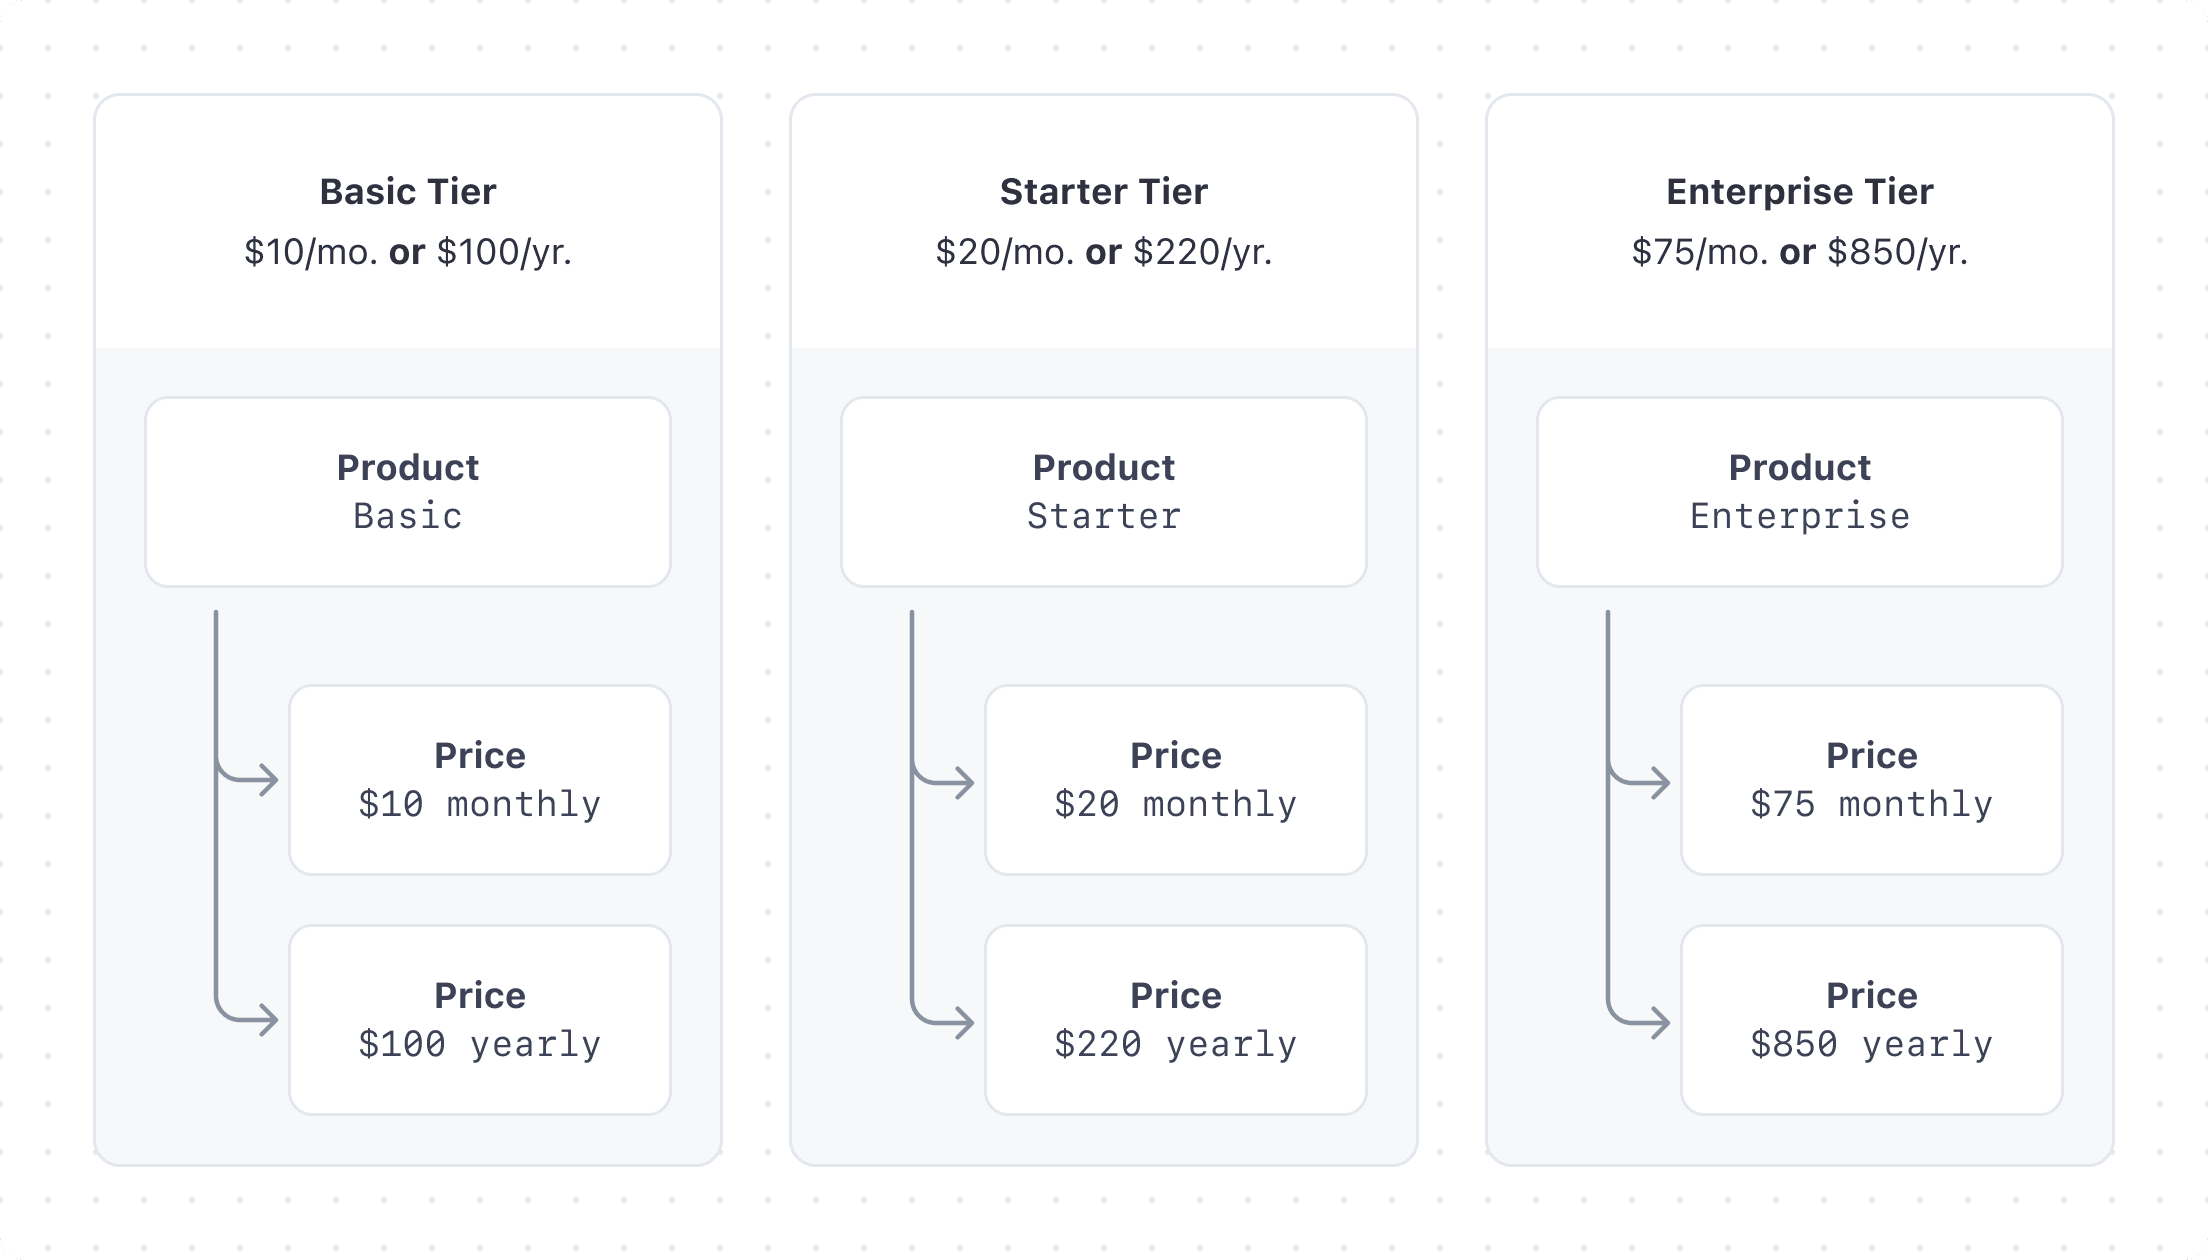
Flat rate: Good-better-best pricing model

Model good-better-best on Stripe

You can type “product.new” into the address bar of any browser to jump straight to the Product Editor.

To create a good-better-best model on Stripe through the Dashboard follow the steps below.

First, create the Basic product. To learn about all the options for creating a product, see the prices guide.

  1. Go to the Products tab.
  2. Click +Add product.
  3. Enter the Name of your product.
  4. (Optional) Add a Description. The description appears at checkout, on the customer portal, and in quotes.

Next, create the monthly price for the Basic product:

  1. Select Standard pricing for the Pricing model, then select Recurring.
  2. Enter the price amount-in this case, 10.00.
  3. Select Monthly for the Billing period.

Then, create the yearly price for the Basic product:

  1. Click + Add another price.
  2. Select Standard pricing for the Pricing model, then select Recurring.
  3. Enter the price amount-in this case, 100.00.
  4. Select Yearly for the Billing period.
  5. Click Save product to save the product and price. You can edit the product and price later.

The subscription integration guide explains how to fit pricing models into a full integration.

  • If you’re using Stripe Checkout, the next step is to create a Checkout session for your site. Make sure to set up Stripe.
  • If you’re using Stripe Elements, the next step is to create a Customer. Make sure you set up Stripe and the sample application.

Per-seat

Togethere, our example collaboration platform company, also wants to offer a per-seat plan. Per-seat pricing is another common offering for SaaS businesses. Togethere’s customers pick how many seats they’ll use, and Togethere charges based on that amount.

To model this scenario, Togethere creates a product and price structure where each unit represents a user. When Togethere creates a subscription for a customer, the customer specifies the number of users for that subscription.

Here’s what that model looks like on Stripe:

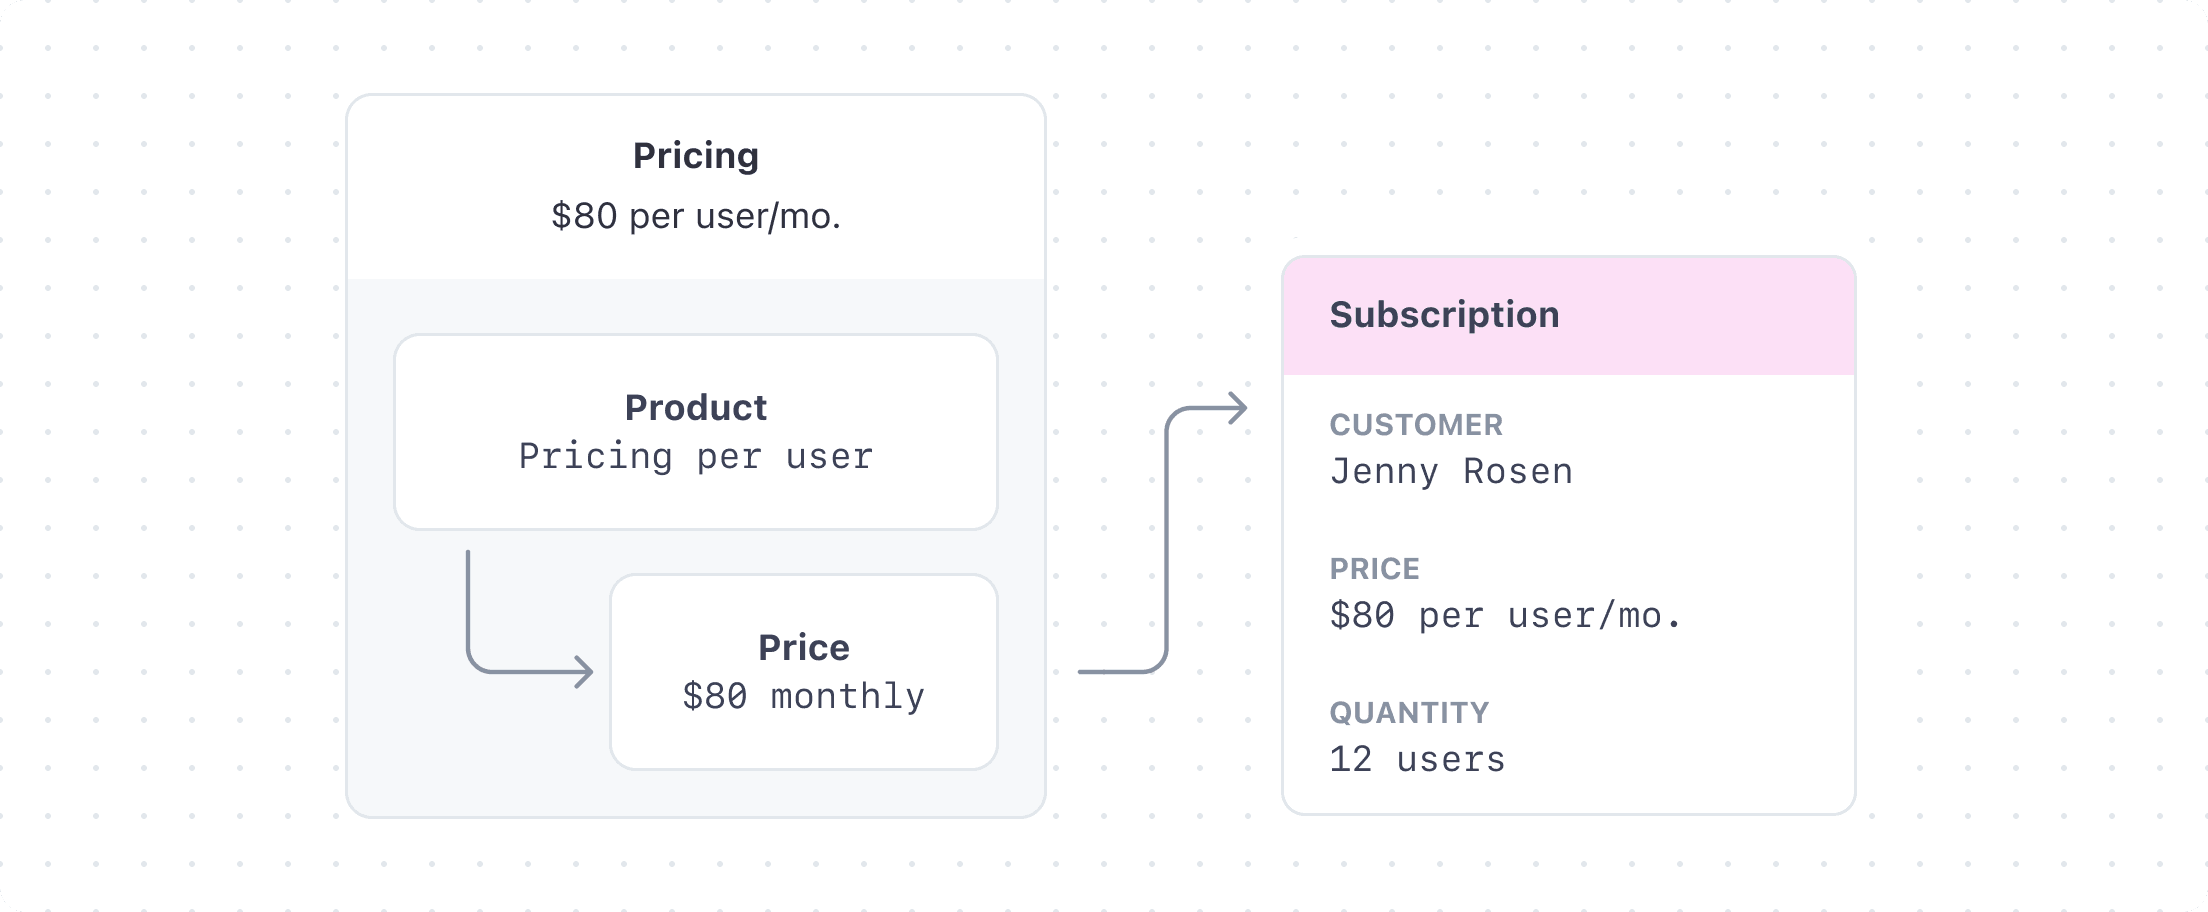
Per-seat pricing model

See the advanced pricing model section for examples of other models. Flat rate and per-seat pricing, where you charge a customer a flat monthly fee in addition to a per-seat rate, is another common model for SaaS businesses.

Model per-seat pricing on Stripe

To create a per-seat model on Stripe through the Dashboard follow the steps below.

First, create the Per-seat product. To learn about all the options for creating a product, see the prices guide.

  1. Go to the Products tab.
  2. Click +Add product.
  3. Enter the Name of the product: Per-seat, in this case.
  4. (Optional) Add a Description. The description appears at checkout, on the customer portal, and in quotes.

Next, create the monthly price for the Per-seat product:

  1. Select Standard pricing for the Pricing model, then select Recurring.
  2. Enter the price amount-in this case, 80.00.
  3. Select Monthly for the Billing period.

To create a subscription using that price:

  1. Go to the Payments > Subscriptions page.
  2. Click + Create subscription.
  3. Find or add a customer.
  4. Search for the Per-seat product you created and select the price you want to use.
  5. (Optional) Select Collect tax automatically to use Stripe Tax.
  6. Click Start subscription to start it immmediately or Schedule subscription to start it on another schedule.

Read the docs to learn all the options for creating a subscription.

The subscription integration guide explains how to fit pricing models into a full integration.

  • If you’re using Stripe Checkout, the next step is to create a Checkout session for your site. Make sure you set up Stripe.
  • If you’re using Stripe Elements, the next step is to create a Customer. Make sure you set up Stripe and the sample application.

For other versions of per-seat pricing, see the advanced models section.

Usage-based pricing

Another common pricing model for SaaS businesses like Togethere is the usage-based model.

To see what an end-to-end integration based on the usage-based pricing model looks like, read the usage-based billing guide.

With the usage-based model, you charge your customers based on how much of your service they use during the billing cycle, instead of explicitly setting quantities, as in the per-seat and flat rate pricing models. (Another difference is that in the per-seat and flat-rate models, you could optionally collect payment for the billing cycle up front. With metered billing, you have to collect payment in arrears.) You must also record and report usage.

Togethere wants to charge on a per-minute basis for usage of their new conferencing service, where more usage drives the per-minute price lower for the customer.

Here’s what that model looks like on Stripe:

Usage-based pricing model

Usage types

For recurring purchases, you define how much to charge customers through usage_types-either licensed or metered.

Licensed usage

Metered usage

Package and standard pricing

In the Dashboard, you can select Standard pricing or Package pricing as pricing models. Both of these models map to the licensed (recurring[usage_type]='licensed') usage type. With both models, you specify the number of units when you create or update a subscription. Here’s how they differ:

  • With Standard pricing, the quantity defaults to 1.
  • With Package pricing, you set the unit amount to values of 2 or more.

Reporting usage

Stripe expects that you maintain your own system for recording customer usage, but you must also provide usage information for subscriptions to Stripe. When you report usage, be aware that:

  • The default value for the action parameter is increment. This value assumes that the price is configured with aggregate_usage=sum and that you write usage as it occurs, passing it to Stripe with the current timestamp.

  • A set value for the action parameter supports the case where you aggregate usage yourself, and configure the price with aggregate_usage=last_during_period or aggregate_usage=last_ever.

Reporting usage outside the current billing interval results in an error. Stripe leaves a 5 minute window in the default aggregation mode (aggregate_usage=sum) after the period ends to allow for clock drift. For all other aggregation modes the timestamp must be within the current period.

Command Line
curl https://api.stripe.com/v1/prices/
{{PRICE_ID}}
\ -u
sk_test_4eC39HqLyjWDarjtT1zdp7dc
: \ -d "migrate_to[price]"="{{MIGRATE_TO_PRICE_ID}}" \ -d "migrate_to[effective_after]"=1684177200 \ -d "migrate_to[behavior]"=at_cycle_end
Command Line
curl https://api.stripe.com/v1/subscription_items/{{SUBSCRIPTION_ITEM_ID}}/usage_records \ -u
sk_test_4eC39HqLyjWDarjtT1zdp7dc
: \ -X POST \ -d quantity=100 \ -d timestamp=1680202413 \ -d action=increment

Using an idempotency key lets you safely re-report usage in the event of intermittent API errors.

At the end of a subscription period, Stripe automatically totals and invoices for all usage during the billing period. Metered billing invoices respect trials. You can’t change the invoice after you submit it. The usage reporting endpoint is rate-limited, so you might need to exercise caution and avoid making too many separate usage records.

When canceling a subscription at the end of the period, a final invoice includes any usage reported before the subscription ends. Canceling a subscription immediately doesn’t bill for any usage accrued during the final billing cycle.

Retrieving current usage

To retrieve total usage for the current period, you can retrieve the upcoming invoice for the subscription. The usage is reflected as the quantity of the invoice item for a subscription_item. The total usage value may not be the most up-to-date quantity because slight processing delays can occur.

Model usage-based pricing on Stripe

The following example shows how to create a metered usage pricing model. In this case, Togethere charges .07 USD per minute.

To create a metered usage pricing model on Stripe through the Dashboard:

First, create the Per-minute pricing product. To learn about all the options for creating a product, see the prices guide.

  1. Go to the Products tab.
  2. Click +Add product.
  3. Enter the Name of the product: Per-minute pricing, in this case.
  4. (Optional) Add a Description. The description appears at checkout, on the customer portal, and in quotes.

Next, create the monthly price for the Per-minute pricing product. Select Graduated pricing for the Pricing model, then select Recurring.

Create three graduated pricing tiers:

First unitLast unitPer unitFlat fee
For the first0600.25 USD0.00 USD
For the next611200.20 USD0.00 USD
For the next121∞0.15 USD0.00 USD

Then, select Monthly for the Billing period and check Usage is metered.

To create a subscription using that price:

  1. Go to the Payments > Subscriptions page.
  2. Click + Create subscription.
  3. Find or add a customer.
  4. Search for the Per-minute pricing product you created and select the price you want to use.
  5. (Optional) Select Collect tax automatically to use Stripe Tax.
  6. Click Start subscription to start it immmediately or Schedule subscription to choose when to start it.

Read the docs to learn all the options for creating a subscription.

The subscription integration guide explains how to fit pricing models into a full integration.

  • If you’re using Stripe Checkout, the next step is to create a Checkout session for your site. Make sure you set up Stripe.
  • If you’re using Stripe Elements, the next step is to create a Customer. Make sure you set up Stripe and the sample application.

For other versions of usage-based pricing, see the advanced models section.

Tiered pricing

Prices can represent tiers, allowing the unit cost to change with quantity or usage. Togethere might, for example, want to offer lower rates for customers who use more projects per month. The following examples show two different ways to adjust pricing as usage increases: volume-based pricing and graduated pricing. To demonstrate these approaches to tiered pricing, we’ll use the following tiers:

Number of projectsPrice per tier
1-57 USD
6-106.50 USD
11+6 USD

Use tiers if you need non-linear pricing when quantity or usage changes. You can also combine tiered pricing with base fees to create more complex pricing models.

When you create a price with billing_scheme=per_unit, the unit_amount is the same regardless of how many units a customer buys. Stripe multiplies this amount by the quantity to determine the total cost. For example, a unit_amount of 5 USD creates this billing structure:

Quantity/Usage at end of periodTotal cost
15 USD
525 USD
630 USD
20100 USD
25125 USD

When you create a price with billing_scheme=tiered, the unit cost varies depending on how many units your customer buys. Here’s an example tier structure:

TierAmount (unit cost)
1-5 (up_to=5)5 USD (unit_amount=500)
6-10 (up_to=10)4 USD (unit_amount=400)
10-15 (up_to=15)3 USD (unit_amount=300)
15-20 (up_to=20)2 USD (unit_amount=200)
20+ (up_to=inf)1 USD (unit_amount=100)

Multiplication happens:

  • At the start of the billing period if the Price objects have recurring.usage_type = licensed.
  • At the end of the billing period if the Price objects have recurring.usage_type = metered.

With tiered billing, you:

  • Set the tiers_mode to either volume or graduated.
  • Create a tiers array to represent the tiers structure.

See also the volume-based and graduated pricing examples.

Volume-based pricing

With volume-based pricing, the subscription item is billed at the tier corresponding to the amount of usage at the end of the period. To implement volume-based billing tiers, set volume as the value of tiers_mode:

Command Line
curl https://api.stripe.com/v1/prices \ -u
sk_test_4eC39HqLyjWDarjtT1zdp7dc
: \ -d nickname="Project Volume Pricing" \ -d "tiers[0][unit_amount]"=700 \ -d "tiers[0][up_to]"=5 \ -d "tiers[1][unit_amount]"=650 \ -d "tiers[1][up_to]"=10 \ -d "tiers[2][unit_amount]"=600 \ -d "tiers[2][up_to]"=inf \ -d currency=usd \ -d "recurring[interval]"=month \ -d "recurring[usage_type]"=metered \ -d product=
{{PRODUCT_ID}}
\ -d tiers_mode=volume \ -d billing_scheme=tiered \ -d "expand[0]"=tiers

Under volume-based pricing, a customer with 5 projects is charged 35 USD at the end of the period: 7 USD for each of the 5 projects. However, if they accumulate 6 projects the following month, then all projects are billed at the 6-10 rate. That month, they’re charged 39 USD (6.50 × 6).

With tiers_mode=volume, the entire quantity is multiplied by the unit cost of the tier.

Quantity/Usage at end of periodTotal for volume tiered pricing
15 USD
525 USD
624 USD
2040 USD
2525 USD

Because the tier price applies to the entire quantity or usage, the total can decrease when calculating the final cost.

Graduated pricing

While similar to volume pricing, graduated pricing charges for the usage in each tier instead of applying a single price to all usage. To use graduated tiers, set the value of tiers_mode to graduated:

Command Line
curl https://api.stripe.com/v1/prices \ -u
sk_test_4eC39HqLyjWDarjtT1zdp7dc
: \ -d nickname="Per-minute pricing" \ -d "tiers[0][unit_amount]"=500 \ -d "tiers[0][up_to]"=5 \ -d "tiers[1][unit_amount]"=400 \ -d "tiers[1][up_to]"=10 \ -d "tiers[2][unit_amount]"=100 \ -d "tiers[2][up_to]"=inf \ -d currency=usd \ -d "recurring[interval]"=month \ -d "recurring[usage_type]"=metered \ -d product=
{{PRODUCT_ID}}
\ -d tiers_mode=graduated \ -d billing_scheme=tiered \ -d "expand[0]"=tiers

With graduated pricing, 5 projects result in the same charge as volume-based pricing—35 USD total at 7 USD per project. This changes as usage breaks out of the first tier. A customer with more than 5 projects is charged 7 USD per project for the first 5 projects, then 6.50 USD for projects 6 through 10, and finally 6 USD per project thereafter. A customer with 6 projects would be charged 41.50 USD, 35 USD for the first 5 projects and 6.50 USD for the 6th project.

With tiers_mode=graduated, the quantity is multiplied by the amount that falls into that tier. Then, the total is summed. For example, the total cost for an amount of 6 is 29 USD: 25 USD for the 5 quantity that falls into the 1–5 tier, plus 4 USD for the single quantity that falls into the 6–10 tier.

Quantity and usage at end of the periodTotal for graduated tiered pricing
15 USD
525 USD
629 USD
2070 USD
2575 USD

Adding flat fees

You can specify a flat fee (flat_amount) to add to the invoice. This works for both tiers_mode=volume and tiers_mode=graduated. For example, you can have a flat fee that increases when certain usage thresholds are met:

TierAmount (unit cost)Flat fee
1-5 (up_to=5)5 USD (unit_amount=500)10 USD (flat_amount=1000)
6-10 (up_to=10)4 USD (unit_amount=400)20 USD (flat_amount=2000)
10-15 (up_to=15)3 USD (unit_amount=300)30 USD (flat_amount=3000)
15-20 (up_to=20)2 USD (unit_amount=200)40 USD (flat_amount=4000)
20+ (up_to=inf)1 USD (unit_amount=100)50 USD (flat_amount=5000)

In this example, if quantity is 12 and tiers_mode=volume, the total amount to be billed is 12 * 3 USD + 30 USD = 66 USD.

If quantity is 12 and tiers_mode=graduated, the total amount is 5 * 5 USD + 10 USD + 5 * 4 USD + 20 USD + 2 * 3 USD + 30 USD = 111 USD. A tier can have either a unit_amount or a flat_amount, or both, but it must have at least one of the two.

If quantity is 0, the total amount is 10 USD regardless of tiers_mode. We always bill the first flat fee tier when quantity=0. To bill 0 when there’s no usage, set up an up_to=1 tier with an unit_amount equal to the flat fee and omit the flat_amount.

Variable pricing

There are two types of variable pricing models:

  • Inline pricing: You define the price for your customer when you create a subscription, invoice, or Checkout Session.
  • Pay-what-you-want pricing: You let the customer define the price when they select a product or service. You can let customers define their own price for when you use Checkout or Payment Links. To learn more, see Let customers decide what to pay.

Inline pricing

In some cases, you might want to use a custom price that hasn’t been preconfigured. For example, you might want to use inline prices when you manage your product catalog outside of Stripe.

You can only create inline prices through the API. Inline prices aren’t compatible with Payment Links.

To create an inline price use case, pass in price_data instead of a price.id when you create a subscription. For example, to subscribe a customer to a monthly subscription with an inline price:

Command Line
curl https://api.stripe.com/v1/subscriptions \ -u
sk_test_4eC39HqLyjWDarjtT1zdp7dc
: \ -d customer=
{{CUSTOMER_ID}}
\ -d "items[0][price_data][unit_amount]"=5000 \ -d "items[0][price_data][currency]"=usd \ -d "items[0][price_data][product]"=
{{PRODUCT_ID}}
\ -d "items[0][price_data][recurring][interval]"=month

This creates a monthly recurring price of 50 USD for the basic service offering. By default, prices created with price_data are effectively archived (they’re marked as active=false) so that they you can’t reuse them for other customers or subscriptions. You can’t update or reuse inline prices after you create them. You can also use price_data with these APIs:

  • Checkout
  • Invoice Items
  • Subscription Schedules

Pay-what-you-want pricing

You can use this feature to collect a tip for a service provided, accept donations for a cause, or give your customers the option to pay what they want for your product or service. Go to Stripe Support to learn more about Stripe’s requirements for accepting tips or donations.

Pay-what-you-want payments have the following limitations:

  • You can’t use promotion codes or discounts with them.
  • They don’t support recurring payments.

Create a product catalog

To create a pay-what-you-want pricing model on Stripe through the Products and Prices APIs:

  1. Create the Fundraising dinner product.
Command Line
curl https://api.stripe.com/v1/products \ -u
sk_test_4eC39HqLyjWDarjtT1zdp7dc
: \ -d name="Fundraising dinner"
  1. Create a price for the customer input. You can optionally specify a preset price, which is the initial amount on the payment page that your customer can update. You can also set a minimum and maximum bound for the price.
Command Line
curl https://api.stripe.com/v1/prices \ -u
sk_test_4eC39HqLyjWDarjtT1zdp7dc
: \ -d currency=usd \ -d "custom_unit_amount[enabled]"=true \ -d product=
{{PRODUCT_ID}}

Create a Checkout Session

To enable customers to change the amount on the payment page, use the price ID when you create a Checkout Session. If you select Customer chooses price as your pricing model, you can’t add any other line items and the quantity can only be 1.

Command Line
curl https://api.stripe.com/v1/checkout/sessions \ -u
sk_test_4eC39HqLyjWDarjtT1zdp7dc
: \ -d cancel_url="https://example.com" \ -d "line_items[0][price]"=
{{PRICE_ID}}
\ -d "line_items[0][quantity]"=1 \ -d mode=payment \ -d success_url="https://example.com"

Multi-currency prices

A single Price can support multiple currencies. This helps you manage localized pricing when selling internationally.

Create multi-currency Prices

You can create multi-currency Prices in the API or the Dashboard.

From the Product details page for a product in your Dashboard, click on + Add another price to create a new price. The first currency on your Price will be the default currency. Make sure all your Prices have the same default currency. After selecting the default currency, click on + Add more currencies to add currency options to your Price.

You can search and select from supported currencies. Stripe suggests an exchange rate based on currency values at 12:00 PM EST, but you can pick your own. For currencies that are subject to larger fluctuations, we recommend adding more of a buffer.

After you’re done filling in the details, click Add price to save it.

Coupons, Promotion Codes, and Shipping Rates also support multi-currency in a similar way to Prices.

Render multi-currency Prices

To show your customer the price in their currency, you can retrieve the multi-currency Price and view its currency_options.<currency>.unit_amount field. The API response won’t include currency_options by default. To include it in the response, expand the currency_options field:

Command Line
curl -G https://api.stripe.com/v1/prices/{{PRICE_ID}} \ -u
sk_test_4eC39HqLyjWDarjtT1zdp7dc
: \ -d "expand[]"=currency_options

To improve latency and avoid problems with rate-limiting, cache the Price instead of re-fetching it every time a customer visits your site.

Use multi-currency Prices

Each purchase uses one of the multi-currency Price’s supported currencies, depending on how you use the Price in your integration.

Checkout automatically determines the customer’s local currency from their IP address, as long as the Price supports that currency. If the customer’s local currency isn’t supported, Checkout uses the Price’s default currency.

If a Checkout Session uses multiple Prices, Coupons, Promotion Codes, or Shipping Rates, then they must all support the customer’s local currency, or else Checkout uses the default currency. They must all have the same default currency, or else Stripe returns an error when you create the Checkout Session.

Alternatively, you can use the currency parameter to explicitly tell Checkout which currency to use.

Learn more about how Checkout handles local currencies.

Migrate from single-currency Prices to multi-currency

If you have an existing single-currency Price, you can retroactively add multiple currencies to it in the Dashboard.

Only the Stripe Dashboard can retroactively add multiple currencies to an existing Price. The Stripe API doesn’t support retroactively adding multiple currencies. If you’re using the API, create a new multi-currency Price from scratch.

After you add a new currency to a Price, the only way to change it is to archive the existing Price and create a new one. Learn more about managing existing prices.

If you use Checkout or Payment Links, then multi-currency Prices take effect automatically. If Stripe detects that the customer’s local currency is supported by the Price, then it automatically uses that currency. If you use multiple Prices, Coupons, Promotion Codes, or Shipping Rates in a single purchase, then they must all support the customer’s local currency, and they must all have the same default currency.

If you’re creating Subscriptions directly, the multi-currency Price(s) won’t take effect until you start passing the currency parameter. If you don’t pass the currency parameter, the Subscription always uses the Price(s)’ default currency.

Multiple prices

Products can use multiple prices to define different pricing options. The product description is shared between prices and appears the same on the customer’s receipt and invoice—only the pricing differs.

As Togethere’s product matures, they begin offering the same product at different price points. Specifically, certain customers are willing to pay for discounted up-front quarterly and yearly subscriptions. Togethere creates a quarterly 57 USD option:

Command Line
curl https://api.stripe.com/v1/prices \ -u
sk_test_4eC39HqLyjWDarjtT1zdp7dc
: \ -d nickname="Standard Quarterly" \ -d product="{{PRODUCT_ID}}" \ -d unit_amount=5700 \ -d currency=usd \ -d "recurring[interval]"=month \ -d "recurring[interval_count]"=3 \ -d "recurring[usage_type]"=licensed

And a yearly 220 USD option:

Command Line
curl https://api.stripe.com/v1/prices \ -u
sk_test_4eC39HqLyjWDarjtT1zdp7dc
: \ -d nickname="Standard Yearly" \ -d product="{{PRODUCT_ID}}" \ -d unit_amount=22000 \ -d currency=usd \ -d "recurring[interval]"=year \ -d "recurring[usage_type]"=licensed

Advanced pricing models

Flat rate and per-seat

You can subscribe the customer to two separate products to model a pricing structure that includes both a base fee and additional per-seat pricing. One product serves as the flat base price and the other product represents the variable per-seat pricing.

Togethere charges a flat monthly rate for their service plus a tiered price for more than 50 users.

Model flat rate and per-seat on Stripe

To model this structure on Stripe, Togethere creates a Product and Price for the base fee:

Command Line
curl https://api.stripe.com/v1/prices \ -u
sk_test_4eC39HqLyjWDarjtT1zdp7dc
: \ -d nickname="Monthly Base Fee" \ -d product="{{BASE_FEE_PRODUCT_ID}}" \ -d unit_amount=500 \ -d currency=usd \ -d "recurring[interval]"=month \ -d "recurring[usage_type]"=licensed

Then they create a monthly price that charges 15 USD per user:

Command Line
curl https://api.stripe.com/v1/prices \ -u
sk_test_4eC39HqLyjWDarjtT1zdp7dc
: \ -d nickname="Per-seat price" \ -d product="{{PRODUCT_ID}}" \ -d unit_amount=1500 \ -d currency=usd \ -d "recurring[interval]"=month \ -d "recurring[usage_type]"=licensed

Here’s how they subscribe a customer with three users to the base fee price and the per-user price:

Command Line
curl https://api.stripe.com/v1/subscriptions \ -u
sk_test_4eC39HqLyjWDarjtT1zdp7dc
: \ -d customer=
{{CUSTOMER_ID}}
\ -d "items[0][price]"="{{BASE_FEE_PRICE_ID}}" \ -d "items[0][quantity]"=1 \ -d "items[1][price]"="{{PER_SEAT_PRICE_ID}}" \ -d "items[1][quantity]"=3

This results in a 50 USD charge every month: the 5 USD base monthly rate, plus 15 USD each for 3 users.

Aggregate metered usage

You can apply the usage-based pricing model in situations where the unit you’re measuring isn’t strictly based on a sum.

For example, Togethere offers a video conferencing service where they charge based on how many minutes the meetings last. Togethere bills their customers at the end of the month based on their usage of the meetings, in addition to the flat monthly fee. Togethere wants to charge for the maximum number of minutes used per customer per month. They can configure this with the aggregate_usage parameter:

Command Line
curl https://api.stripe.com/v1/prices \ -u
sk_test_4eC39HqLyjWDarjtT1zdp7dc
: \ -d nickname="Conferencing service" \ -d product="{{PRODUCT_ID}}" \ -d unit_amount=20000 \ -d currency=usd \ -d "recurring[interval]"=month \ -d "recurring[usage_type]"=metered \ -d "recurring[aggregate_usage]"=max

Imagine that a customer uses 2 minutes on June 1, then uses another minute on June 15. Later, they’re credited for 1 of the first 2 minutes on June 20. The billed amount at the end of the month is .60 USD (2 minutes maximum usage during the month, charging .20 USD per minute).

The aggregate_usage parameter determines how subscriptions handle usage records. Here are the options for that parameter:

  • sum—The default value (passed if you don’t specify the parameter). The total billed is based on the sum of all usage records for the billing period.
  • last_during_period—The total billed is based on the most recent usage record for the billing period. If no usage is reported for the billing period, the total billed is based on a usage quantity of 0.
  • last_ever—The total billed is based on the most recently provided usage record. If no usage is reported during the current billing period, Stripe looks for a previous usage record. If no usage record is found, the total billed is based on a usage quantity of 0.
  • max—The total billed is based on the usage record with the largest usage quantity for the billing period. If no usage is reported for the billing period, the total billed is based on a usage quantity of 0.

Which option you choose depends on how you handle usage on your end. You also set the value of the action parameter of the usage records API to reflect how you record usage.

Command Line
curl https://api.stripe.com/v1/prices \ -u
sk_test_4eC39HqLyjWDarjtT1zdp7dc
: \ -d "currency"="usd" \ -d "recurring[interval]"="month" \ -d "recurring[usage_type]"="metered" \ -d "product_data[name]"="Gold special" \ -d "nickname"="Gold special price" \ -d "unit_amount"=3000

When you create the subscription:

  • Don’t pass quantity.
  • Make sure to record the subscription item ID. You pass this value to the Usage Records API to report usage.

Transforming quantities

Use the transform_quantity option to aggregate usage before multiplying by unit cost. This is useful if you want to report a different quantity or usage before totaling price.

Togethere decides to expand their offerings with a premium streaming service. Streaming can be resource-intensive, so they charge an extra usage fee (another Product) based on the length of the stream. Customers report the exact length of the stream, but Togethere doesn’t want to charge customers by the minute. Instead, Togethere charges for each hour spent streaming-even a partial hour.

First, create the premium streaming product:

Command Line
curl https://api.stripe.com/v1/products \ -u
sk_test_4eC39HqLyjWDarjtT1zdp7dc
: \ -d name="Premium Streaming Service" \ -d unit_label="Hour(s)"

Next, create a price the streaming service product, charging 5 USD an hour and rounding up (to charge for a full hour even if only part of the hour is used):

Command Line
curl https://api.stripe.com/v1/prices \ -u
sk_test_4eC39HqLyjWDarjtT1zdp7dc
: \ -d nickname="Hours Streaming Rate" \ -d unit_amount=500 \ -d currency=usd \ -d "recurring[interval]"=month \ -d "recurring[usage_type]"=metered \ -d product="{{STREAMING_SERVICE_PRODUCT_ID}}" \ -d "transform_quantity[divide_by]"=60 \ -d "transform_quantity[round]"=up

If a customer spends 150 minutes streaming, that customer would be charged 15 USD for 3 hours of streaming (2 hours and 30 minutes, rounded up).

Flat rate with metered usage

You can also combine flat fees with usage-based pricing to charge a flat monthly rate in addition to charging for usage over the billing cycle.

To create a flat rate with a metered usage pricing model on Stripe through the Products and Prices APIs:

  1. Create the Flat monthly fee product.

    Command Line
    curl https://api.stripe.com/v1/products \ -u
    sk_test_4eC39HqLyjWDarjtT1zdp7dc
    : \ -d name=Per-seat
  2. Create a price for the Flat monthly fee product.

    Command Line
    curl https://api.stripe.com/v1/prices \ -u
    sk_test_4eC39HqLyjWDarjtT1zdp7dc
    : \ -d product=
    {{PRODUCT_ID}}
    \ -d unit_amount=1000 \ -d currency=usd \ -d "recurring[interval]"=month
  3. Create the Meeting per minute usage price.

    Command Line
    curl https://api.stripe.com/v1/prices \ -u
    sk_test_4eC39HqLyjWDarjtT1zdp7dc
    : \ -d nickname="Metered Monthly Plan" \ -d product="{{PRODUCT_ID}}" \ -d unit_amount=700 \ -d currency=usd \ -d "recurring[interval]"=month \ -d "recurring[usage_type]"=metered

When you create subscriptions, specify both price IDs:

Command Line
curl https://api.stripe.com/v1/subscriptions \ -u
sk_test_4eC39HqLyjWDarjtT1zdp7dc
: \ -d customer=
{{CUSTOMER_ID}}
\ -d "items[0][price]"="{{FLAT_MONTHLY_FEE_PRICE_ID}}" \ -d "items[0][quantity]"=1 \ -d "items[1][price]"="{{METERED_USAGE_PRICE_ID}}" \ -d "items[1][quantity]"=1

Billing thresholds

Billing cycle anchor

When a threshold is reached, your code controls whether to reset billing cycle anchor, prorating all potential licensed subscriptions accordingly.

Billing thresholds allow you to issue an invoice, and to (optionally) reset a subscription’s billing cycle anchor, when a customer’s accrued usage in a subscription cycle reaches a specified monetary or usage threshold. Consider using billing thresholds if you want to add precautions to limit the amount owed, or to limit the products consumed, between invoices or charges.

Add a monetary threshold to a subscription

You commonly set the amount of a threshold’s value to a multiple of the cost of one unit of the product being sold.

Setting a lower amount threshold causes your customers to receive an invoice for every unit of usage, which can cause confusion.

The value is a positive integer in the smallest currency unit (for example, 100 cents to charge 1 USD; or 100 to charge 100 JPY, a zero-decimal currency). It must be at least 50 currency units.

You can also set monetary thresholds in the Dashboard, when you create or update a subscription.

Command Line
curl https://api.stripe.com/v1/subscriptions/sub_49ty4767H20z6a \ -u
sk_test_4eC39HqLyjWDarjtT1zdp7dc
: \ -d "billing_thresholds[amount_gte]"=10000 \ -d "billing_thresholds[reset_billing_cycle_anchor]"="false"

Add a usage threshold to a subscription item

As with monetary thresholds, usage thresholds should ideally be greater than one unit of usage, to avoid frequent invoicing. Stripe doesn’t currently support setting usage thresholds through the Dashboard.

Command Line
curl https://api.stripe.com/v1/subscription_items/si_CFhSgkWb0MyTWg \ -u
sk_test_4eC39HqLyjWDarjtT1zdp7dc
: \ -d "billing_thresholds[usage_gte]"=2000

Thresholds and billing cycle anchor

When a customer’s usage reaches a threshold, the subscription’s billing cycle anchor won’t change (by default). For example, if a threshold is reached in the middle of a month-long subscription, the subscription resets at the end of the month like a subscription without thresholds.

You can change this behavior so that reaching a threshold resets the billing cycle anchor. Doing this effectively treats reaching a threshold as if the subscription had reached its natural rollover point at the end of the month.

Command Line
curl https://api.stripe.com/v1/subscriptions/sub_49ty4767H20z6a \ -u
sk_test_4eC39HqLyjWDarjtT1zdp7dc
: \ -d "billing_thresholds[reset_billing_cycle_anchor]"="true"

Be aware that reset_billing_cycle_anchor=true isn’t allowed if a metered subscription has aggregate_usage=last_ever.

Thresholds and tiered pricing

Tiers are maintained across threshold invoices. As with a subscription without thresholds, tiers reset only at the end of the billing period, or if you configure the subscription to reset the billing cycle anchor when it reaches a threshold.

For example, let’s say you run an ad platform that has a graduated tiering structure for ad impressions:

TierAmount (unit cost)
1-10000 (up_to=10000)0.50 USD (unit_amount=50)
10000+ (up_to=inf)0.40 USD (unit_amount=40)

Because usage is billed after the fact, you set a threshold of 100 USD as a stopgap for new customers. Under this scheme, your customer is effectively billed every 200 impressions for the first 10,000 impressions (200 * 0.50 USD = 100 USD). When the customer exceeds 10,000 impressions, they’re effectively billed every 250 impressions (250 * 0.40 USD = 100 USD). This continues until the end of the billing period, at which point all un-invoiced usage are invoiced, and the subscription and tiers reset.

If you prefer that tiers reset upon reaching a threshold, you must configure the subscription to reset the billing cycle anchor when usage reaches the thresholds that you set.

Volume tiers

Volume tiers define the pricing for all units of usage, as opposed to graduated tiers, which define pricing for a specific amount of usage. Some pricing models use volume tiers that decrease the unit cost at each successive tier. You can use such models to incentivize customers to use more of a product (for example, ad impressions, or GB of storage).

When combined with thresholds, these pricing models can lead to invoices with line items for negative amounts, under the following conditions:

  1. A threshold invoice has already been issued.
  2. Subsequent usage bills at a lower unit cost.

For example, with these tiers:

TierAmount (unit cost)
1-10000 (up_to=10000)0.50 USD (unit_amount=50)
10000+ (up_to=inf)0.40 USD (unit_amount=40)

If a customer uses 10,000 units, the invoice total is 5,000 USD (10,000 * 0.50 USD = 5,000 USD). Any additional usage causes all usage to bill at the lower unit cost of 0.40 USD. So, if the customer uses just one more unit, the invoice total drops to 4,000.40 USD (10,001 * 0.40 USD = 4,000.40 USD).

If the subscription didn’t have thresholds, Stripe would issue an invoice for 4,000.40 USD at the end of the billing period.

However, to see how negative invoicing can happen, assume that we have a 5,000 USD monetary threshold in place. In this scenario, Stripe issues an invoice when the customer reaches 10,000 units of usage.

If the customer uses just one more unit, the invoice total drops to 4,000.40 USD (10,001 * 0.40 USD = 4,000.40 USD). However, if the customer consumes no more units, then they’re owed 999.60 USD (5,000 USD - 4,000.40 USD = 999.60 USD). At the end of the billing period, Stripe credits this amount to the customer’s balance, which is used to pay down future invoices.

Let’s say the customer continues to accrue usage. The cost of this usage reaches 5,000 USD again when the customer has used 12,500 units (5,000 USD / 0.40 USD = 12,500). However, the previous payment of 5,000 USD covers all of this usage, so no invoice is issued.

Stripe won’t issue an invoice until either the total usage reaches 25,000 units (for a total cost of 10,000 USD), or the end of the billing period arrives—whichever occurs first. The tables below show the line items you should expect to see for the two invoices issued in the case where usage reaches 25,000 units.

Invoice 1

Line ItemQuantityAmount
Usage (0.50 USD per unit)10,0005,000 USD
Total5,000 USD

Invoice 2

Line ItemQuantityAmount
Usage (0.40 USD per unit)25,00010,000 USD
Amount previously billed (at 0.50 USD per unit)-5,000 USD
Total5,000 USD

Limitations and caveats

  • Thresholds don’t apply to trial subscriptions.
  • Monetary thresholds must be greater than the sum of any flat fees on metered subscription items.
  • Billing thresholds aren’t evaluated during the 24 hours leading up to the end of a subscription. This helps limit confusion for a customer who receives multiple invoices on the same date.
  • Subscriptions are only allowed a single monetary threshold.
  • Subscription items are only allowed a single usage threshold.
  • Given the real-time nature of usage reporting, invoices might not be issued at the exact moment a specified threshold is reached. Invoiced amounts or usage might be slightly higher than the specified thresholds.
  • The value used to determine whether a monetary threshold has been reached excludes taxes, but includes discounts and applicable prorations.
  • If a subscription uses the last_ever aggregation mode, you can’t enable the reset_billing_anchor option.

Decimal amounts

Decimal pricing is useful if you need to create pricing amounts that aren’t whole numbers. For example, if you’re running a cloud storage SaaS business, you can create a price that charges 0.05 cents for each MB used per month. Based on usage, the quantity of MB is then multiplied by 0.05 cents and rounded to the nearest whole cent.

Creating objects with decimal amounts

To create prices with decimal amounts, specify unit_amount_decimal instead of unit_amount. unit_amount_decimal allows you to set the amount in the minor unit of the currency that you charge in. For example, you can set unit_amount_decimal = 105.5 in USD to represent 105.5 cents, or 1.055 USD. unit_amount_decimal accepts decimals up to 12 decimal places.

If you plan to use tiers, you can specify unit_amount_decimal instead of unit_amount. You can also create invoice items with unit_amount_decimal instead of unit_amount.

In API responses, the integer unit_amount field isn’t populated if the object is created with a decimal value. For example, if you create a price with unit_amount_decimal = 0.05, the response contains unit_amount = null and unit_amount_decimal = 0.05. You can still pass integer values into unit_amount_decimal, in which case unit_amount is populated in the response. For instance, if you create a price with unit_amount_decimal = 5, the response contains unit_amount = 5 and unit_amount_decimal = 5.0.

If your integration has event handling that uses unit_amount values and you begin using decimal amounts, you need to use unit_amount_decimal instead. This is important because unit_amount will be returned as null if the decimal amounts can’t be converted into integers, which could cause errors in your integration.

Display pricing information

After creating your pricing structures, you can embed a pricing table on your website to display pricing information to your customers. When customers choose a subscription option, they’re taken directly to checkout. Configure, customize, and update directly in the Dashboard without writing any code.

Was this page helpful?
Need help? Contact Support.
Watch our developer tutorials.
Check out our product changelog.
Questions? Contact Sales.
Powered by Markdoc
You can unsubscribe at any time. Read our privacy policy.
On this page
Flat rate: Good-better-best
Per-seat
Usage-based pricing
Tiered pricing
Variable pricing
Multi-currency prices
Multiple prices
Advanced pricing models
Display pricing information
Stripe Shell
Test mode
Welcome to the Stripe Shell! Stripe Shell is a browser-based shell with the Stripe CLI pre-installed. Login to your Stripe account and press Control + Backtick on your keyboard to start managing your Stripe resources in test mode. - View supported Stripe commands: - Find webhook events: - Listen for webhook events: - Call Stripe APIs: stripe [api resource] [operation] (e.g. )
The Stripe Shell is best experienced on desktop.
$