Stripe Connector for Salesforce B2C Commerce implementation guide
Set up Business Manager
The Stripe Connector for Salesforce B2C Commerce (LINK Cartridge) requires several cartridges for full functionality. Additionally, controller and SFRA support is broken out into two separate cartridges, thereby facilitating the installation and use of one or the other models.
Import all three cartridges into UX studio and associate them with a Server Connection.
Site cartridge assignment
- Navigate to Administration > Sites > Manage Sites.
- Click the site name for the storefront site you want to add Stripe functionality to.
- Select the Settings tab.
- For Storefront Reference Architecture (SFRA), add
app_to the cartridge path.stripe_ sfra:int_ stripe_ sfra:int_ stripe_ core
Repeat these steps for each storefront site where you want to implement Stripe.
Business Manager cartridge assignment
- Navigate to Administration > Sites > Manage Sites.
- Click the Business Manager Site and then the Manage the Business Manager site link.
- Add
int_to the cartridge path.stripe_ core
Metadata import
- Navigate to the metadata folder of the project and open the
stripe_folder.site_ template - Open the
sitesfolder and edit thesiteIDHerefolder to the site ID of the site you want. - Add a folder for each site you want Stripe on.
- Navigate to Administration > Site Development > Site Import & Export.
- Compress the
stripe_folder into a zip file and import it.site_ template
Build Stripe styling
If necessary, update the path to your base SFRA installation in package. from the same root folder.
Normally, there’s a top-level project folder in which the repositories of the SFRA base cartridge and all required plugins, libraries, and any other LINK cartridges are cloned. If you cloned the Stripe cartridge into that folder as well, you don’t need to update the paths. property. If you haven’t cloned the cartridge into that folder, update the paths. property in package. with the relative path to the local directory containing the Storefront Reference Architecture repository. The following is the default paths. value:
"paths": {
  "base": "../storefront-reference-architecture/cartridges/app_storefront_base/"
}
After you’re certain package. has the correct path to SFRA cartridges, run the npm run compile:scss command from the root folder of the Stripe repository.
Add new payment processors
There are two payment processors used in the Stripe cartridge. STRIPE_ handles credit card payments only, while STRIPE_ handles payment methods through Payment Element and Express Checkout Element.
Credit payment processor
- Navigate to Merchant Tools > Ordering > Payment Processors and click New.
- In the new window, set the ID to
STRIPE_and click Apply.CREDIT
APM payment processor
- Navigate to Merchant Tools > Ordering > Payment Processors and click New.
- In the new window, set the ID attribute to value
STRIPE_and click Apply.APM
Update payment methods
Navigate to Merchant Tools > Ordering > Payment Methods, click the CREDIT_CARD payment method, and select the STRIPE_CREDIT payment processor in the dropdown under the CREDIT_CARD details section.
For dynamic payment methods or the Payment Request Button, enable STRIPE_APM_METHODS to include payment methods supported by Stripe. See the payment methods guide for more details.
To utilize the Stripe Payment Request Button, enable the STRIPE_PAYMENT_REQUEST_BTN payment method. Refer to payment request button for more details.
Install the Stripe Salesforce Commerce app
Use Stripe Apps to bolster security and simplify the use of distinct restricted keys for each integration with your Stripe account. The process of installing the Stripe App and acquiring the newly generated secret and publishable keys is essential for your integration with the Salesforce Commerce connector. This approach eliminates the need to manually create your own restricted key or use a secret key. To integrate the Salesforce Commerce app and reinforce your account’s security infrastructure:
- Navigate to the Stripe App Marketplace, then click Install the Salesforce Commerce app.
- Select the Stripe account where you want to install the app.
- Review and approve the app permissions, install the app in test mode or live mode, then click Install.
- After you install the app, store the keys in a safe place where you won’t lose them. To help yourself remember where you stored it, you can leave a note on the key in the Dashboard.
- Use the newly generated publishable key and secret key to finish the Connector configuration.
- To manage the app or generate new security keys after installation, navigate to the application settings page in test mode or live mode.
Configuration
Update Merchant Tools > Site Preferences > Custom Site Preferences > Stripe Configurations with site-specific values.
Populate Stripe secret API key with the values from the Stripe Salesforce Commerce app.
Populate publishable API key with the values from the Stripe Salesforce Commerce app.
Is this SFRA installation: Set to
yesif the current site is using SFRA.Capture Funds on Stripe Charge: The default value is
true(Yes). Set tofalse(No) to authorize Stripe charges instead.Stripe card element CSS style: Set the CSS styling that the card element button inherits to fit within the overall storefront styles (for example,
{"base": {"fontFamily": "Arial, sans-serif","fontSize": "14px","color": "#C1C7CD"},"invalid": {"color": "red" } }).Stripe API URL:
https://js.stripe. com/v3/ Stripe Payment Request Button Style: For the payment request button, select the limited CSS styling for the button. Refer to styling the element for more details.
Apple Pay Verification String: Enter the Apple verification string provided from the Stripe Dashboard. This is a one-time enablement. The Stripe console proxies the Apple Pay for a web verification string upon setup. Configure this in the sandbox if using the Payment Request Button as a form of payment on the storefront.
Country Code (Stripe Payment Request Button): This is the default country code (for example, US) for the Payment Request Button. You might need to customize on a multi-country single site in order to dynamically pass the country code rather than the site preference. Refer to creating a payment request instance for more details.
Stripe webhook signing secret: Enter the webhook signing secret provided by the Stripe Dashboard. Stripe signs webhook events and passes a validation to SFCC. SFCC validates the contents of the message using this secret.
Stripe Allowed Webhook Statuses: Configure the allowed statuses for webhooks to respond to.

Stripe Enabled: Enables or disables the cartridge.
Stripe Quick Setup
Alternatively, you can configure Stripe in Business Manager using Stripe Quick Setup
- Log in to your Business Manager.
- Search for “Stripe Quick Setup” within Business Manager under Administration.
- Select the sites that you want to configure Stripe for.
- Enter your
Stripe Publishable KeyandRestricted Access keyretrieved from the Stripe Salesforce Commerce app. - Click Quick Setup.
Set up Apple Pay
For Apple Pay:
Update RedirectURL.:
server.extend(page);

server.replace('Start', function (req, res, next) {
  const URLRedirectMgr = require('dw/web/URLRedirectMgr');

  // Intercept the incoming path request
  if (URLRedirectMgr.getRedirectOrigin() === '/.well-known/apple-developer-merchantid-domain-association') {
    res.render('stripe/util/apple');
    return next();
  }

  const redirect = URLRedirectMgr.redirect;
  const location = redirect ? redirect.location : null;
  const redirectStatus = redirect ? redirect.getStatus() : null;

  if (!location) {
    res.setStatusCode(404);
    res.render('error/notFound');
  } else {
    if (redirectStatus) {
      res.setRedirectStatus(redirectStatus);
    }
    res.redirect(location);
  }

  return next();
});
Set up an alias to one of the sites on the sandbox temporarily so that the domain can be verified in the Stripe Dashboard. The alias needs to be something like this:
{
  "__version": "1",
    "settings": {
      "http-host": "your.sandbox.domain.demandware.net",
      "https-host": "your.sandbox.domain.demandware.net",
      "default": "true",
      "site-path": "/",
  },
  "your.sandbox.domain.demandware.net": [
    {
      "locale": "en_GB",
      "if-site-path": "/",
    }
  ]
}
The locale value needs to be a locale that isn’t disabled.
- On the Payment method domains page, click Add a new domain.
- Enter your domain name.
- Click Save and continue.
- Download the domain association file.
- Host the file at
/.. For example, if you registerwell-known/apple-developer-merchantid-domain-association https://example., make that file available atcom https://example..com/. well-known/apple-developer-merchantid-domain-association - Click Verify.
Update storefront code
The base LINK cartridge code contains support for all credit cards supported by Stripe. The list of allowed cards on the storefront is still limited by the Credit/Debit Cards list in Business Manager (Merchant Tools > Ordering > Payment Methods > Credit/Debit Cards).
Make the following updates to the Storefront Code. Examples provided are based on SFRA version 4.4. The following sections detail the customizations made to SFRA code.
There are many controller endpoints that are appends instead of replaces. Those aren’t covered as they should work without doing anything.
Controller updates are only required for replaced endpoints, as you might have already replaced that endpoint in your integration. Use the changes made to the base cartridge and add them to your already replaced controller. If you haven’t extended/replaced these endpoints, you don’t need to do anything.
Controller: CheckoutServices.js
Path: app_
Remove the payment instrument validation in the SubmitPayment endpoint:
if (!paymentMethodID && currentBasket.totalGrossPrice.value > 0) {
  const noPaymentMethod = {};

  noPaymentMethod[billingData.paymentMethod.htmlName] = Resource.msg(
    'error.no.selected.payment.method',
    'payment',
    null
  );

  delete billingData.paymentInformation;
  res.json({
    form: billingForm,
    fieldErrors: [noPaymentMethod],
    serverErrors: [],
    error: true
  });
  return;
}

// Validate payment instrument
const creditCardPaymentMethod = PaymentMgr.getPaymentMethod(PaymentInstrument.METHOD_CREDIT_CARD);
const paymentCard = PaymentMgr.getPaymentCard(billingData.paymentInformation.cardType.value);

const applicablePaymentCards = creditCardPaymentMethod.getApplicablePaymentCards(
  req.currentCustomer.raw,
  req.geolocation.countryCode,
  null
);

if (!applicablePaymentCards.contains(paymentCard)) {
  // Invalid payment instrument
  const invalidPaymentMethod = Resource.msg('error.payment.not.valid', 'checkout', null);
  delete billingData.paymentInformation;
  res.json({
    form: billingForm,
    fieldErrors: [],
    serverErrors: [invalidPaymentMethod],
    error: true
  });
  return;
}
Update the order creation code:
// Re-calculate the payments
const calculatedPaymentTransactionTotal = COHelpers.calculatePaymentTransaction(currentBasket);
if (calculatedPaymentTransactionTotal.error) {
  res.json({
      error: true,
      errorMessage: Resource.msg('error.technical', 'checkout', null);
  });
  return next();
}
const stripeCheckoutHelper = require('int_stripe_core').getCheckoutHelper();
const order = stripeCheckoutHelper.createOrder(currentBasket);

if (!order) {
  res.json({
    error: true,
    errorMessage: Resource.msg('error.technical', 'checkout', null);
  });
  return next();
}
Update the order placement code:
var isAPMOrder = stripeCheckoutHelper.isAPMORder(order);

if (!isAPMOrder) {
  var stripePaymentInstrument = stripeCheckoutHelper.getStripePaymentInstrument(order);

  if (stripePaymentInstrument && order.custom.stripeIsPaymentIntentInReview) {
    res.json({
      error: false,
      orderID: order.orderNo,
      orderToken: order.orderToken,
      continueUrl: URLUtils.url('Order-Confirm').toString()
    });

    return next();
  }
  // Places the order
  var placeOrderResult = COHelpers.placeOrder(order, fraudDetectionStatus);

  if(placeOrderResult.error) {
    stripeCheckoutHelper.refundCharge(order);
    res.json({
      error: true,
      errorMessage: Resource.msg('error.technical', 'checkout', null)
    });
  const fraudDetectionStatus = hooksHelper(
    'app.fraud.detection',
    'fraudDetection',
    currentBasket,
    require('*/cartridge/scripts/hooks/fraudDetection').fraudDetection
  );

  if (fraudDetectionStatus.status === 'fail') {
    Transaction.wrap(function () {
      OrderMgr.failOrder(order);
    });

    // Fraud detection failed
    req.session.privacyCache.set('fraudDetectionStatus', true);

    res.json({
      error: true,
      cartError: true,
      redirectUrl: URLUtils.url('Error-ErrorCode', 'err', fraudDetectionStatus.errorCode).toString(),
      errorMessage: Resource.msg('error.technical', 'checkout', null);
    });
    return next();
  }
  COHelpers.sendConfirmationEmail(order, req.locale.id);

  // Reset usingMultiShip after successful Order placement
  req.session.privacyCache.set('usingMultiShip', false);

  res.json({
    error: false,
    orderID: order.orderNo,
    orderToken: order.orderToken,
    continueUrl: URLUtils.url('Order-Confirm').toString()
  });

  return next();
}
Controller: PaymentInstruments.js
Path: app_
Replace the DeletePayment endpoint with the following code:
server.replace('DeletePayment', function(req, res, next) {
  var stripeHelper = require ('int_stripe_core').getStripeHelper();
  var wallet = stripeHelper.getStripeWallet(customer);
  var UUID = req.querystring.UUID;
  wallet.removePaymentInstrument({ custom: { stripeId: UUID }});

  res.json({  UUID: UUID });
  next();
});
Controller: RedirectURL.js
Path: app_
Add the following code to the Start function:
server.replace('Start', function (req, res, next) {
  const URLRedirectMgr = require('dw/web/URLRedirectMgr');

  // Intercept the incoming path request
  if (URLRedirectMgr.getRedirectOrigin() === '/.well-known/apple-developer-merchantid-domain-association') {
    res.render('stripe/util/apple');
    return next();
  }

  const redirect = URLRedirectMgr.redirect;
  const location = redirect ? redirect.location : null;
  const redirectStatus = redirect ? redirect.getStatus() : null;

  if (!location) {
    res.setStatusCode(404);
    res.render('error/notFound');
  } else {
    if (redirectStatus) {
      res.setRedirectStatus(redirectStatus);
    }
    res.redirect(location);
  }

  return next();
});
External interfaces
Stripe functionality relies heavily on external calls to Stripe services. All external interfaces use the service framework to communicate with the Stripe API.
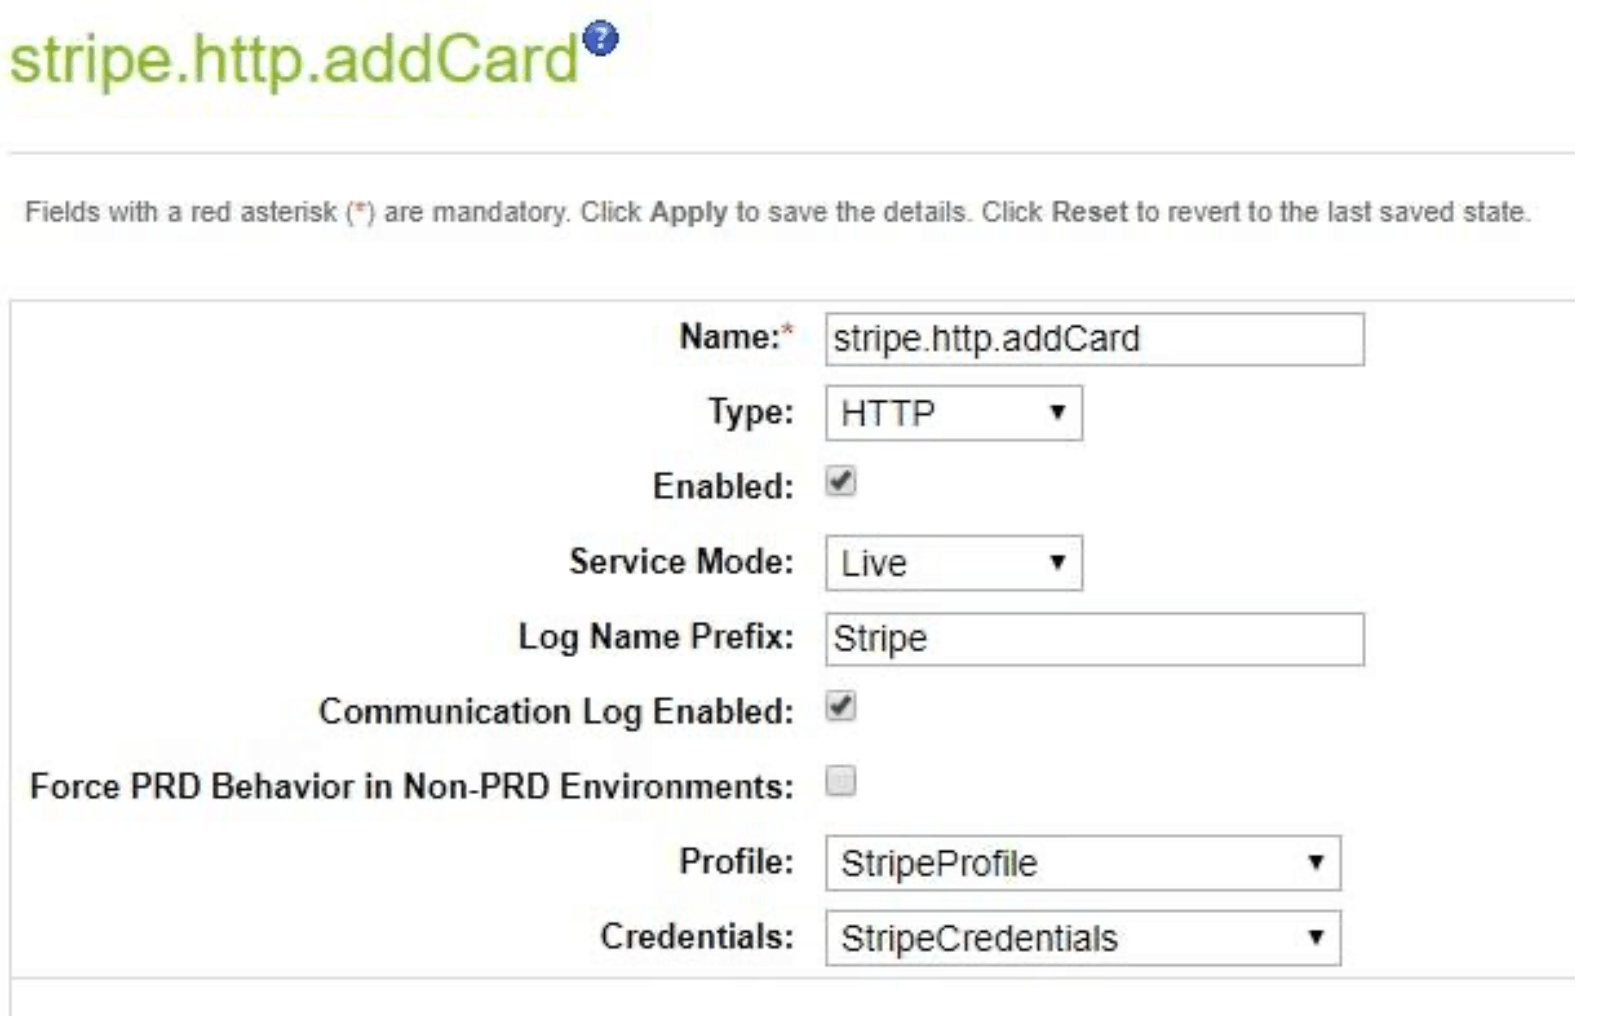
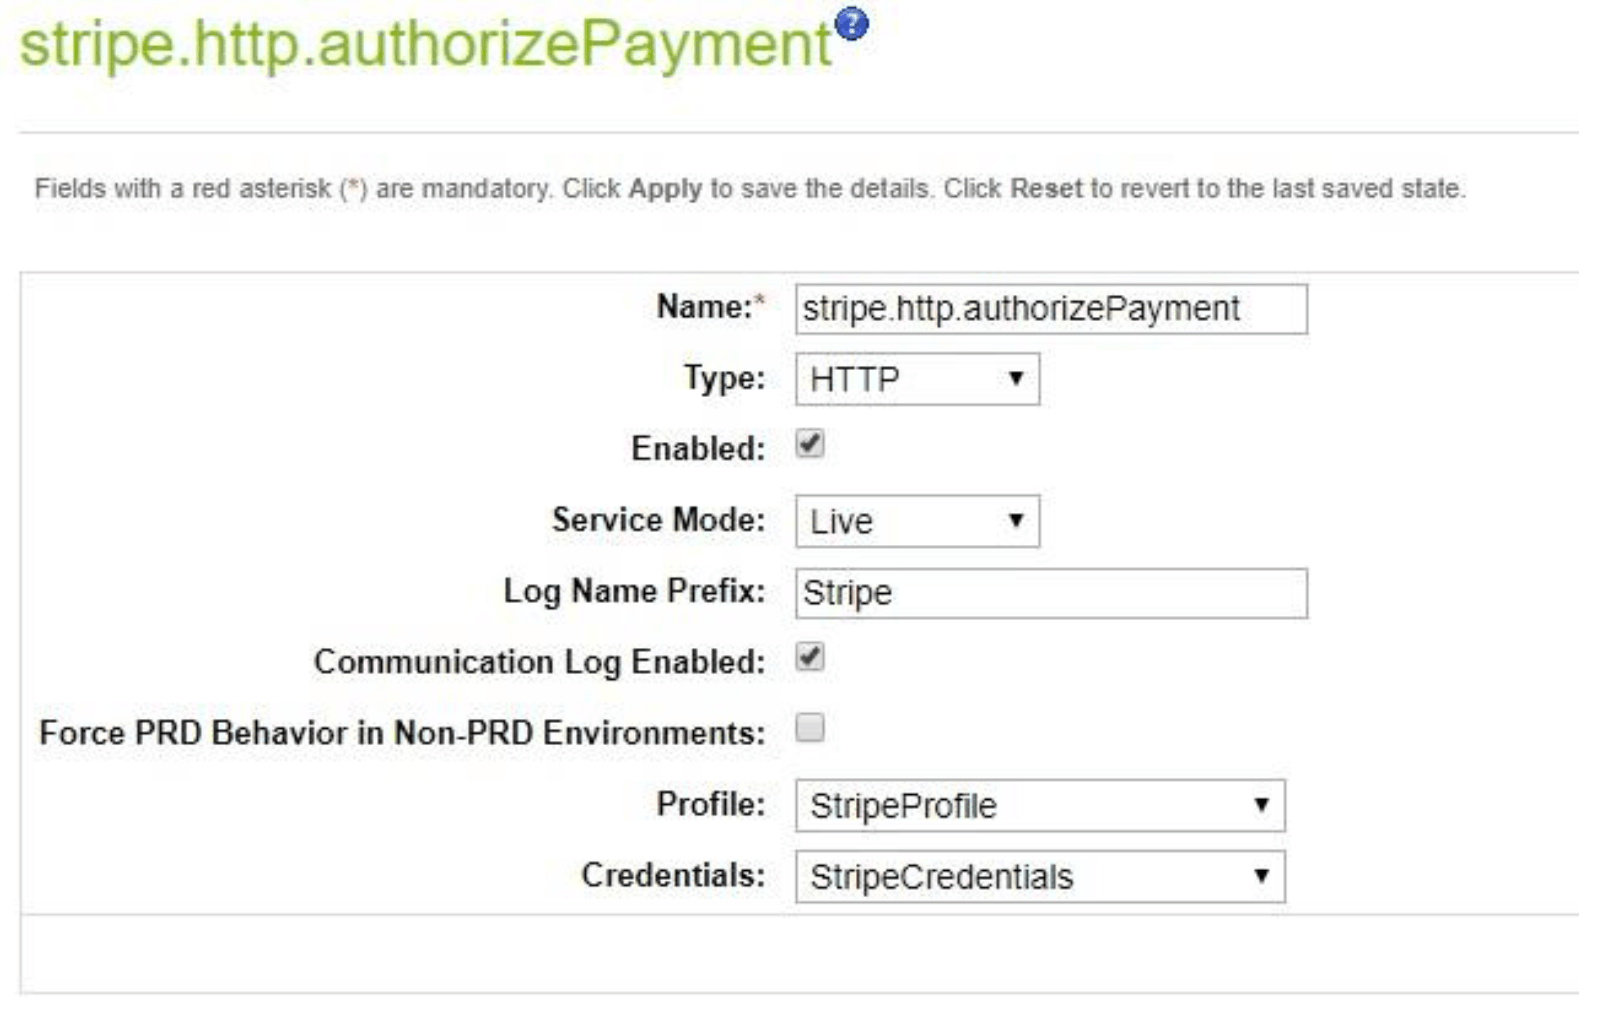
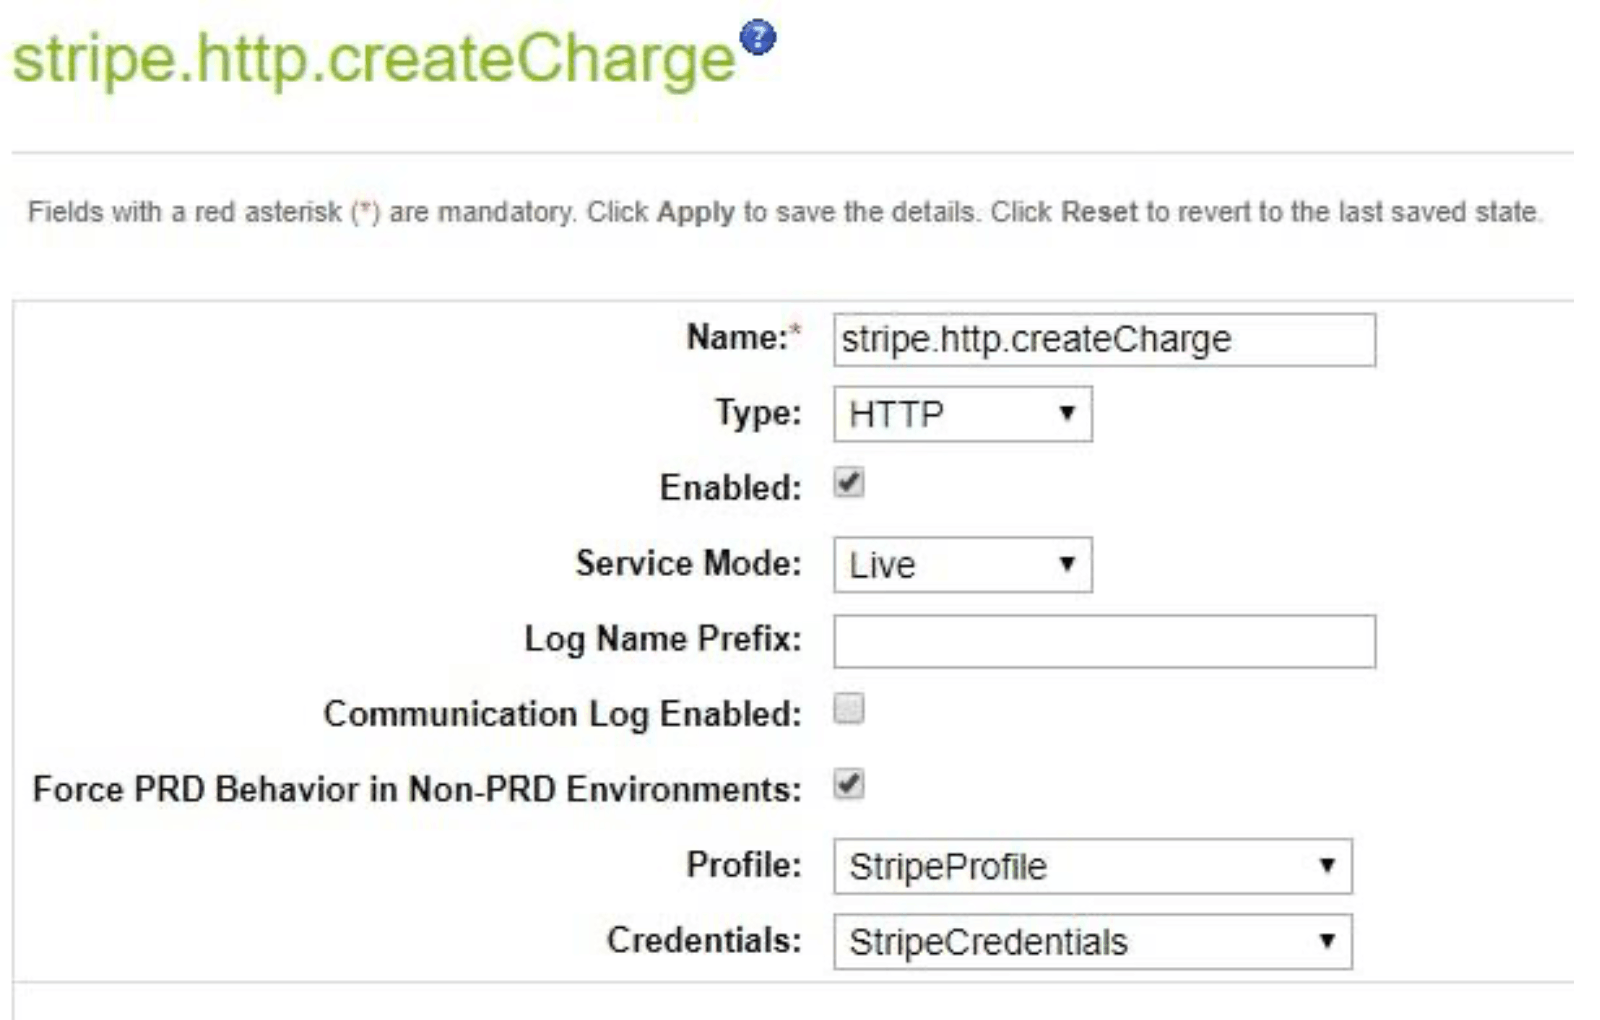
Stripe accounts are free to create and use. Most communications with Stripe services are logged and accessible in the Stripe Dashboard. We encourage you to use the Stripe Dashboard to monitor and test your integration. You can find the main configuration for integration of the Stripe services under Administration > Operations > Services with a different service for each external call:
stripe.http. addCard stripe.http. authorizePayment stripe.http. createCharge stripe.http. createCustomer stripe.http. deleteCard stripe.http. fetchCustomerCards stripe.http. fetchCustomerSources stripe.http. refundCharge stripe.http. retrieveCustomer stripe.http. service stripe.http. updateCard
All of these services use the same profile and the same credentials. The only thing that may be different is whether or not the communication log is enabled and the log name prefix. Here is the configuration of some of the services:
Stripe Payment Element
Stripe cartridge supports Stripe Payment Element as a payment method.
The Payment Element is an embedded UI component that lets you accept up to 25+ payment methods with a single integration.

To enable the Payment Element, navigate to Business Manager > Merchant Tools > Ordering > Payment Methods and enable the payment method with ID set to STRIPE_. In storefront Checkout > Payment, there is a widget with all payment methods enabled in the Stripe Dashboard.
When you enable Payment Element in Business Manager, it can replace all other payment methods. You can disable all payment methods and use STRIPE_ instead.
To enable saving of payment methods for future use from Stripe Payment Element, navigate to Business Manager > Custom Preferences > Stripe Configs and set Stripe Payment Element: Enable Save Payment Method for Future Purchases to Yes.
To display a list of saved payment methods in checkout, navigate to Business Manager > Payments Methods and enable the CREDIT_ payment method. When it’s enabled with STRIPE_, the credit card tab includes a list saved cards (if any).
Stripe Radar insights display
Stripe LINK cartridge supports Radar insights view to showcase risk insights within the Orders section of Business Manager. Radar provides real-time fraud protection and requires no additional development time. Fraud professionals can add Radar for Fraud Teams to customize protection and get deeper insights.
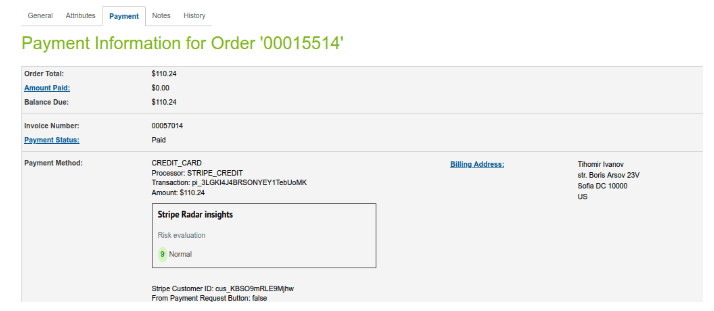
To enable the insights display, navigate to Business Manager > Merchant Tools > Custom Preferences > Stripe Configs and set Risk Score Data to Yes.
