This integration requires endpoints on your server that talk to the Stripe API. Use the official libraries for access to the Stripe API from your server:
plugins {id("com.android.application")}
android {...}
dependencies {// ...// Stripe Android SDKimplementation("com.stripe:stripe-android:21.7.1")// Include the financial connections SDK to support US bank account as a payment methodimplementation("com.stripe:financial-connections:21.7.1")}
Note
For details on the latest SDK release and past versions, see the Releases page on GitHub. To receive notifications when a new release is published, watch releases for the repository.
View your payment methods settings and enable the payment methods you want to support. You need at least one payment method enabled to create a PaymentIntent.
By default, Stripe enables cards and other prevalent payment methods that can help you reach more customers, but we recommend turning on additional payment methods that are relevant for your business and customers. See Payment method support for product and payment method support, and our pricing page for fees.
PaymentIntent: Stripe uses this to represent your intent to collect payment from a customer, tracking your charge attempts and payment state changes throughout the process.
(Optional) Customer: To set up a payment method for future payments, you must attach it to a Customer. Create a Customer object when your customer creates an account with your business. If your customer is making a payment as a guest, you can create a Customer object before payment and associate it with your own internal representation of the customer’s account later.
(Optional) Customer Ephemeral Key: Information on the Customer object is sensitive, and can’t be retrieved directly from an app. An Ephemeral Key grants the SDK temporary access to the Customer.
Note
If you never save cards to a Customer and don’t allow returning Customers to reuse saved cards, you can omit the Customer and Customer Ephemeral Key objects from your integration.
For security reasons, your app can’t create these objects. Instead, add an endpoint on your server that:
Retrieves the Customer, or creates a new one.
Creates an Ephemeral Key for the Customer.
Creates a PaymentIntent with the amount, currency, and customer. You can also optionally include the automatic_payment_methods parameter. Stripe enables its functionality by default in the latest version of the API.
Returns the Payment Intent’s client secret, the Ephemeral Key’s secret, the Customer’s id, and your publishable key to your app.
The payment methods shown to customers during the checkout process are also included on the PaymentIntent. You can let Stripe pull payment methods from your Dashboard settings or you can list them manually. Regardless of the option you choose, know that the currency passed in the PaymentIntent filters the payment methods shown to the customer. For example, if you pass eur on the PaymentIntent and have OXXO enabled in the Dashboard, OXXO won’t be shown to the customer because OXXO doesn’t support eur payments.
Unless your integration requires a code-based option for offering payment methods, Stripe recommends the automated option. This is because Stripe evaluates the currency, payment method restrictions, and other parameters to determine the list of supported payment methods. Payment methods that increase conversion and that are most relevant to the currency and customer’s location are prioritized.
Note
Test a running implementation of this endpoint on Glitch.
You can manage payment methods from the Dashboard. Stripe handles the return of eligible payment methods based on factors such as the transaction’s amount, currency, and payment flow. The PaymentIntent is created using the payment methods you configured in the Dashboard. If you don’t want to use the Dashboard or if you want to specify payment methods manually, you can list them using the payment_method_types attribute.
: \ -X"POST"\ -d"customer"="{{CUSTOMER_ID}}"\ -d"amount"=1099\ -d"currency"="eur"\# In the latest version of the API, specifying the `automatic_payment_methods` parameter# is optional because Stripe enables its functionality by default. -d"automatic_payment_methods[enabled]"=true \
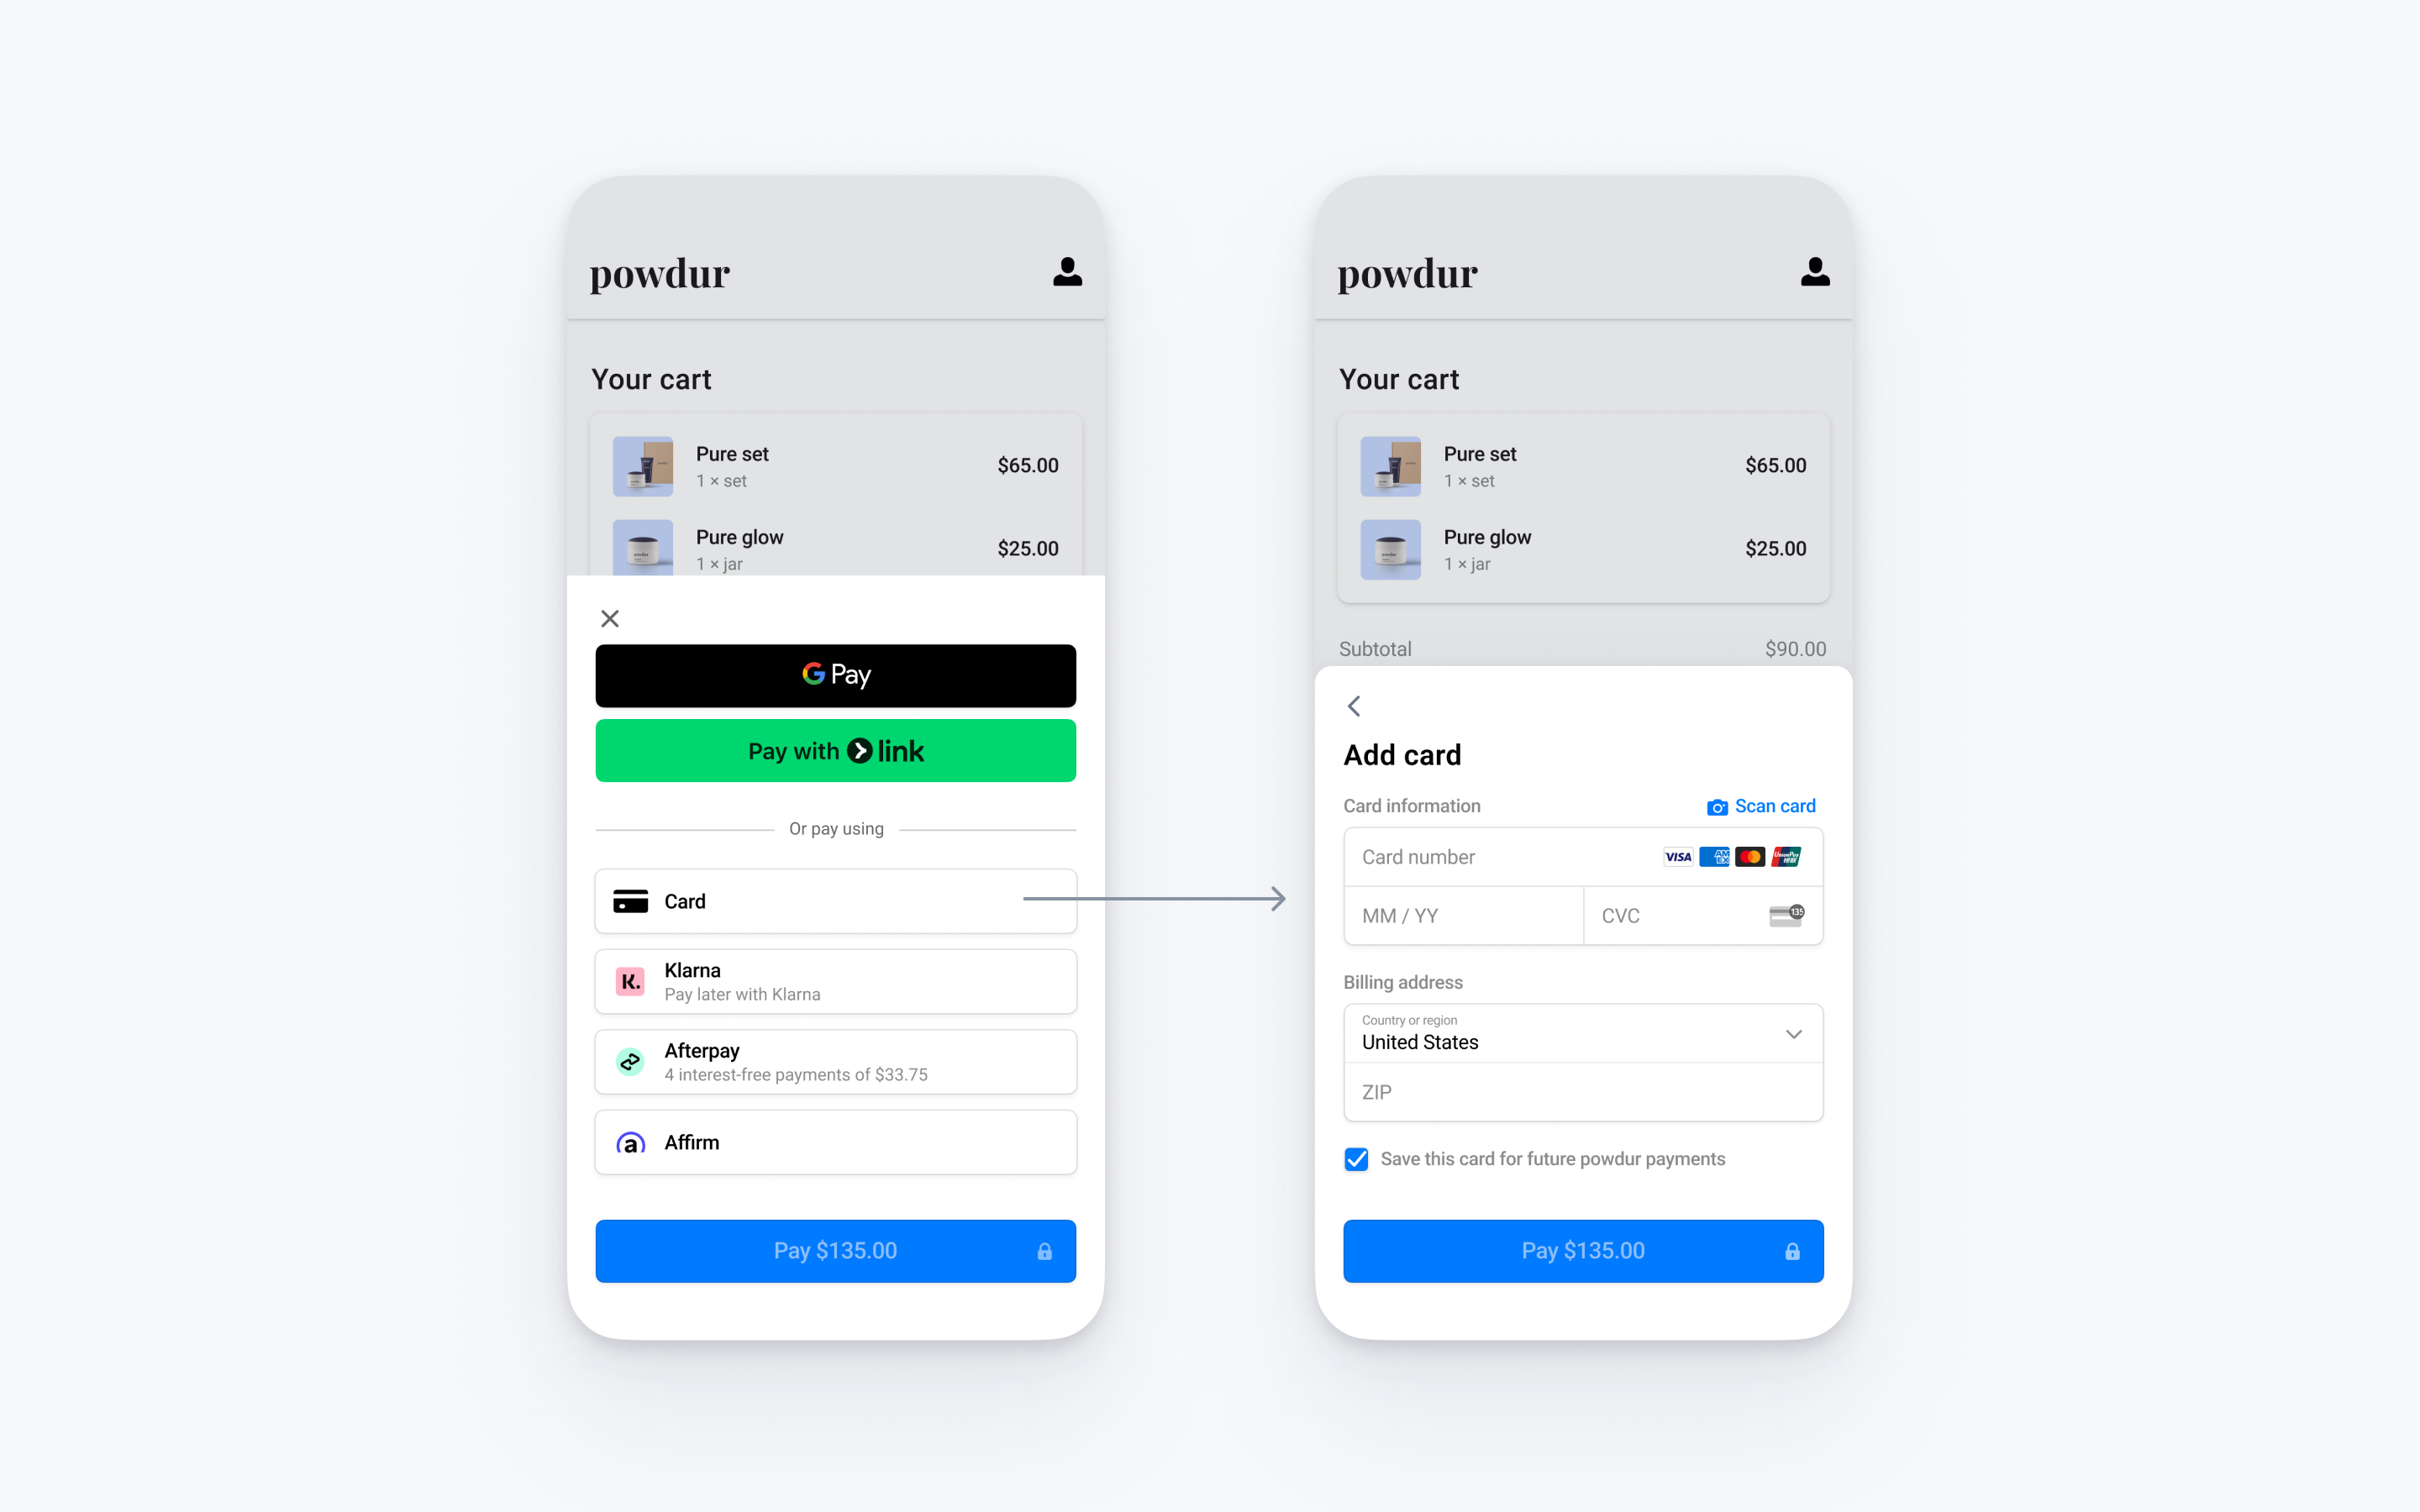
Before displaying the mobile Payment Element, your checkout page should:
Show the products being purchased and the total amount
Collect any required shipping information using the Address Element
Include a checkout button to present Stripe’s UI
Initialize a PaymentSheet instance inside onCreate of your checkout Activity, passing a method to handle the result.
import androidx.compose.runtime.Composable
import com.stripe.android.paymentsheet.PaymentSheetResult
import com.stripe.android.paymentsheet.rememberPaymentSheet
@ComposablefunApp(){val paymentSheet =rememberPaymentSheet(::onPaymentSheetResult)}privatefunonPaymentSheetResult(paymentSheetResult: PaymentSheetResult){// implemented in the next steps}
Next, fetch the PaymentIntent client secret, Ephemeral Key secret, Customer ID, and publishable key from the endpoint you created in the previous step. Set the publishable key using PaymentConfiguration and store the others for use when you present the PaymentSheet.
import androidx.compose.runtime.Composable
import androidx.compose.runtime.LaunchedEffect
import androidx.compose.runtime.getValue
import androidx.compose.runtime.mutableStateOf
import androidx.compose.runtime.remember
import androidx.compose.runtime.setValue
import androidx.compose.ui.platform.LocalContext
// Add the following lines to build.gradle to use this example's networking library:// implementation 'com.github.kittinunf.fuel:fuel:2.3.1'// implementation 'com.github.kittinunf.fuel:fuel-json:2.3.1'import com.github.kittinunf.fuel.httpPost
import com.github.kittinunf.fuel.json.responseJson
import com.stripe.android.PaymentConfiguration
import com.stripe.android.paymentsheet.PaymentSheet
import com.stripe.android.paymentsheet.PaymentSheetResult
import com.stripe.android.paymentsheet.rememberPaymentSheet
import com.github.kittinunf.result.Result
@ComposablefunApp(){val paymentSheet =rememberPaymentSheet(::onPaymentSheetResult)val context = LocalContext.current
var customerConfig by remember { mutableStateOf<PaymentSheet.CustomerConfiguration?>(null)}var paymentIntentClientSecret by remember { mutableStateOf<String?>(null)}LaunchedEffect(context){"Your backend endpoint/payment-sheet".httpPost().responseJson{ _, _, result ->if(result is Result.Success){val responseJson = result.get().obj()
paymentIntentClientSecret = responseJson.getString("paymentIntent")
customerConfig = PaymentSheet.CustomerConfiguration(
id = responseJson.getString("customer"),
ephemeralKeySecret = responseJson.getString("ephemeralKey"))val publishableKey = responseJson.getString("publishableKey")
PaymentConfiguration.init(context, publishableKey)}}}}privatefunonPaymentSheetResult(paymentSheetResult: PaymentSheetResult){// implemented in the next steps}
import androidx.compose.material.Button
import androidx.compose.material.Text
import androidx.compose.runtime.Composable
import androidx.compose.runtime.LaunchedEffect
import androidx.compose.runtime.getValue
import androidx.compose.runtime.mutableStateOf
import androidx.compose.runtime.remember
import androidx.compose.runtime.setValue
import androidx.compose.ui.platform.LocalContext
// Add the following lines to build.gradle to use this example's networking library:// implementation 'com.github.kittinunf.fuel:fuel:2.3.1'// implementation 'com.github.kittinunf.fuel:fuel-json:2.3.1'import com.github.kittinunf.fuel.httpPost
import com.github.kittinunf.fuel.json.responseJson
import com.stripe.android.PaymentConfiguration
import com.stripe.android.paymentsheet.PaymentSheet
import com.stripe.android.paymentsheet.PaymentSheetResult
import com.stripe.android.paymentsheet.rememberPaymentSheet
import com.github.kittinunf.result.Result
@OptIn(ExperimentalCustomerSessionApi::class)@ComposablefunApp(){val paymentSheet =rememberPaymentSheet(::onPaymentSheetResult)val context = LocalContext.current
var customerConfig by remember { mutableStateOf<PaymentSheet.CustomerConfiguration?>(null)}var paymentIntentClientSecret by remember { mutableStateOf<String?>(null)}LaunchedEffect(context){"Your backend endpoint/payment-sheet".httpPost().responseJson{ _, _, result ->if(result is Result.Success){val responseJson = result.get().obj()
paymentIntentClientSecret = responseJson.getString("paymentIntent")
customerConfig = PaymentSheet.CustomerConfiguration(
id = responseJson.getString("customer"),
ephemeralKeySecret = responseJson.getString("ephemeralKey"))val publishableKey = responseJson.getString("publishableKey")
PaymentConfiguration.init(context, publishableKey)}}}Button(
onClick ={val currentConfig = customerConfig
val currentClientSecret = paymentIntentClientSecret
if(currentConfig !=null&& currentClientSecret !=null){presentPaymentSheet(paymentSheet, currentConfig, currentClientSecret)}}){Text("Checkout")}}privatefunpresentPaymentSheet(
paymentSheet: PaymentSheet,
customerConfig: PaymentSheet.CustomerConfiguration,
paymentIntentClientSecret: String
){
paymentSheet.presentWithPaymentIntent(
paymentIntentClientSecret,
PaymentSheet.Configuration(
merchantDisplayName ="My merchant name",
customer = customerConfig,// Set `allowsDelayedPaymentMethods` to true if your business handles// delayed notification payment methods like US bank accounts.
allowsDelayedPaymentMethods =true))}privatefunonPaymentSheetResult(paymentSheetResult: PaymentSheetResult){when(paymentSheetResult){is PaymentSheetResult.Canceled ->{print("Canceled")}is PaymentSheetResult.Failed ->{print("Error: ${paymentSheetResult.error}")}is PaymentSheetResult.Completed ->{// Display for example, an order confirmation screenprint("Completed")}}}
Setting allowsDelayedPaymentMethods to true allows delayed notification payment methods like US bank accounts. For these payment methods, the final payment status isn’t known when the PaymentSheet completes, and instead succeeds or fails later. If you support these types of payment methods, inform the customer their order is confirmed and only fulfill their order (for example, ship their product) when the payment is successful.
Stripe sends a payment_intent.succeeded event when the payment completes. Use the Dashboard webhook tool or follow the webhook guide to receive these events and run actions, such as sending an order confirmation email to your customer, logging the sale in a database, or starting a shipping workflow.
Listen for these events rather than waiting on a callback from the client. On the client, the customer could close the browser window or quit the app before the callback executes, and malicious clients could manipulate the response. Setting up your integration to listen for asynchronous events is what enables you to accept different types of payment methods with a single integration.
In addition to handling the payment_intent.succeeded event, we recommend handling these other events when collecting payments with the Payment Element:
Sent when a customer successfully initiates a payment, but the payment has yet to complete. This event is most commonly sent when the customer initiates a bank debit. It’s followed by either a payment_intent.succeeded or payment_intent.payment_failed event in the future.
Send the customer an order confirmation that indicates their payment is pending. For digital goods, you might want to fulfill the order before waiting for payment to complete.
Welcome to the Stripe Shell!
Stripe Shell is a browser-based shell with the Stripe CLI pre-installed. Log in to your
Stripe account and press Control + Backtick (`) on your keyboard to start managing your Stripe
resources in test mode.
- View supported Stripe commands:
- Find webhook events:
- Listen for webhook events:
- Call Stripe APIs: stripe [api resource] [operation] (e.g., )