Stripe hosted onboarding for Custom accounts
Let Stripe collect identity verification information for your Custom connected accounts.
Connect Onboarding for Custom Accounts is a web form hosted by Stripe that takes care of collecting identity verification information from users. It dynamically adjusts the information that it collects to reflect the connected account’s capabilities, country, and business type. Connect Onboarding is the recommended solution to collect identity verification information for Custom accounts, and ensures that your flow is optimized for:
- Mobile browsers
- Accessibility
- Internationalization and localization
- Conversion rate
- Intelligently requesting requirements based on what’s already provided on the account
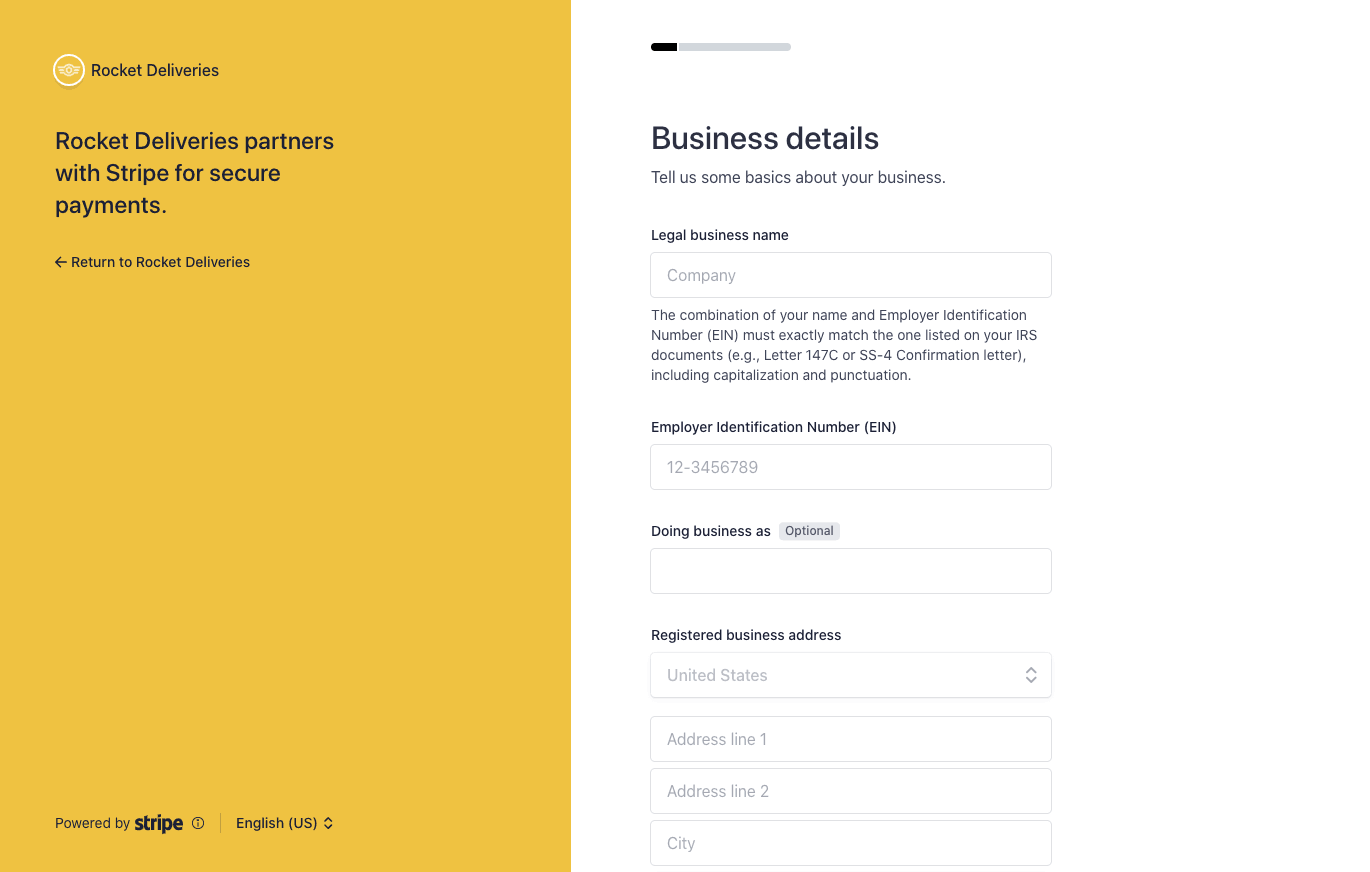
Here’s what the form looks like for Stripe’s sample integration, Rocket Deliveries:
How to use Connect Onboarding for Custom Accounts
- Navigate to your onboarding settings to customize the visual appearance of the form. You must provide the name, color, and icon of your brand. You must collect bank account details within the form, either manually or instantly with Stripe Financial Connections.
- Create a new account and get the account ID, or use an existing account ID (in the form of
acct_).XXXXXXXX - If you have information about the account holder (like their name, address, or other details), you can proactively provide this through the account create or update methods. The more information provide through the API, the less information Connect Onboarding prompts your user for.
- Call the Account Links with the following parameters (see the API ref for more):
accountrefresh_url return_url typecollection_(optional)options
- In the onboarding flow for your own platform, redirect your user to the
urlreturned by Account Links. - Handle additional account states, redirecting your user back into the Connect Onboarding flow if necessary. To handle user-initiated updates to information they’ve already provided, create a way for your user to get a new redirect to the Connect Onboarding form from your platform’s Dashboard.
Determine the information to collect
Connect Onboarding for Custom Accounts supports upfront or incremental onboarding. Upfront onboarding collects the eventually_ requirements for the account, while incremental onboarding collects the currently_ requirements. For the advantages and disadvantages of each, see the onboarding flows documentation.
The currently_ requirements request only the user information needed for verification at this specific point in time; the eventually_ requirements include a more complete set of questions that we’ll eventually need to collect.
Based on the needs of your platform, pass either currently_ or eventually_ as the value of the collection_ parameter in your calls to Account Links. Here’s an example request:
Redirect your user to the Account Link URL
The response to your Account Links request includes a value for the key url. Redirect your user to this link to send them into the flow. You can only use your Account Link URLs one time because they grant access to the account holder’s personal information. Authenticate the user in your application before redirecting them to this URL. If you enable Collect external account information for accounts where the platform is responsible for collecting requirements in your payout onboarding settings, or if the treasury capability is requested, the user must set up additional authentication with Stripe before entering the onboarding flow.
Security tip
Don’t email, text, or otherwise send account link URLs outside of your platform application. Instead, provide them to the authenticated account holder within your application.
Handle the user returning to your platform
Connect Onboarding requires you to pass both a return_ and refresh_ to handle all cases in which the user will be redirected back to your platform. It’s important that you implement these correctly to provide the best experience for your user.
Note
You can use HTTP for your return_ and refresh_ while you’re in testing (for example, to test with localhost), but live mode only accepts HTTPS. Be sure you’ve swapped any testing URLs for HTTPS URLs before going live.
return_url
Stripe will issue a redirect back to this URL when the user completes the Connect Onboarding flow, or clicks Save for later at any point in the flow. It does not mean that all information has been collected, or that there are no outstanding requirements on the account. It only means the flow was entered and exited properly.
No state is passed with this URL. After a user is redirected to your return_, check the state of the requirements attribute on their account. You can either listen to account. webhooks or retrieve the Account object and inspect the state of its requirements attribute. See more details in Step 4 below.
refresh_url
Your user will be redirected to the refresh_ in these cases:
- The link is expired (a few minutes went by since the link was created)
- The link was already visited (the user refreshed the page or clicked the back/forward button)
- The link was shared in a third-party application such as a messaging client that attempts to access the URL to preview it. Many clients automatically visit links which cause them to become expired
Your refresh_ should trigger a method on your server to call Account Links again, with the same parameters, and redirect the user back into the Connect Onboarding flow to create a seamless experience.
Handle the case of new requirements becoming due
Set up your integration to listen for changes to account requirements, if you haven’t already done so. We recommend using webhooks for this purpose. You can test handling new requirements (and how they might disable charges and payouts) with our test trigger cards.
When upcoming requirements updates affect your connected accounts, we’ll notify you.
If you use embedded or Stripe-hosted onboarding, you can proactively collect information to fulfill future requirements. For embedded onboarding, include the collectionOptions attribute in the embedded onboarding component. For Stripe-hosted onboarding, specify the collection_ parameter when creating account links.
Based on the verification needs of your application, send the user back into Connect Onboarding as necessary to satisfy currently_ or eventually_ requirements as described in step 1. You can use this as a signal of when to send your user back into the flow. Keep in mind that using Connect Onboarding means you don’t really need to worry about what the requirements are – sending the user back into Connect Onboarding means it will collect the right information.
For example, if your user mistypes their information and they can’t be verified, they could be asked to provide an Identity Document (for example, a Driver’s License in the United States). Sending this user into Connect Onboarding prompts them to upload such a document to ensure they become verified.
Note
Connect Onboarding for Custom Accounts doesn’t collect the external_ requirement by default. To collect external_, enable Collect external account information for accounts where the platform is responsible for collecting requirements in your payout onboarding settings. Learn more about managing bank accounts and debit cards.
Handle the case of user-initiated updates
Most Connect Onboarding usage discussed thus far has been about prompting the user to provide new information. Connect Onboarding also supports user-initiated updates to the information they’ve already provided in the type parameter of the Account Link. type accepts one of two values: account_ or account_.
account_onboarding
This value for type provides a form for inputting outstanding requirements. Use it when you’re onboarding a new user, or when an existing user has new requirements; such as when a user had already provided enough information, but you requested a new capability that needs additional info. Send the user to the form in this mode to just collect the new information you need.
account_update
This value for type displays the attributes that are already populated on the account object and allows your user to edit previously provided information. Provide an access point in your platform website to a type=account_ Account Link for users to make updates themselves (for example, when their address changes). Consider framing the link as “edit my profile” or “update my verification information.”
Supported browsers
Hosted onboarding supports the same set of browsers that the Stripe Dashboard currently supports:
- The last 20 major versions of Chrome and Firefox
- The last two major versions of Safari and Edge
- The last two major versions of mobile Safari on iOS
Hosted onboarding isn’t supported when embedded through webviews. It’s only supported in standalone browsers.