Checkout migration guide
Learn how to migrate to Stripe's latest integrations.
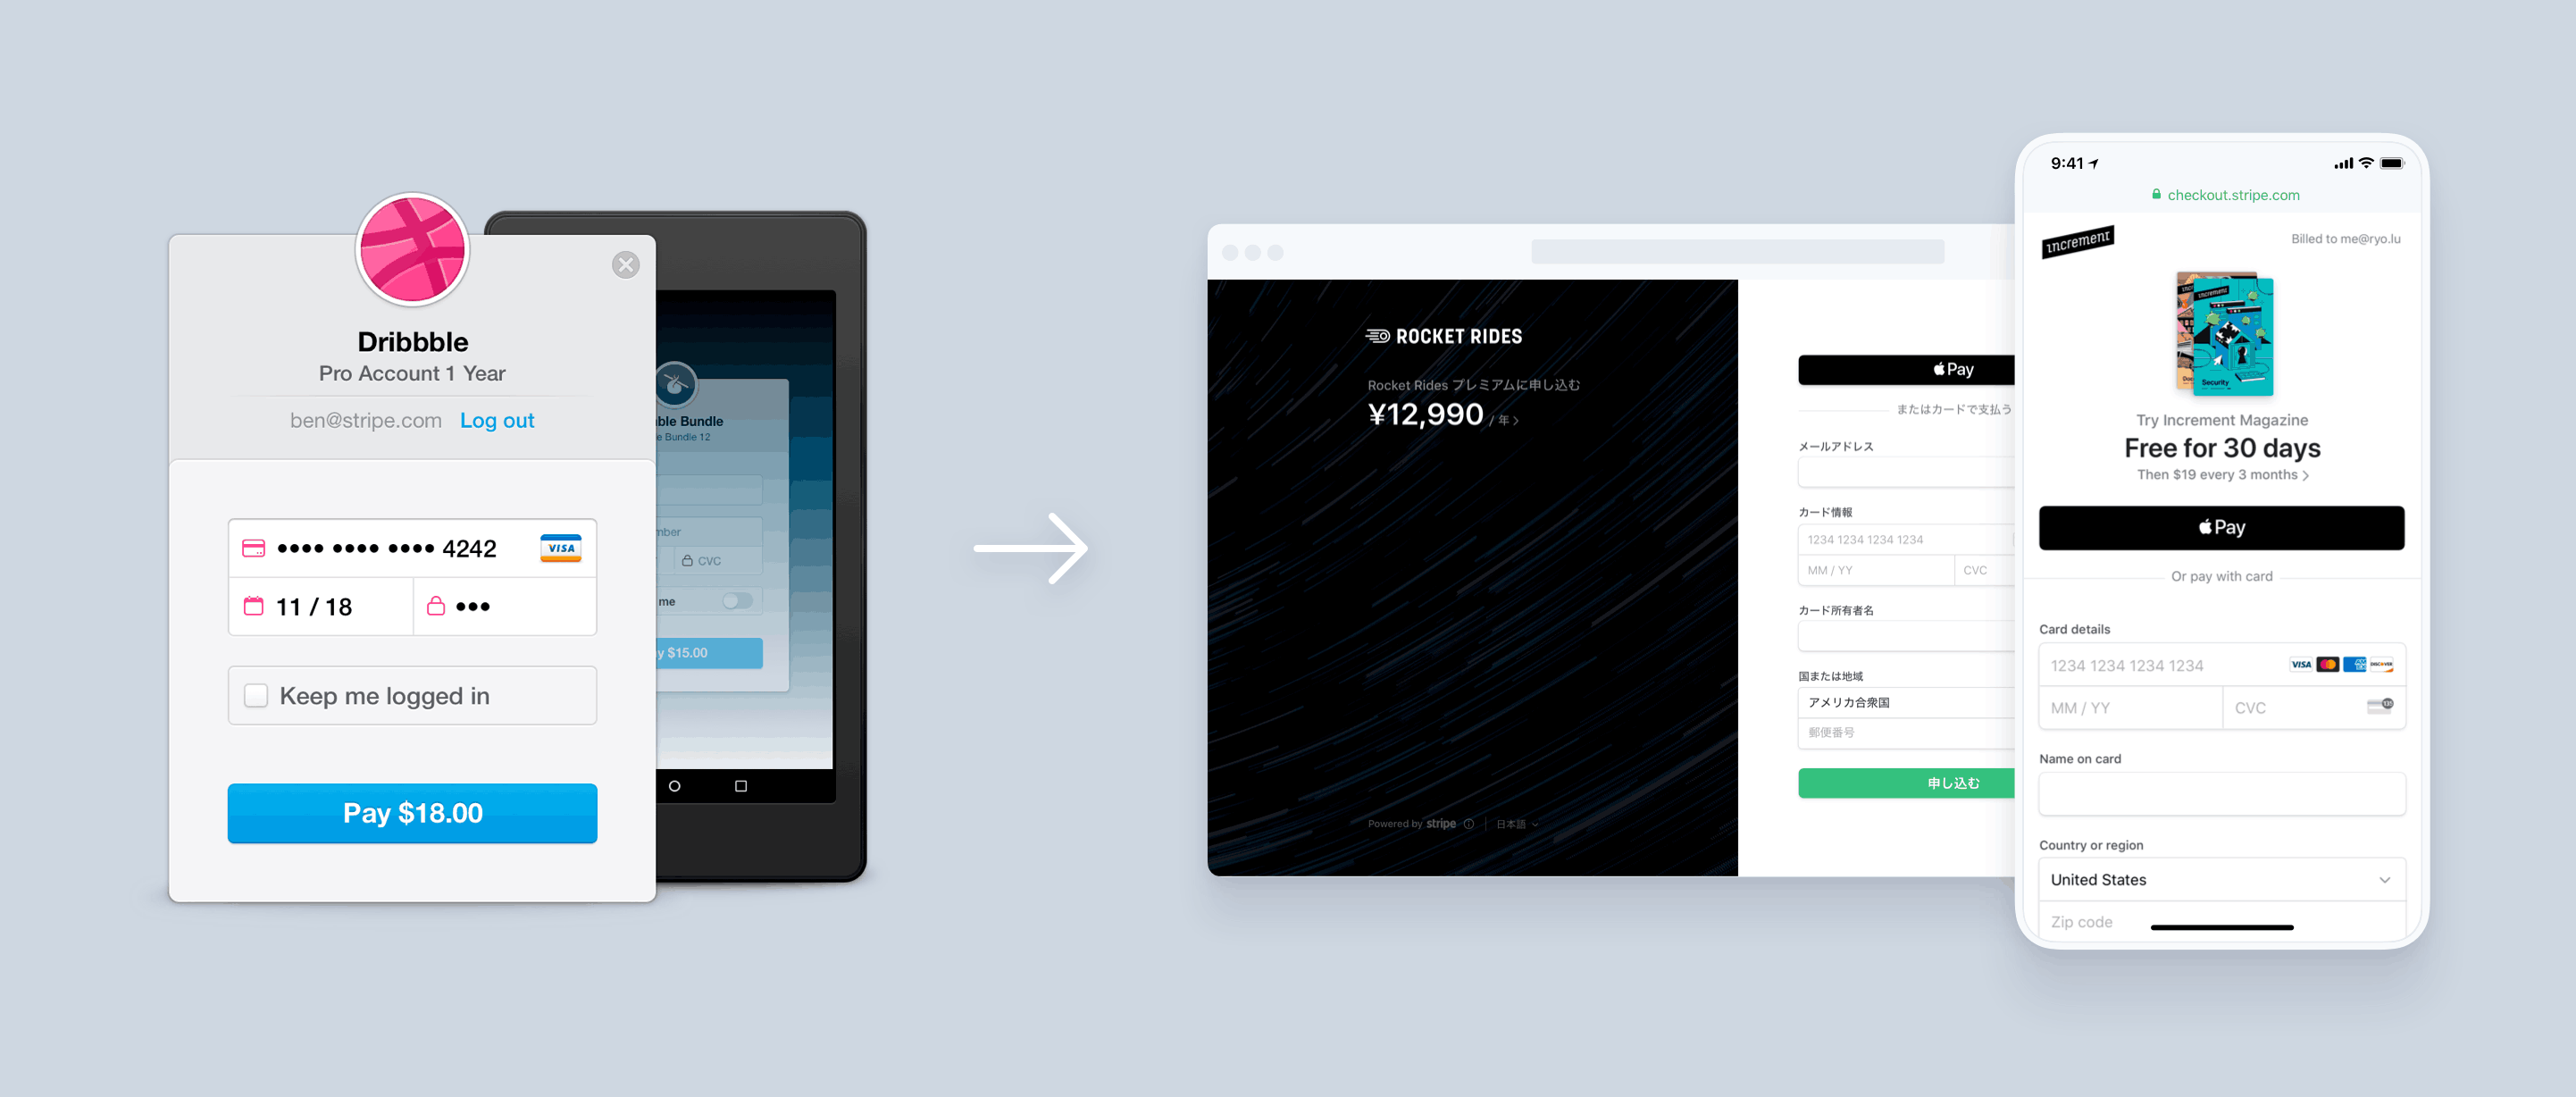
The legacy version of Checkout presented customers with a modal dialog that collected card information, and returned a token or a source to your website. In contrast, Payment Links and the current version of Checkout are smart payment pages hosted by Stripe that creates payments or subscriptions. Both integrations support Apple Pay, Google Pay, Dynamic 3D Secure, Connect, re-using existing Customers, and many other features. You can also compare other payment integrations if Payment Links or Checkout doesn’t fit your use case.
Before you begin
If you use Stripe’s SDKs, upgrade to the latest version.
Choose your business model
To migrate from the legacy version of Checkout, follow the guide that most closely represents your business model. Each guide recommends an integration path along with example code.
Dynamic product catalog and pricing
If you have a large product catalog or require support for dynamically generated line items (such as donations or taxes).
If you’re a SaaS provider billing users and need support for advanced features.
Connect platforms and marketplaces
If you’re operating a marketplace connecting service providers with customers.
Saving payment methods for future use
If you’re operating a business which doesn’t charge the customer until after services rendered.
Simple product catalog with fixed pricing
If you’re selling a few products with pre-determined prices.
If you’re a SaaS provider with a monthly subscription plan.
As you follow the relevant migration guide, you can also reference the conversion table for a mapping of specific parameters and configuration options.
Dynamic product catalog and pricing
If you’re selling products where the amount or line items are determined dynamically (for example, a large product catalog or donations), see accepting one-time payments.
You might have used the legacy version of Checkout to create a token or source on the client, and passed it to your server to create a charge. The current version of Checkout reverses this flow—you create a Session on your server, redirect your customer to Checkout, who is then redirected back to your application after the payment.
Before
With the legacy version of Checkout, you’d display the dynamic amount and description and collect card information from your customer.
<form action="/purchase" method="POST"> <script src="https://checkout.stripe.com/checkout.js" class="stripe-button" data-key=data-name="Custom t-shirt" data-description="Your custom designed t-shirt" data-amount="{{ORDER_AMOUNT}}" data-currency="usd"> </script> </form>"pk_test_TYooMQauvdEDq54NiTphI7jx"
Next, you’d send the resulting token or source to your server and charge it.
After
Add a checkout button to your website that calls a server-side endpoint to create a Checkout Session.
<html>
  <head>
    <title>Buy cool new product</title>
  </head>
  <body>
    <!-- Use action="/create-checkout-session.php" if your server is PHP based. -->
    <form action="/create-checkout-session" method="POST">
      <button type="submit">Checkout</button>
    </form>
  </body>
</html>
A Checkout Session is the programmatic representation of what your customer sees when they’re redirected to the payment form. You can configure it with options such as:
- Line items to charge
- Currencies to use
Include a success_ with the URL of a page on your website that your customer is redirected to after they complete the payment.
After creating a Checkout Session, redirect your customer to the URL returned in the response. If you need to fulfill purchased goods after the payment, see Fulfill Checkout and Payment Link payments.
Dynamic subscriptions
If you’re providing subscription services that are dynamically determined or require support for other advanced features, see setting up a subscription.
You might have used the legacy version of Checkout to create a token or source on the client, and passed it to your server to create a customer and subscription. The current version of Checkout reverses this flow—you first create a Session on your server, redirect your customer to Checkout, who then gets redirected back to your application upon success.
Before
With the legacy version of Checkout, you’d display the subscription information and collect card information from your customer.
<form action="/subscribe" method="POST"> <script src="https://checkout.stripe.com/checkout.js" class="stripe-button" data-key=data-name="Gold Tier" data-description="Monthly subscription with 30 days trial" data-amount="2000" data-label="Subscribe"> </script> </form>"pk_test_TYooMQauvdEDq54NiTphI7jx"
Next, you’d send the resulting token or source to your server to create a customer and a subscription.
After
Add a checkout button to your website that calls a server-side endpoint to create a Checkout Session.
<html>
  <head>
    <title>Subscribe to cool new service</title>
  </head>
  <body>
    <!-- Use action="/create-checkout-session.php" if your server is PHP based. -->
    <form action="/create-checkout-session" method="POST">
      <button type="submit">Subscribe</button>
    </form>
  </body>
</html>
A Checkout Session is the programmatic representation of what your customer sees when they’re redirected to the payment form. You can configure it with options such as:
- Line items to charge
- Currencies to use
Include a success_ with the URL of a page on your website that your customer is redirected to after they complete the payment.
After creating a Checkout Session, redirect your customer to the URL returned in the response. The customer is redirected to the success_ after the customer and subscription are created. If you need to fulfill purchased services after the payment, see Fulfill Checkout and Payment Link payments.
Connect platforms and marketplaces
If you’re operating a Connect platform or marketplace and create payments involving connected accounts, consider using the current version Checkout.
The following example demonstrates using the Checkout Sessions API to process a direct charge. You can also use Checkout and Connect with destination charges and separate charges and transfers.
Before
With the legacy version of Checkout, you’d collect card information from your customer on the client.
<form action="/purchase" method="POST"> <script src="https://checkout.stripe.com/checkout.js" class="stripe-button" data-key=data-name="Food Marketplace" data-description="10 cucumbers from Roger's Farm" data-amount="2000"> </script> </form>"pk_test_TYooMQauvdEDq54NiTphI7jx"
Next, you’d send the resulting token or source to your server and charge it on behalf of the connected account.
After
Add a checkout button to your website that calls a server-side endpoint to create a Checkout Session.
<html>
  <head>
    <title>Roger's Farm</title>
  </head>
  <body>
    <!-- Use action="/create-checkout-session.php" if your server is PHP based. -->
    <form action="/create-checkout-session" method="POST">
      <button type="submit">Checkout</button>
    </form>
  </body>
</html>
A Checkout Session is the programmatic representation of what your customer sees when they’re redirected to the payment form. You can configure it with options such as:
- Line items to charge
- Currencies to use
Include a success_ with the URL of a page on your website that your customer is redirected to after they complete the payment.
After creating a Checkout Session, redirect your customer to the URL returned in the response. If you need to fulfill purchased goods or services after the payment, see Fulfill Checkout and Payment Link payments.
Saving payment methods for future use
If you’re providing services that don’t charge your customers immediately, see setting up future payments.
You might have used the legacy version of Checkout to create a token or source on the client, and passed it to your server to save for later use. The current version of Checkout reverses this flow—you first create a Session on your server, redirect your customer to Checkout, who then gets redirected back to your application upon success.
Before
With the legacy version of Checkout, you’d display the charge information and collect card information from your customer.
<form action="/subscribe" method="POST"> <script src="https://checkout.stripe.com/checkout.js" class="stripe-button" data-key=data-name="Cleaning Service" data-description="Charged after your home is spotless" data-amount="2000"> </script> </form>"pk_test_TYooMQauvdEDq54NiTphI7jx"
Next, you’d send the resulting token or source to your server to eventually create a charge.
After
Add a checkout button to your website that calls a server-side endpoint to create a Checkout Session.
<html>
  <head>
    <title>Cleaning service</title>
  </head>
  <body>
    <!-- Use action="/create-checkout-session.php" if your server is PHP based. -->
    <form action="/create-checkout-session" method="POST">
      <button type="submit">Subscribe</button>
    </form>
  </body>
</html>
A Checkout Session is the programmatic representation of what your customer sees when they’re redirected to the payment form. You can configure it with options such as:
- Line items to charge
- Currencies to use
Include a success_ with the URL of a page on your website that your customer is redirected to after they complete the payment setup.
After creating a Checkout Session, redirect your customer to the URL returned in the response to gather payment method details. The customer is redirected to the success_ after they complete the flow. When you’re ready to collect a payment, retrieve the SetupIntent from the Checkout Session and use it to prepare the transaction.
Simple product catalog with fixed pricing
If you’re selling products with fixed pricing (such as t-shirts or e-books), see the guide on payment links. You might have used the legacy version of Checkout to create a token or source on the client, and passed it to your server to create a charge.
Before
With the legacy version of Checkout, you’d display the amount and description and collect card information from your customer.
<form action="/pay" method="POST"> <script src="https://checkout.stripe.com/checkout.js" class="stripe-button" data-key=data-name="T-shirt" data-description="Comfortable cotton t-shirt" data-amount="500" data-currency="usd"> </script> </form>"pk_test_TYooMQauvdEDq54NiTphI7jx"
Next, you’d send the resulting token or source to your server to create a customer and a charge.
After
Create a Product and a Price representing the item. The following example creates the Product inline. You can also create these objects in the Dashboard.
Create a Payment Link in the Dashboard using the Product and Price. After you create the link, click Buy button to configure the design and generate the code that you can copy and paste into your website.
Simple subscriptions
If you’re providing a simple subscription service (such as monthly access to software), see the guide on payment links. You might have used the legacy version of Checkout to create a token or source on the client, and passed it to your server to create a customer and a subscription.
Before
With the legacy version of Checkout, you’d display the subscription information and collect card information from your customer.
<form action="/subscribe" method="POST"> <script src="https://checkout.stripe.com/checkout.js" class="stripe-button" data-key=data-name="Gold Tier" data-description="Monthly subscription" data-amount="2000" data-currency="usd" data-label="Subscribe"> </script> </form>"pk_test_TYooMQauvdEDq54NiTphI7jx"
Next, you’d send the resulting token or source to your server to create a customer and a subscription.
After
Create a Product and a Price representing the subscription. The following example creates the Product inline. You can also create these objects in the Dashboard.
Create a Payment Link in the Dashboard using the Product and Price. After you create the link, click Buy button to configure the design and generate the code that you can copy and paste into your website.
Parameter conversion
The current version of Checkout supports most of the functionality of the legacy version of Checkout. However, they don’t share the same API. The following table maps the parameters and configuration options between the legacy version and the current version. For a full list of configuration options, see Checkout Sessions.
| Legacy version | Current version | Integration tips |
|---|---|---|
allowRememberMe | Not supported | Reuse existing customers by specifying the customer parameter when creating a Checkout Session. You can also enable Link to allow your customers to securely save and reuse their payment information. |
amount | Automatically calculated as the sum of amounts over all line_ | The total amount is the sum of the line items you pass to Checkout. |
billingAddress | Session. | Checkout automatically collects the billing address when required for fraud-prevention or regulatory purposes. Set this parameter to required to always collect the billing address. |
closed | cancel_ | When a customer wants to close Checkout, they either close the browser tab or navigate to the cancel_. |
currency | Session. | |
description | Session. or product. | If you specify a price, Checkout displays an automatically computed description of how often payments occur. If you specify Session., Checkout displays the name for each line item. |
email | Session. | If you already know your customer’s email, you can prefill it with customer_email when you create the Checkout Session. |
| Business branding: Upload your business logo or icon in the Dashboard. Product images: Specify images for each line item with | Checkout uses specific images for your business’s branding and for the products you’re selling. Checkout displays your business logo by default and falls back to your business icon alongside your business name. |
key | No longer a parameter passed to Checkout | |
locale | Session. | You can specify a supported locale when creating a Checkout Session. |
name | product. for prices specified in Session. | If you specify a price, Checkout displays the name of the product that belongs to the price. If you specify Session., Checkout displays the name for each line item. |
panelLabel | submit_ | Checkout automatically customizes the button text depending on the items you’re selling. For one-time payments, use submit_type to customize the button text. |
shippingAddress | session. | Collect shipping address information by passing an array of allowed_ that you want to ship to. |
token or source | success_ | There’s no longer a callback in JavaScript when the payment completes. As your customer is paying on a different page, set the success_ to redirect your customer after they’ve completed payment. |
zipCode | Automatically collected by Checkout | Checkout automatically collects the postal code when required for fraud-prevention or regulatory purposes. |