Customize invoices
Learn how to customize the content and branding of your invoices.
You can customize the content of an invoice using the API, invoice, and subscription editors; Invoice Templates; or Account Invoice settings. You can also set a customer preferred language and include public information in your account details. Because you know more about your customers and your business than Stripe does, make sure your invoices include all of the required information. Your invoices must be accurate, charge the appropriate tax, and comply with all applicable laws and regulations in your region.
Invoice settings
Branding 
Stripe allows you to customize (as well as preview) email receipts, hosted invoices, invoice PDFs, and so on, in your Branding settings.
Icons and logos must be in JPG or PNG format, less than 512kb in size, and equal to or greater than 128px by 128px.
- Icon—A square, digital-friendly icon or logo.
- Logo—A non-square logo to override some uses of the icon.
- Brand color—Used on receipts, invoices, and the customer portal.
- Accent color—Used as a background on emails and pages.
Apply brand settings
Brand settings apply to your whole account and take effect in many places.
| Setting | Emails | Checkout & Payment Links | Customer portal | Hosted Invoice Page | Invoice PDFs |
|---|---|---|---|---|---|
| Icon | Yes | Yes | Yes | Yes | Yes |
| Logo | No | Yes | No | No | Yes |
| Brand color | Yes | No | Yes | Yes | Yes |
| Accent color | Yes (background color) | Yes | Yes | Yes | No |
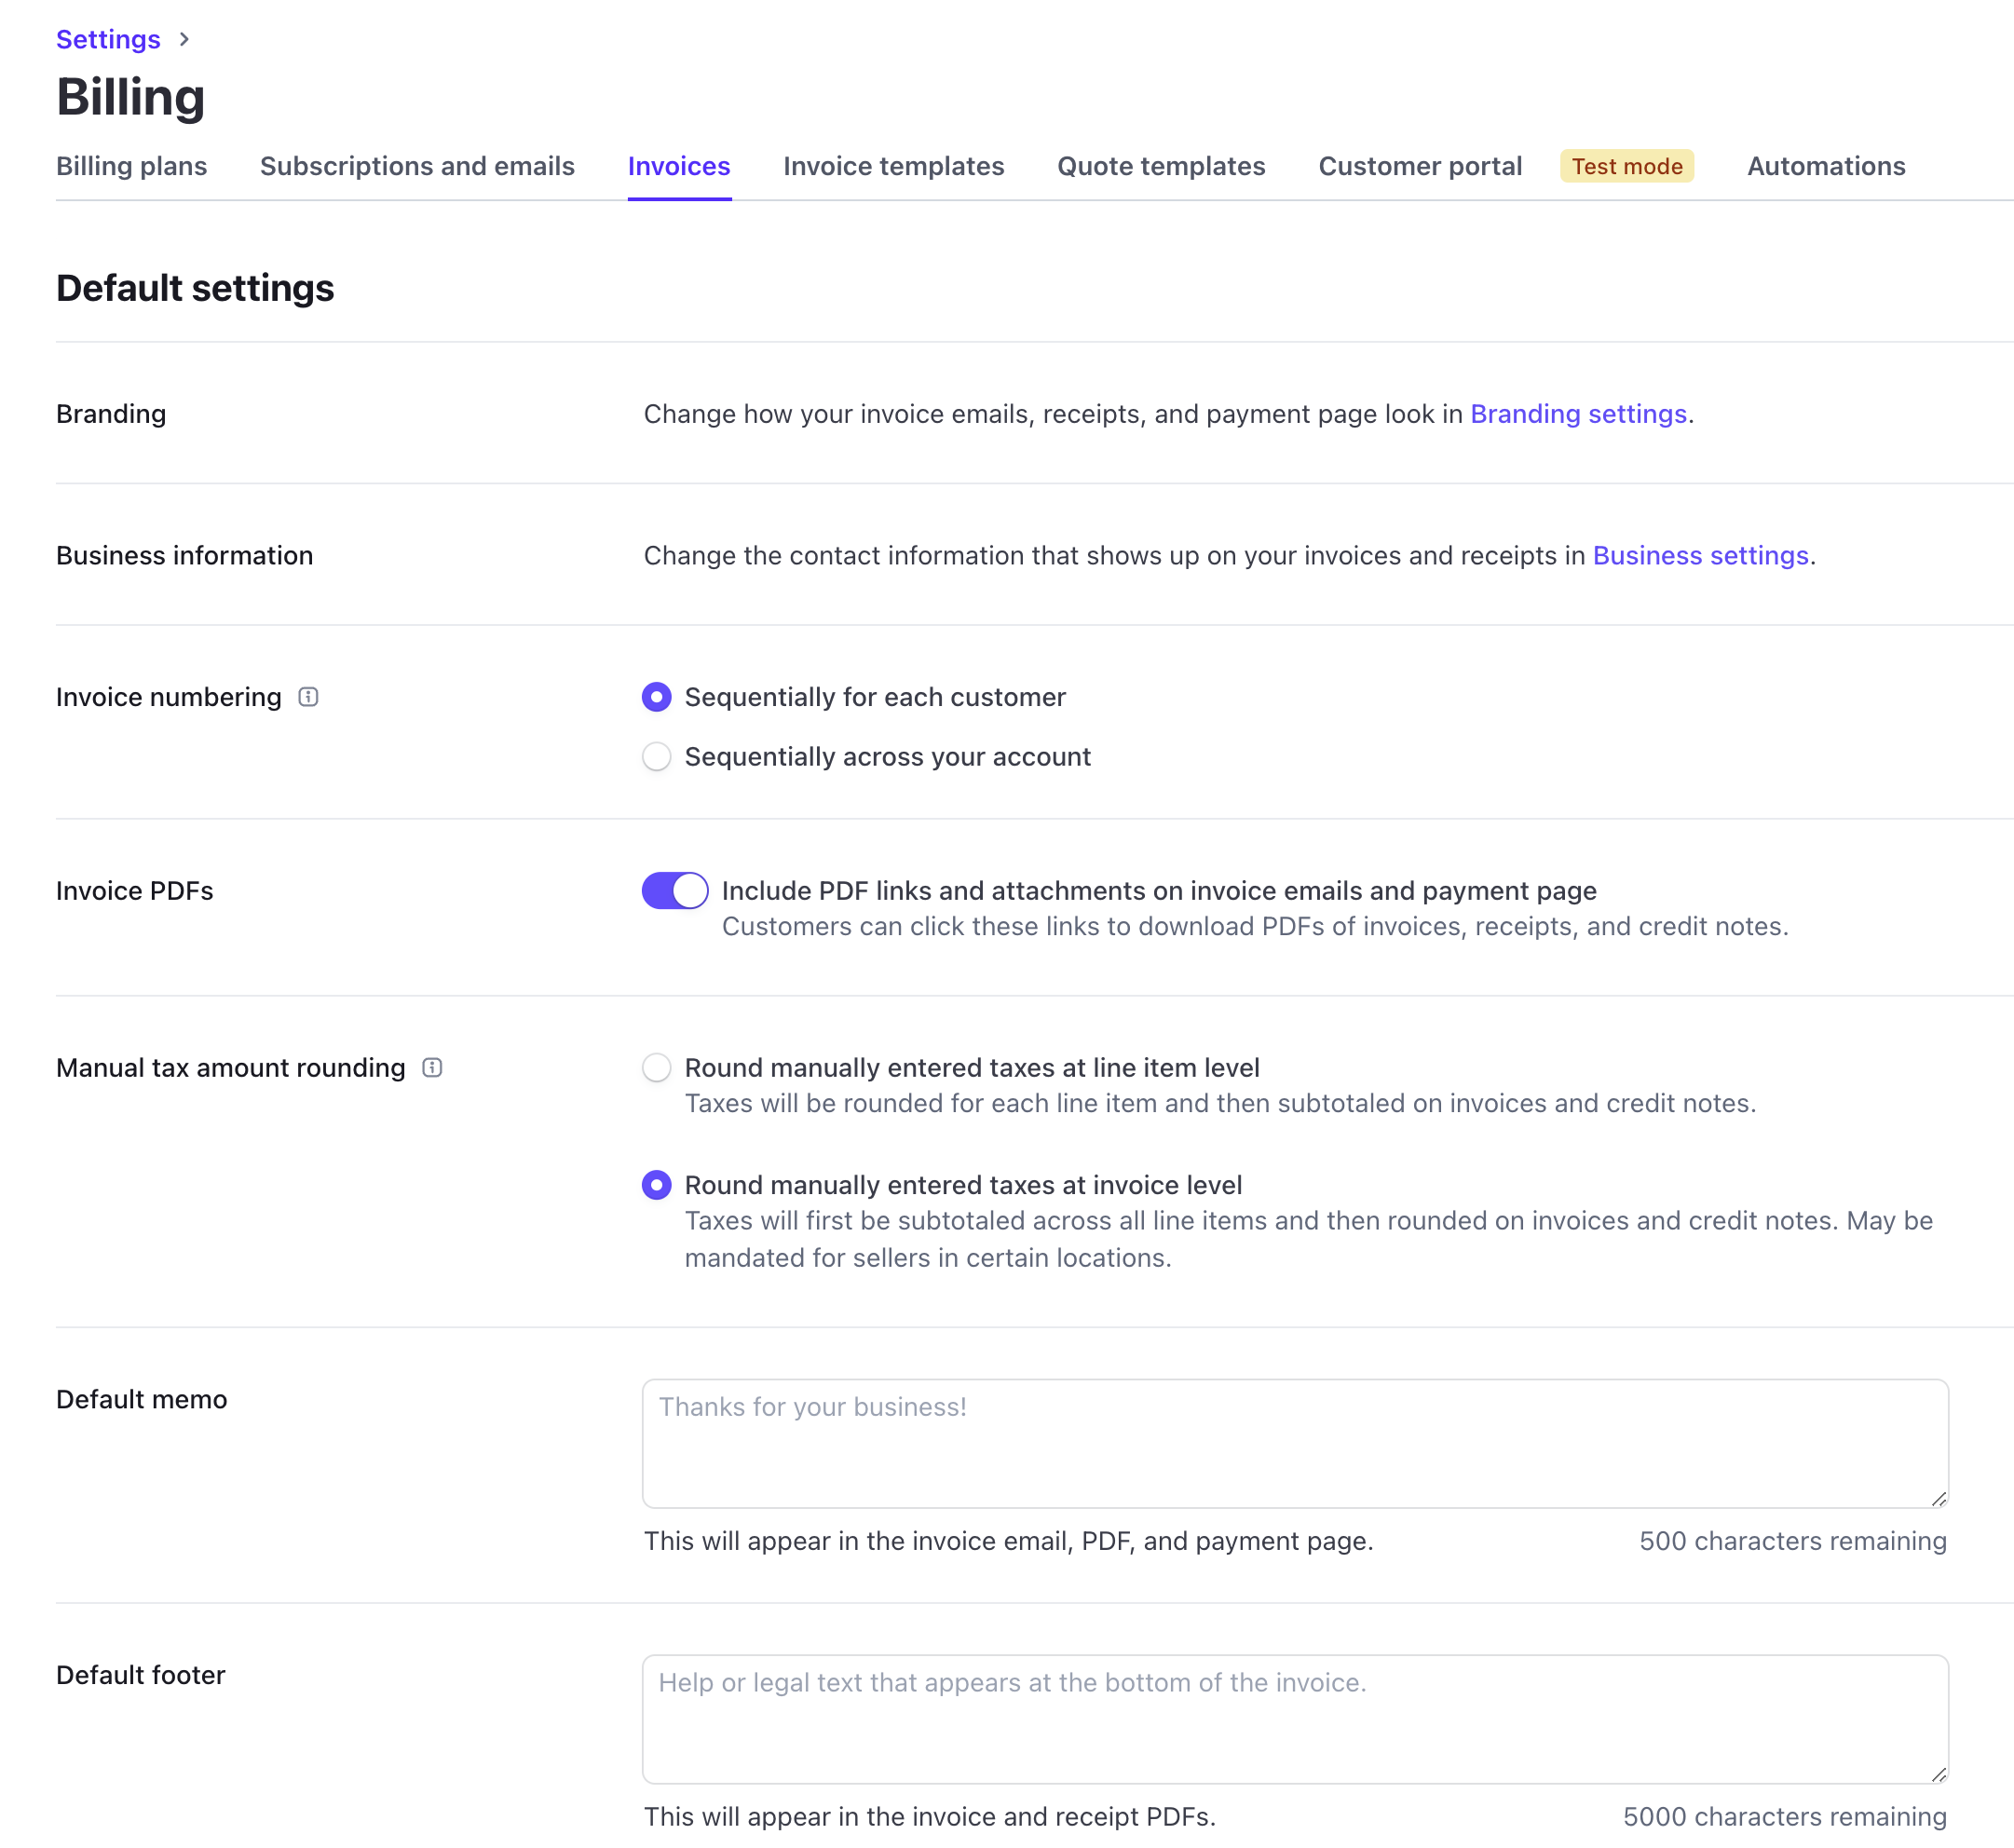
Invoice numbering
Stripe automatically generates invoice numbers to help track and reconcile invoices. Invoice numbers have a prefix and suffix, such as 586A2E-0139 or MYSHOP-1203. (The full invoice number is always unique across your account in both schemes.) Stripe supports two invoice numbering schemes:
- Sequentially for each customer (customer-level)—Uses a unique prefix for each customer and assigns invoice numbers sequentially for a given customer.
- Sequentially across your account (account-level)—Uses the same prefix for every customer and assigns invoice numbers sequentially across your entire account.
Stripe chooses a default behavior based on the country your Stripe account is based in. European Union member countries and the United Kingdom typically require account level sequencing. All other countries default to customer level sequencing because it doesn’t expose the total number of invoices. When switching between schemes or updating prefixes, only future invoices use the new settings. This doesn’t impact existing invoices.
Caution
Invoice requirements vary by jurisdiction. Consult with a professional for guidance on your specific use case. You’re responsible for verifying that the invoices you issue meet local tax requirements.
Customer level prefixes
When you configure an invoice to use customer-level numbering, each invoice number begins with the customer’s unique invoice prefix.
For example, if one of your customers is a business named Typographic, you might set the prefix to TYPGRA. The first invoice number for Typographic would be TYPGRA-0001, the second would be TYPGRA-0002 and so on.
You can override prefixes so that you can trace invoices back to your customers. You can set prefixes on the Customers page in the Dashboard or with the API by using the invoice_prefix parameter. Prefixes have to be between 3 and 12 characters and they can’t match any other customer prefix, including prefixes that are no longer in use.
Account level prefixes
When you configure an invoice to use account-level numbering, each invoice number starts with a common prefix and has a sequential number.
For example, if your business is named Rocket Rides, you might set the prefix to RKTRIDE. Your first invoice would be RKTRIDE-0001, a second invoice to a different customer would be RKTRIDE-0002, another invoice to the first customer would be RKTRIDE-0003, and so on.
Stripe automatically assigns the account-wide prefix, but you can override it to make it clearer that these invoices come from you. If you want to modify the prefix for your account, you can change it in Invoice settings. This requires that your account’s default API version is at least 2020-03-02. Prefixes have to be between 3 and 12 characters and they can’t match any customer prefix, including prefixes that are no longer in use.
Caution
You can’t use a customer prefix as an account prefix. This includes prefixes that are no longer in use.
Connect account prefixes
For connected accounts that aren’t currently managed with the on_ parameter, sequential invoice numbering—at the customer and merchant level—will begin at 0001 if the parameter is used in the future.
Set the next invoice number
By default, invoice numbers start at 0001. If you’d like to use a different starting invoice number, however, you can change it. For example, some users—when migrating existing customers to Stripe Invoicing—want their invoice numbers to continue where their old system left off. If the user left off at invoice number 123 in their old system, Stripe allows them to resume the invoice number at 124.
Set the number on the Customer details page or with the API by using the next_invoice_sequence parameter. If you’re using account-level prefixes, set the next invoice number in the Next invoice sequence field in Invoice settings.
You can only set the next invoice number to numbers greater than any numbers used on an invoice. The maximum allowed invoice number is 1,000,000,000 regardless of how you set it. Use the lowest value possible so that you don’t reach this limit.
Invoice fields
Learn more about the different Invoice fields, including memo, footer, and custom fields. To set the same value on these fields for groups of customers, you can use Invoice Templates.
Default memo
A memo is included in invoice PDFs, invoice emails, and the Hosted Invoice Page. Memos are commonly used as a notes section, thanking the invoiced customer for their business, or giving more context around the invoice (such as a note from the salesperson who talked to the customer).
You can set a default memo field for your account in Invoice settings. Any new invoices use this value. You can also specify the memo on Invoice Templates, which replaces the default memo on invoices using a template.
You can specify a different memo for a particular invoice when you create or update it in the Dashboard. You can also specify a memo using the API by calling update invoice and including the description parameter.
Default footer
Invoice PDFs can include an optional footer text block. The footer field is often used for contractual or legally required text. A common use case is displaying legally required company registration information, such as a UK Companies House registration number.
Like the memo field, you can set the default footer value in Invoice settings or specify footers on Invoice Templates. You can specify a different footer for a particular draft invoice when you create or update it in the Dashboard, or with the API by calling update Invoice. If an invoice has been finalized, you can’t update its footer field.
Default item prices
You can issue invoices with line item prices that exclude inclusive tax. Tax-exclusive prices are only shown in the invoice PDF. That means, when using inclusive tax, the Hosted Invoice Page and invoice emails show tax-inclusive prices. You can define the settings for net prices in the Dashboard or API.
- Include inclusive tax—The invoice PDF displays line item prices including the inclusive tax. (This is the default.)
- Exclude tax—The invoice PDF displays line item prices excluding tax.
Order precedence
If you set a default for line item prices at the customer level, it takes precedence over account-level settings.
Custom fields
Add custom fields to enhance your invoice PDF documents and help you comply with your business practice and tax reporting obligations. Custom fields allow you to provide up to four key-value pairs that display in the invoice header. You can set up to four custom field key-value pairs in the Invoice Editor, with the Invoices API, or with Invoice Templates.
Some common uses for custom fields are:
- Purchase Order (PO) numbers
- Contractor numbers
- Tax compliance
Custom field inheritance
You can set custom invoice fields on the Customer object. Any custom fields you set at the customer level apply to all of the draft invoices you generate for that customer. You can always modify these inherited custom fields while the invoice is still a draft. After the invoice finalizes, you can’t update the custom fields.
PDF page size
You can set the page size for your invoice PDF, including finalized invoices, to A4 (8.27 x 11.69 inches) or Letter (8.5 x 11 inches).

Group line items
To help your customers better understand your invoices (including PDFs, Hosted Invoice Page, and invoice emails), categorize, and display invoice line items under different groups. You can also hide groups of line items. If some line items are excessively detailed, you can configure it so that only their group-level subtotal is visible to your customers.
Default payment terms
Under Default payment terms in Invoice settings, you can select when the payment is due after you send the invoice. You can also choose whether to include a Stripe-hosted link to an invoice payment page in the invoice email. Customers can visit this link to pay, download, and see the status of their invoice. Lastly, you can manage your accepted payment methods in this section.
Customer preferred languages
When you create a customer, use the Language dropdown to add their preferred language. (You can also add or edit a customer’s preferred language in the Customer details page or when creating an invoice.) Stripe uses the chosen language to localize invoice emails and PDFs, receipt emails and PDFs, as well as credit note PDFs. To update the language through the API, use the preferred_locales field.
Stripe Invoicing supports the following languages:
- Bulgarian
- Chinese (Hong Kong)
- Chinese (Simplified)
- Chinese (Taiwan)
- Croatian
- Czech
- Danish
- Dutch
- English (United Kingdom)
- English (United States)
- Estonian
- Filipino
- Finnish
- French (Canada)
- French (France)
- German
- Greek
- Hungarian
- Indonesian
- Italian
- Japanese
- Korean
- Latvian
- Lithuanian
- Malay (Malaysia)
- Malayalam
- Maltese
- Norwegian
- Polish
- Portuguese (Brazil)
- Portuguese (Portugal)
- Romanian
- Russian
- Slovak
- Slovenian
- Spanish (Latin America)
- Spanish (Spain)
- Swedish
- Thai
- Turkish
- Vietnamese
Billing and shipping addresses
Stripe uses a customer’s address as the billing address on the invoice PDF. You can add or edit a customer’s address on the Customer details page. If you don’t set the address field, Stripe renders the shipping address as the billing address on the PDF.
To render shipping details on the Invoice PDF, set the shipping_details field. If you don’t set the shipping_ field, Stripe renders the shipping address from the customer’s shipping field on the PDF.
Public support information
Invoices include any public information that you specified under Public business information, such as your support email address or business website. Using these settings, you can also choose to include a support phone number in customer-facing documents—like invoice PDFs and emails—or default to your business address.