Test mode and use cases
Use test mode and our uses cases to test your integration.
Stripe’s test mode allows you to test your integration without making actual charges or payments. Test mode is a testing environment that simulates creating real objects without the risk of affecting real transactions or moving actual money. We recommend using our quality assurance (QA) testing use cases, and importing our Postman collection to aid you in the testing process.
Test mode 
In test mode, you can charge test credit cards as well as create test products and prices. You can also use test mode to simulate transactions to make sure that your integration works correctly. This feature helps to identify any bugs or errors in your Stripe implementation before you go live with actual payments.
After you create a Stripe account, you can find a set of test API keys in the Stripe Dashboard. You can use these API keys to create and retrieve simulated data by making requests to the Stripe API. To start accepting real payments, you need to activate your account, toggle off test mode, and use the live API keys in your integration. Stripe provides a number of resources for testing your integration.
Impact on live mode
In the Dashboard, changing settings in test mode might also change them in live mode. Many Dashboard pages have a white notification box and disable live mode settings while in test mode. In this case, any settings still enabled are safe to use. If there’s no white callout, assume any changes made in test mode affect live mode settings (unless you see an orange test data banner).
Test mode versus live mode
All Stripe API requests occur in either test mode or live mode. API objects in one mode aren’t accessible to the other. For instance, a test-mode product object can’t be part of a live-mode payment.
| Type | When to use | Objects | How to use | Considerations |
|---|---|---|---|---|
| sandboxes | Use a sandbox, and its associated test API keys, as you build your integration. In a sandbox, card networks and payment providers don’t process payments. | API calls return simulated objects. For example, you can retrieve and use test account, payment, customer, charge, refund, transfer, balance, and subscription objects. | Use test credit cards and accounts. You can’t accept real payment methods or work with real accounts. | Identity doesn’t perform any verification checks. Also, Connect account objects don’t return sensitive fields. |
| live mode | Use live mode, and its associated live API keys, when you’re ready to launch your integration and accept real money. In live mode, card networks and payment providers do process payments. | API calls return real objects. For example, you can retrieve and use real account, payment, customer, charge, refund, transfer, balance, and subscription objects. | Accept real credit cards and work with customer accounts. You can accept actual payment authorizations, charges, and captures for credit cards and accounts. | Disputes have a more nuanced flow and a simpler testing process. Also, some payment methods have a more nuanced flow and require more steps. |
The Test mode toggle in the Dashboard doesn’t affect your integration code. Your test and live mode API keys affect the behavior of your code.
Test card numbers
Stripe provides a set of test card numbers that you can use to simulate various payment scenarios. You can use these test card numbers to create simulated payments in test mode without processing actual payments or charges.
When you use test card numbers, you can enter any expiration date in the future and any three-digit CVC code to simulate a successful payment. If you want to simulate a failed payment, you can use specific test card numbers and CVC codes provided by Stripe.
Test card numbers are only valid in test mode. Don’t use them for real payments.
Delete test data
To delete all of your test data from your Stripe account, complete the following steps:
- Log in to the Dashboard using your existing Stripe account.
- While in test mode, click Developers > Overview.
- Under Test data, click Review test data. The dialog gives you a list of all of your existing test data objects.
- Click Delete test data to initiate the deletion process. You can’t undo the deletion of your test data.
Test mode is temporarily unusable while the deletion process occurs.
Note
You must manually delete Meters because the object isn’t supported by the automated test data deletion process.
Test email
By default, Stripe doesn’t email customers in test mode. For example, paying an invoice in test mode doesn’t send a receipt email to the customer. Invoices finalized through the API in test mode also don’t send a receipt email to the customer.
If you want Stripe to email customers in test mode, you can do the following in the Dashboard:
- Create and manually send an invoice to a specific customer.
- Manually send a receipt for a paid invoice.
To verify emails for invoices and receipts, set the email address for your Team on the Customer object or receipt_ attribute on the PaymentIntent.
Testing use cases
The following table contains quality assurance (QA) testing use cases:
| Use case | Action |
|---|---|
| Charge success (capturing immediately) |
|
| PaymentIntent authorization success (capturing funds for later) |
|
| PaymentIntent capture success (capturing immediately or capturing funds for later) |
|
| Charge fail | The charge appears as Failed in the Dashboard under Payments.
|
| Radar block | No matter which version of Radar you use, it might block a charge due to high risk or a rule. The response is the same as what you get when a charge fails. |
| Charge disputed |
|
Charge inquiry opened | Inquiries are similar to disputes, with three key distinctions: no funds are withdrawn unless we elevate an inquiry to a dispute, they remain refundable until disputed, and have a different set of statuses. In this case, Stripe fires a
|
Dispute won |
|
Dispute lost | When a customer loses a dispute, Stripe updates the existing
|
Inquiry won | When you win an inquiry, your balance remains the same, as no funds were removed when you initially opened the inquiry. Stripe updates the existing
|
Inquiry lost |
|
Charge refunded | The charge appears as Refunded in the Dashboard under Payments.
|
Charge partially refunded |
|
| Account balance goes negative | Make sure to test for a negative balance on Stripe and verify that your bank accounts can accept debits from us. |
| Successful payout | If you enable webhooks for a successful payout (recommended), test your handling of the event. |
| Failed payout | If you enable webhooks for a failed payout (recommended), test your handling of the event. |
Stripe’s Postman collection
Postman is a widely-used API development tool. To make integrating Stripe easier, we provide a Payments-specific Postman collection with the tools you need to test the server-side component of your integration.
Import the collection
To begin, you need to access the Postman app. You can use either the browser or desktop version. After launching the app, import the collection.
To start this process on the web, press the Import button at the top-left corner, followed by the Link option. Insert the Payments collection link. If you’re using the Postman desktop app, click File > Import. After successfully importing, the collection appears under Collections.
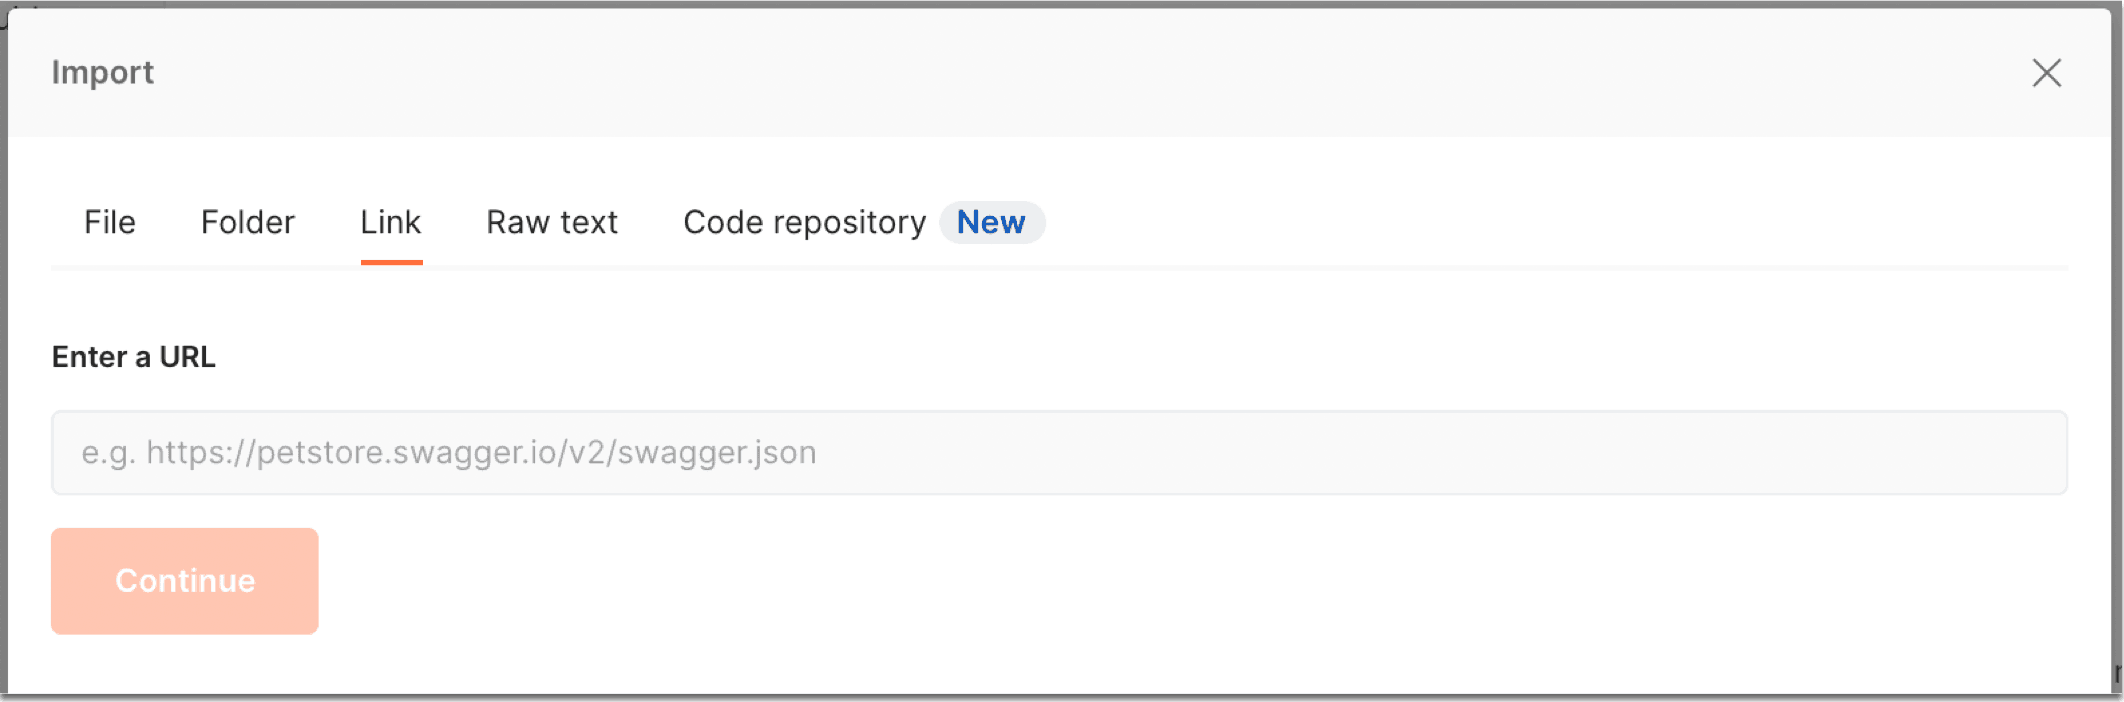
The import dialog
Use the collection
To use the collection, navigate to the collection you just imported and click Variables. Copy your testmode Stripe secret key from the Stripe Dashboard, and paste it into the Initial Value field. After you complete this step, you’re ready to begin making requests.
Other variables are populated by scripts during the runtime of the collection. For example, when creating a customer, price, charge or PaymentIntent, the system saves that ID through a script in the collection, which is then accessible for later requests, like issuing a refund.
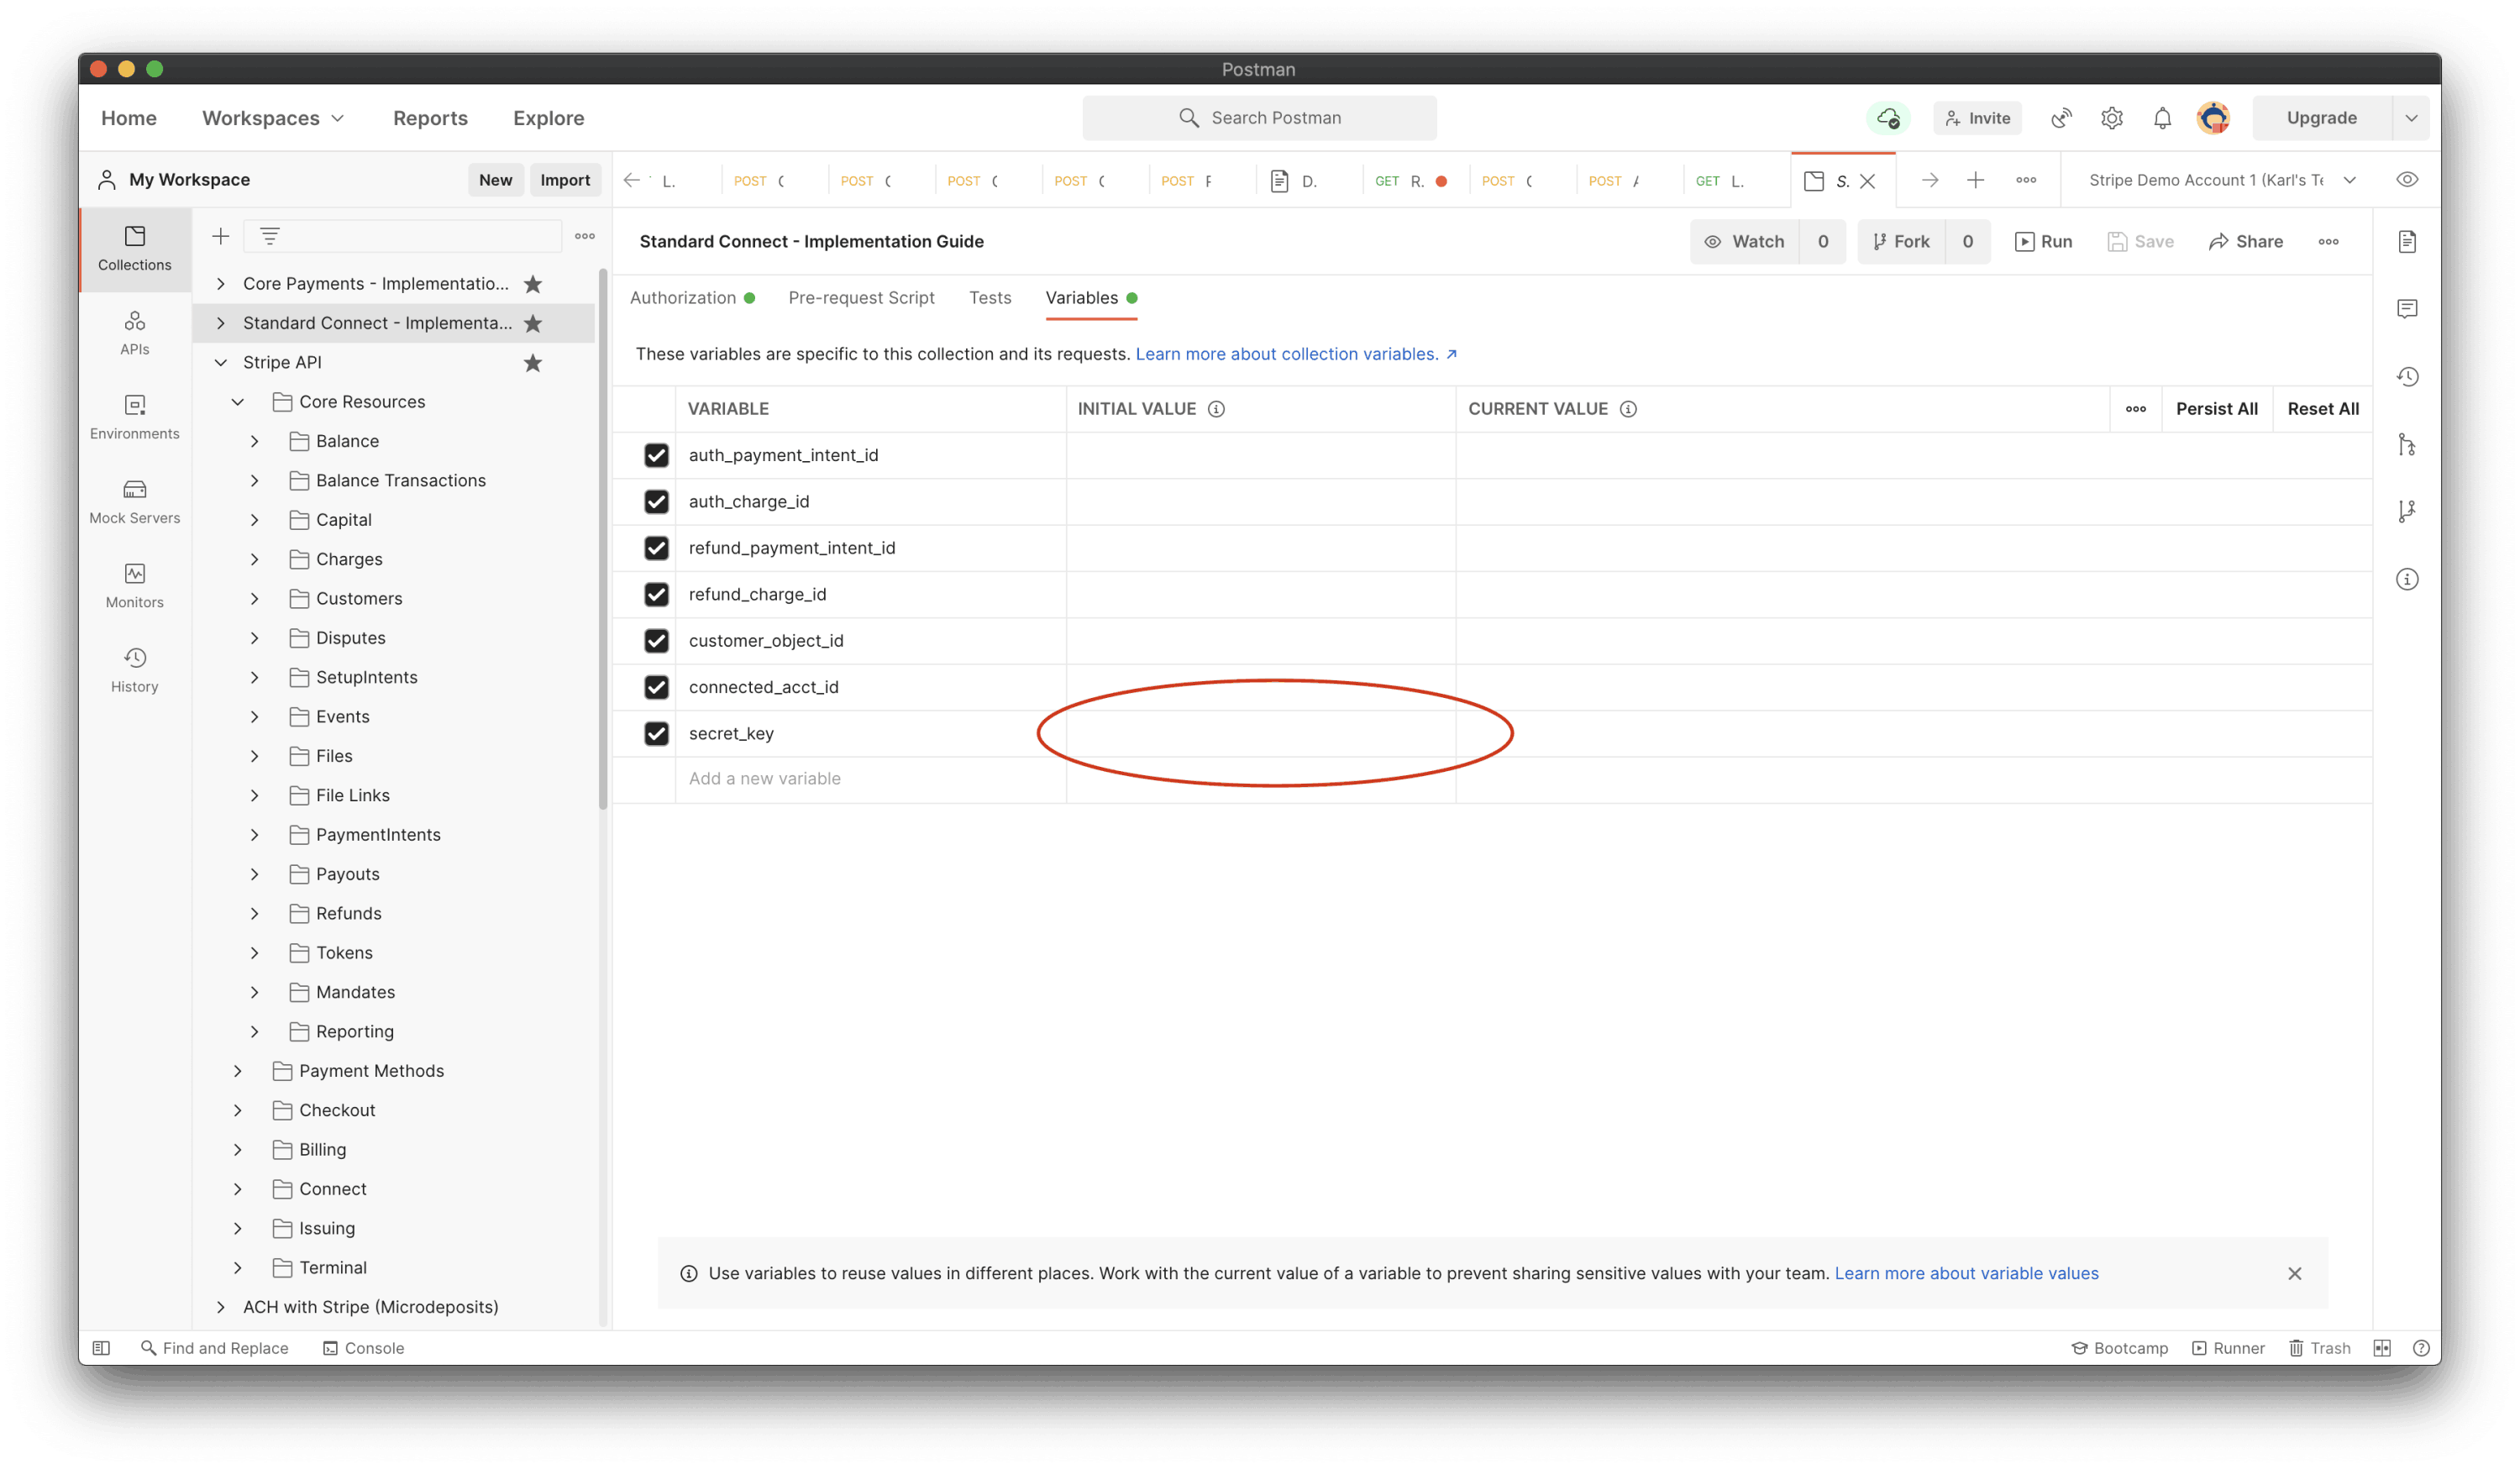
Add a secret key to a Postman collection