Access verification results
Learn how to access sensitive verification results.
You wrote code to display a modal to collect identity documents and handle verification outcomes. Now you might need access to the sensitive verification results such as your user’s date of birth or pictures of the collected document.
First, consider using the Identity Dashboard to access sensitive verification results. If needed, give team members controlled access to your Stripe account. This saves you development time and ensures the sensitive verification data is kept securely on Stripe.
You can access most verification details programmatically, such as the result of a verification check or the user’s name and address using your secret key. Access to more sensitive fields require restricted API keys.
| Verification result | Available in Dashboard | Secret key access | Restricted API key access | Recommended Verification Session field | Expand property |
|---|---|---|---|---|---|
| Address | verified_ | verified_ | |||
| Document type | last_ | last_ | |||
| First and last names | verified_ | last_ | |||
| Issuing country of the document | last_ | last_ | |||
| Result of the verification check | status | Expand not required | |||
| Issued date of the document | last_ | last_ | |||
| Type of ID number | last_ | last_ | |||
| Email address | verified_ | verified_ | |||
| Phone number | verified_ | verified_ | |||
| Expiration date of the document | last_ | last_ | |||
| Date of birth | verified_ | verified_ | |||
| Document ID number | last_ | last_ | |||
| Document images | last_ | last_ | |||
| Face images | last_ | last_ | |||
| ID number | verified_ | verified_ |
Restricted API keys allow access based on the security measures associated with it:
- Restricted keys — Allow access to sensitive verification results for verifications processed in the last 48 hours.
- IP restricted keys - Allow access to sensitive verification results for all verifications.
In this guide, you’ll learn how to:
- Consider your sensitive data access requirements carefully.
- Create restricted API keys.
- Make API requests to obtain sensitive verification results.
- Roll your keys if they’re compromised.
- Communicate your sensitive verification results and security measures to your users.
- Add IP restrictions to your key for long-term access to sensitive verification results.
- Consider your sensitive data access requirements carefully.
- Create restricted API keys.
- Make API requests to obtain sensitive verification results.
- Roll your keys if they’re compromised.
- Communicate your sensitive verification results and security measures to your users.
Consider your sensitive data access requirements carefully
To build an integration with Stripe Identity that prioritizes your user’s privacy, you must first decide the minimum amount of PII that you need access to. If you don’t need access to the most sensitive data (that requires authentication with a restricted API key), then your integration can authenticate using your secret key only.
To access PII resulting from a verification, you can retrieve a VerificationSession and expand either the verified_outputs field or - if you need more granular detail on the verification result - the last_verification_report. Expanding either of these fields automatically includes all of the PII fields they contain that only require a secret key.
Here is an example of how to expand the verified_ field to retrieve a user’s name that was verified by Stripe Identity.
If you do need to access sensitive PII that requires a restricted key, follow the steps in this guide.
Create a restricted API keyDashboard
You can use your account’s secret API keys to perform any API request without restriction. Accessing sensitive verification results requires restricted keys, which are more secure.
To create a new restricted key,
- Go to the API keys page in the Dashboard and click Create restricted key.
- Name your key.
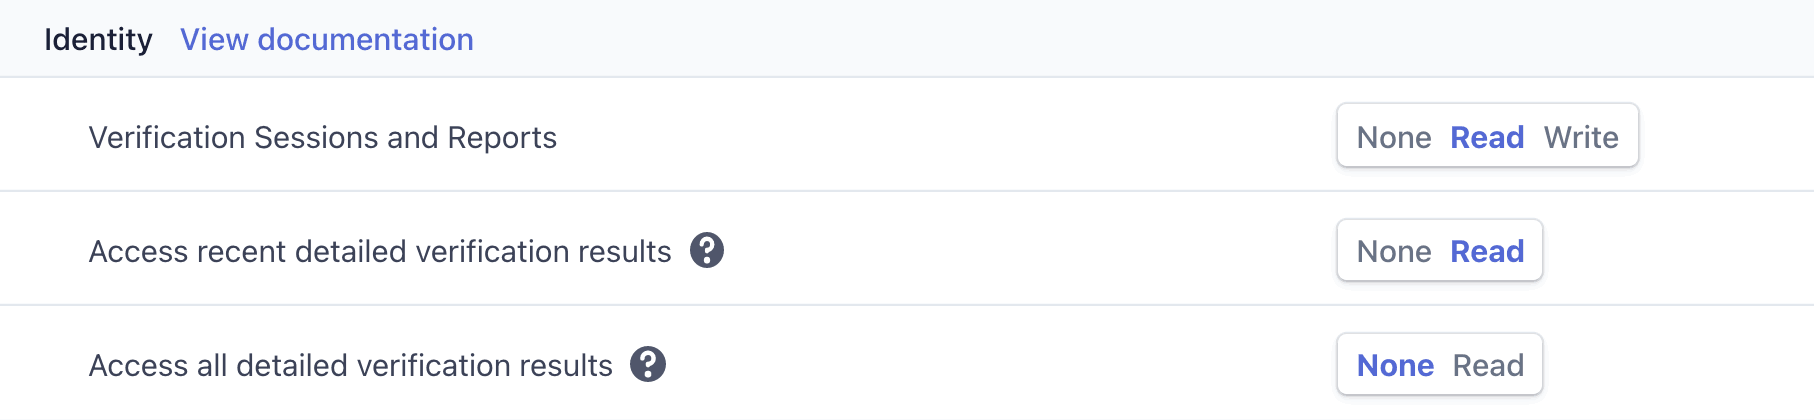
- Make sure the Identity Verification Sessions and Reports and Access recent sensitive verification results permissions are set to Read.
- (optional) If you need to access collected images, add the Files Write permission.
- Click Create key.
- Store the key securely. Learn more about keeping your keys safe.
Make API requests to obtain sensitive verification resultsServer-side
VerificationReports contain all the collected data and verification results from a submitted session. VerificationReports are created when all verification checks for a session are processed. They allow you to understand why a verification check failed and what data was successfully verified.
You can expand the last_verification_report session field to retrieve the associated VerificationReport.
By default, VerificationReports don’t include sensitive verification results. To access these, you’ll need to:
- Authenticate using the restricted API key created in step 1.
- Expand the fields you want to access.
Here’s an example of accessing the extracted date of birth, ID number, and document number from a document check:
Accessing collected images
You can retrieve identity document and face images that you collect as part of a session using the File Upload API. The following fields on a VerificationReport can hold a reference to a File resource in the Stripe API:
- document.files - images of the identity document
- selfie.document - image of the photo ID front
- selfie.selfie - image of the user’s face
Note
Document and face images are very sensitive and some countries, such as Germany, have laws prohibiting ID Document images from being shared or kept longer than necessary. As much as possible, access image content with short-lived FileLinks, don’t make copies of the file contents, and redact sessions and collected images when you’re done using them for the purpose collected.
To access the contents of the file, you need to authenticate using the previously created restricted key and Create a FileLink with a short expiration and send the url to the client:
Note
FileLinks for document and selfie files must expire within 30 seconds. We recommend not downloading the file contents on your server, instead send the FileLink URL to the client to display the image.
If you believe an attacker has accessed sensitive data collected by Identity, please reach out to support.
Roll your keys if they’re compromisedDashboard
Using restricted API keys that only have Identity permissions allows you to roll the keys in case of emergency without affecting other Stripe product integrations.
We recommend that you regularly monitor your restricted key usage to ensure that no one has gained access to them. In the Dashboard, you can use the overflow menu (…) to view request logs for a specific API key to view all the requests made from that key.
If an API key is compromised, roll the key in the Dashboard to block it and generate a new one. Make sure to expire it immediately to prevent bad actors from retrieving sensitive information.
Warning
Rolling blocks the API key and generates a new one. We recommend reviewing your security history for events related to this key. Any webhook endpoints created with this key will stay active, even after the key is rolled.
If you believe an attacker has accessed sensitive data collected by Identity, please reach out to support.
Communicate your sensitive data use and security measures
Make sure your privacy policy includes information on your use of sensitive verification results. It may also help if you provide information about your security practices.
See also