Skip to content
Sign in
An image of the Stripe logo
/
Create account
Sign in
Home
Payments
Finance automation
Banking as a service
Developer tools
No-code
All products
Home
Payments
Finance automation
Home
Payments
Finance automation
Banking as a service
Developer tools
Overview
Get started
About Stripe payments
Start an integration
Payment Links
Checkout
Web Elements
Mobile Elements
Payment scenarios
During the payment
After the payment
Add payment methods
More payment scenarios
Faster checkout with Link
Other Stripe products
Connect
    Overview
    Get started
    Collect payments then pay out
    Enable other businesses to accept payments directly
    Pay out money
    Explore Connect
    Onboard your accounts
    Choose your account type
    Standard
    Express
    Custom
    Update accounts
    Service agreement types
    Payment methods
    Account capabilities
    Handle verification with the API
    Additional Verifications
    Update verified info
    Connect embedded components
    Quickstart
    Quickstart (beta)
    Get started with Connect embedded components
    Customize Connect embedded components
    Accept payments
    Create a charge
    Create a payments page
    Create payment links with Connect
    Connect integration guide
    Dynamic payment methods
    Set statement descriptors
    Connect platforms using the Payment Methods API
    Create subscriptions
    Create invoices
    Debit Express and Custom connected accounts
    Pay out
    Set bank and debit card payouts
    Bank accounts and debit cards
    Manage payout schedule
    Manual payouts
    Payout reversals
    Instant Payouts
    Cross-border payouts
    Crypto payouts
    Manage funds
    Add money to your platform balance
    Account balance
    Handle multiple currencies
    Manage accounts
    Best practices
    Listen for updates
    Dashboard account management
    Understanding risk offerings
    Platform controls for Standard accounts
    Make API calls for connected accounts
    Set MCCs
    Testing
    Payment Method Configurations API
    Migrate to Payment Method Configurations API
    Multiple payment method configurations
    Manage tax forms
    Overview
    Get started with tax reporting
    1099 Tax Support and Communication Guide
    Tax form settings
    Calculation methods
    Identity information on tax forms
    File tax forms
    File tax forms with states
    Identify forms with missing information
    Update tax forms
    Deliver tax forms
    Deliver tax forms with Stripe Express
    Correct tax forms
    Split tax forms
    Tax year changeover
    What's new for tax year 2023
Terminal
Radar
Financial Connections
Crypto
Identity
Climate
Resources
About the APIs
Implementation guides
Regulation support
Testing
Connect
·
HomePaymentsConnect

Multiple configurations for your Connect accounts

Learn how to allow your connected accounts to display different sets of payment methods to their buyers in different scenarios.

Use this feature if your platform supports setting different types of payment methods for different types of transactions (for example, subscriptions versus one-time checkout) or for different invoice amounts (for example, invoices more than a certain dollar amount can be paid using BNPL).

Create a new payment method configuration in your Dashboard

Navigate to the payment method settings page for your connected accounts in the Stripe Dashboard. This is where you control your platform level “parent” configurations. Your connected accounts receive a “child” configuration for each parent that they can customize within the constraints you set below.

You start with one parent configuration by default. To create an additional configuration, click Add new configuration, and give it a name.
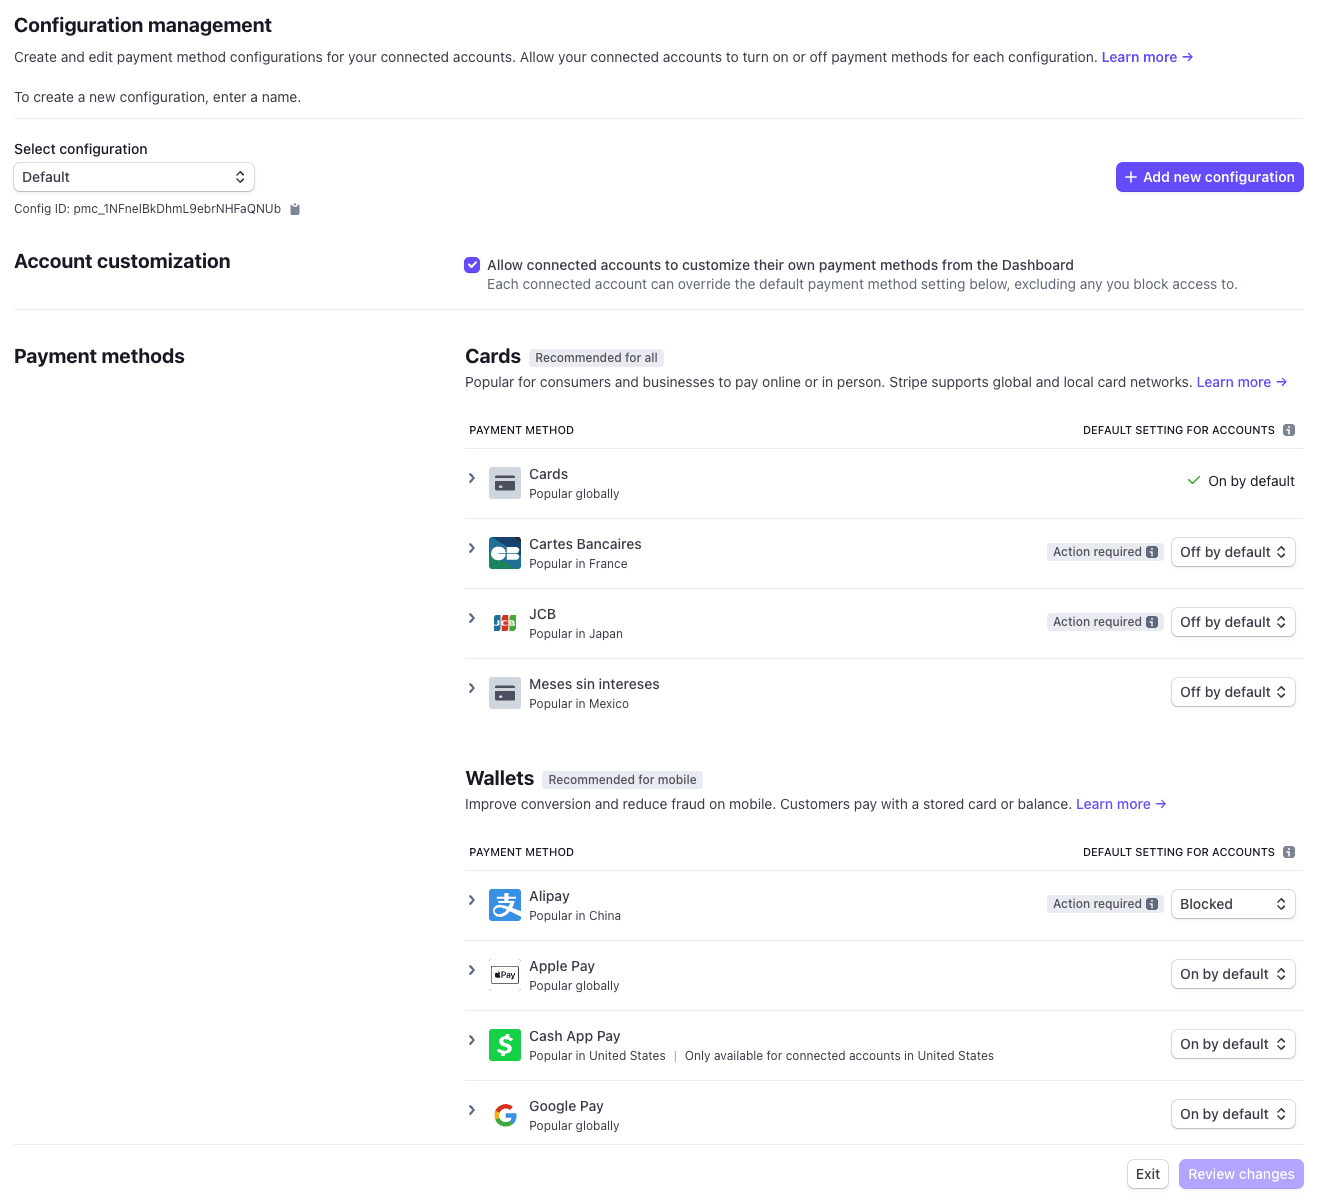
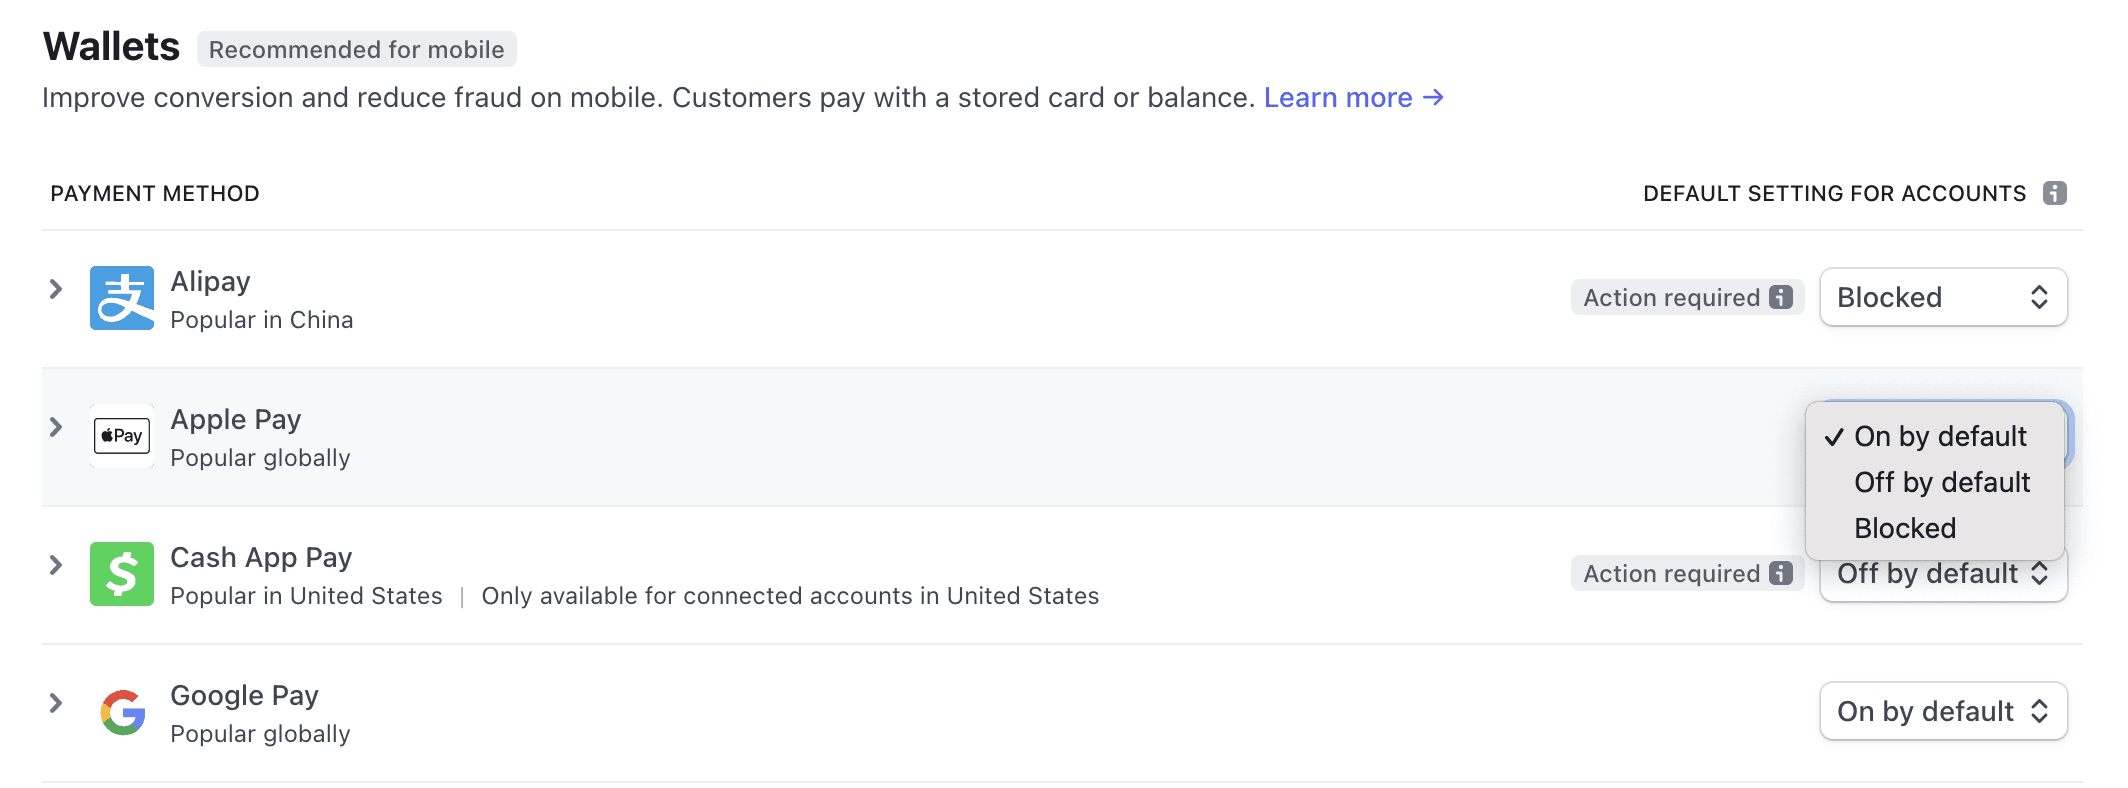
Payment method configuration page

Set the platform level default state

You can apply the default setting for each payment method to your new parent configuration, and control what customizations your connected accounts can make. Use the dropdown to select the desired setting:

  • On by default the payment method is on by default. Connected accounts can turn it on and off.
  • Off by default the payment method is off by default. Connected accounts can turn it on and off.
  • Blocked turns the payment method off for all connected accounts. Connected accounts can’t turn it on.
Configure settings for each payment method

Allow your connected accounts to customize

Standard Connected accounts can visit the Dashboard to turn payment methods on or off if the payment method has been set to either On by default or Off by default. Your connected accounts see the newly created child configuration in their Dashboard payment method settings. Your connected accounts can use the dropdown menu at the top of the page to choose a configuration to edit.

If you want your connected accounts to customize their payment method settings from your platform dashboard instead of the Stripe Dashboard, or if you have Custom or Express accounts who don’t have access to the Stripe Dashboard, you can integrate with the Payment Method Configurations API.

Use the Payment Method Configurations API with the connected account ID and child configuration ID to read the current state of a payment method for a specific connected account on that configuration.

Command Line
curl https://api.stripe.com/v1/payment_method_configurations/
{{PAYMENT_METHOD_CONFIGURATION_ID}}
\ -u "
sk_test_4eC39HqLyjWDarjtT1zdp7dc
:"
\ -H "Stripe-Account:
{{CONNECTED_ACCOUNT_ID}}
"
{ "object": "list", "data": [ { "id":
"{{PAYMENT_METHOD_CONFIGURATION_ID}}"
, "object": "payment_method_configuration", "name": "My Custom Configuration", "active": true, "is_default": true, "livemode": false, "parent":
"{{PAYMENT_METHOD_CONFIGURATION_ID}}"
, "acss_debit": { "available": false, "display_preference": { "overridable": true, "preference": "off", "value": "off" } }, "affirm": { "available": false, "display_preference": { "overridable": true, "preference": "off", "value": "off" } }, "afterpay_clearpay": { "available": false, "display_preference": { "overridable": true, "preference": "off", "value": "off" } }, ... additional payment methods } ], "has_more": false, "url": "/v1/payment_method_configurations" }

If successful, the return list displays each payment method and includes two parameters outlining availability and display preference.

  • available is the combination of capability value (active, inactive, pending, or unrequested) and display_preference value.

    You can use the available field to know whether or not a buyer sees this payment method at checkout time. If available is true, that payment method’s capability is active and display_preference is on. If available is false, the payment method either doesn’t have an active capability or the display_preference value is off, and buyers won’t see it at checkout time. To simplify your integration and take advantage of other features, use payment methods that you manage from the Dashboard at checkout, which automatically reads this parameter and shows the right payment methods to buyers.

  • display_preference has three components: overridable, preference, and value.

    • overridable is read-only, and indicates whether the connected account’s preference can override the default set above.
    • preference is writable, and stores the connected account’s preference.
    • value is read-only, and reflects the effective display_preference value.

Note

Only payment methods that are relevant in the connected account’s country are shown in the API response and are configurable. Check country support.

When a connected account owner takes action to turn on or off a payment method, you can update the display_preference preference attribute. This stores the connected account owner’s preference for that payment method and is used to determine whether buyers see the payment method.

Command Line
curl https://api.stripe.com/v1/payment_method_configurations/
{{PAYMENT_METHOD_CONFIGURATION_ID}}
\ -u "
sk_test_4eC39HqLyjWDarjtT1zdp7dc
:"
\ -d "affirm[display_preference][preference]"=on
{ "id":
"{{PAYMENT_METHOD_CONFIGURATION_ID}}"
, "object": "payment_method_configuration", "name": "My Custom Configuration", "active": true, "is_default": true, "livemode": false, "acss_debit": { "available": false, "display_preference": { "overridable": true, "preference": "off", "value": "off" } }, "affirm": { "available": true, "display_preference": { "overridable": true, "preference": "on", "value": "on" } }, "afterpay_clearpay": { "available": false, "display_preference": { "overridable": true, "preference": "off", "value": "off" } }, ... additional payment methods }

When your connected accounts turn on payment methods with the API, Stripe intelligently ranks the payment methods based on the buyer’s location, order size, and other factors to always show the highest converting payment methods first.

Display available payment methods on checkout

Pass the parent configuration ID when rendering your checkout flow to use your new configuration. Stripe automatically looks up the child configuration for the associated connected account and uses their customized settings.

If you’re using the Payment Element and creating a PaymentIntent before rendering the Payment Element, you can pass the parent ID into your PaymentIntent.

var stripe = Stripe('pk_12345...', {stripeAccount: 'acct_12345'}); await stripe.paymentIntents.create({ amount: 1099, currency: 'usd', // In the latest version of the API, specifying the `automatic_payment_methods` parameter is optional because Stripe enables its functionality by default. automatic_payment_methods: { enabled: true }, // Your parent configuration ID payment_method_configuration:
'{{PAYMENT_METHOD_CONFIGURATION_ID}}'
});

If you’re using the Payment Element with the deferred intent creation integration path, you can pass the parent ID in to your elements session options.

const options = { mode: 'payment', amount: 1099, currency: 'usd', payment_method_configuration:
'{{PAYMENT_METHOD_CONFIGURATION_ID}}'
}

If you’re creating a Checkout session, you can pass the parent ID in to your checkout session options.

Command Line
curl https://api.stripe.com/v1/checkout/sessions \ -u "
sk_test_4eC39HqLyjWDarjtT1zdp7dc
:"
\ -d mode=payment \ -d "line_items[0][price]"=
{{PRICE_ID}}
\ -d "line_items[0][quantity]"=1 \ --data-urlencode success_url="https://example.com/success" \ --data-urlencode cancel_url="https://example.com/cancel" \ -d currency=usd \ -d payment_method_configuration=
{{PAYMENT_METHOD_CONFIGURATION_ID}}

(Optional)—Apple Pay, Google Pay, and Link

Some payment methods, such as Apple Pay, Google Pay and Link, aren’t included as separate payment method types on a PaymentIntent and are confirmed only when supplying card. With the Payment Method Configurations API, you can let connected account owners opt in or opt out of these specific payment methods and prevent them from showing up in the UI.

Was this page helpful?
Need help? Contact Support.
Watch our developer tutorials.
Check out our product changelog.
Questions? Contact Sales.
Powered by Markdoc
You can unsubscribe at any time. Read our privacy policy.
On this page
Create a new payment method configuration in your Dashboard
Set the platform level default state
Allow your connected accounts to customize
Display available payment methods on checkout
(Optional)—Apple Pay, Google Pay, and Link
Products Used
Connect
Stripe Shell
Test mode
Welcome to the Stripe Shell! Stripe Shell is a browser-based shell with the Stripe CLI pre-installed. Log in to your Stripe account and press Control + Backtick (`) on your keyboard to start managing your Stripe resources in test mode. - View supported Stripe commands: - Find webhook events: - Listen for webhook events: - Call Stripe APIs: stripe [api resource] [operation] (e.g., )
The Stripe Shell is best experienced on desktop.
$