Create account
Sign in
Home
Payments
Business operations
Financial services
Developer tools
Security
All products
Home
Payments
Business operations
Home
Payments
Business operations
Financial services
Developer tools
Support
Overview
Overview
Customers
Products and Prices
Tax Rates
Customer portal
Quotes
Start with a use case
Subscriptions with Checkout
Fixed-price subscriptions with Elements
Metered billing with Elements
Per-seat billing with Elements
Manage subscriptions
How subscriptions work
Subscription webhooks
Change subscriptions
Strong Customer Authentication (SCA)
Improved tax support
Invoices API updates
Migrating to Prices
Additional features
Testing
Add payment methods
Bacs Direct Debit in the UK
BECS Direct Debit in Australia
SEPA Direct Debit in the EU
Invoice customers
How invoices work
Create an invoice
Invoices with Connect
Customize invoices
Hosted invoice page
Additional features
Revenue recognition
Overview
Reports
Methodology
Examples
Overrides
Testing
billing
·
HomePaymentsSubscriptions and invoices

Create an invoice

Learn how to create an invoice and bill a customer.

Without code With code

This guide describes how to create an invoice and collect payment. Invoices provide an itemized list of goods and services rendered, which includes the cost, quantity, and taxes. You can also use them as a tool to collect payment.

Businesses that aren’t subscription based but still need to send invoices to their customers commonly use one-off invoices. For example, a consulting business might send invoices for the time and resources that each consultation uses.

The Stripe Dashboard is the most common way to create one-off invoices but you can automate this process if you integrate with the API.

1 Create an invoice Dashboard

To create an invoice in the Stripe Dashboard:

  1. Navigate to the Create an invoice page.
  2. Select + Add new customer and fill out the Name, Account email, and Description fields.
  3. Click Add customer.
  4. Enter an item description and price.
  5. Click Send invoice.
  6. Verify the email address in the Send to field and then click Send invoice again. The address is autofilled using the customer’s email but you can modify it if you want to use a test email address.

Creating an invoice with the Dashboard.

Optional Duplicate an invoice

With the Dashboard, you can also create a one-off invoice by duplicating a previous invoice and modifying the new copy. When you duplicate an invoice, Stripe copies all the information on the original invoice except for credit notes, and any deleted or archived products, prices, coupons, discounts, or tax rates.

To duplicate an invoice, view your invoices and click the ••• button for the invoice you want to duplicate. Click the Duplicate invoice button to create, edit, and then send the new invoice.
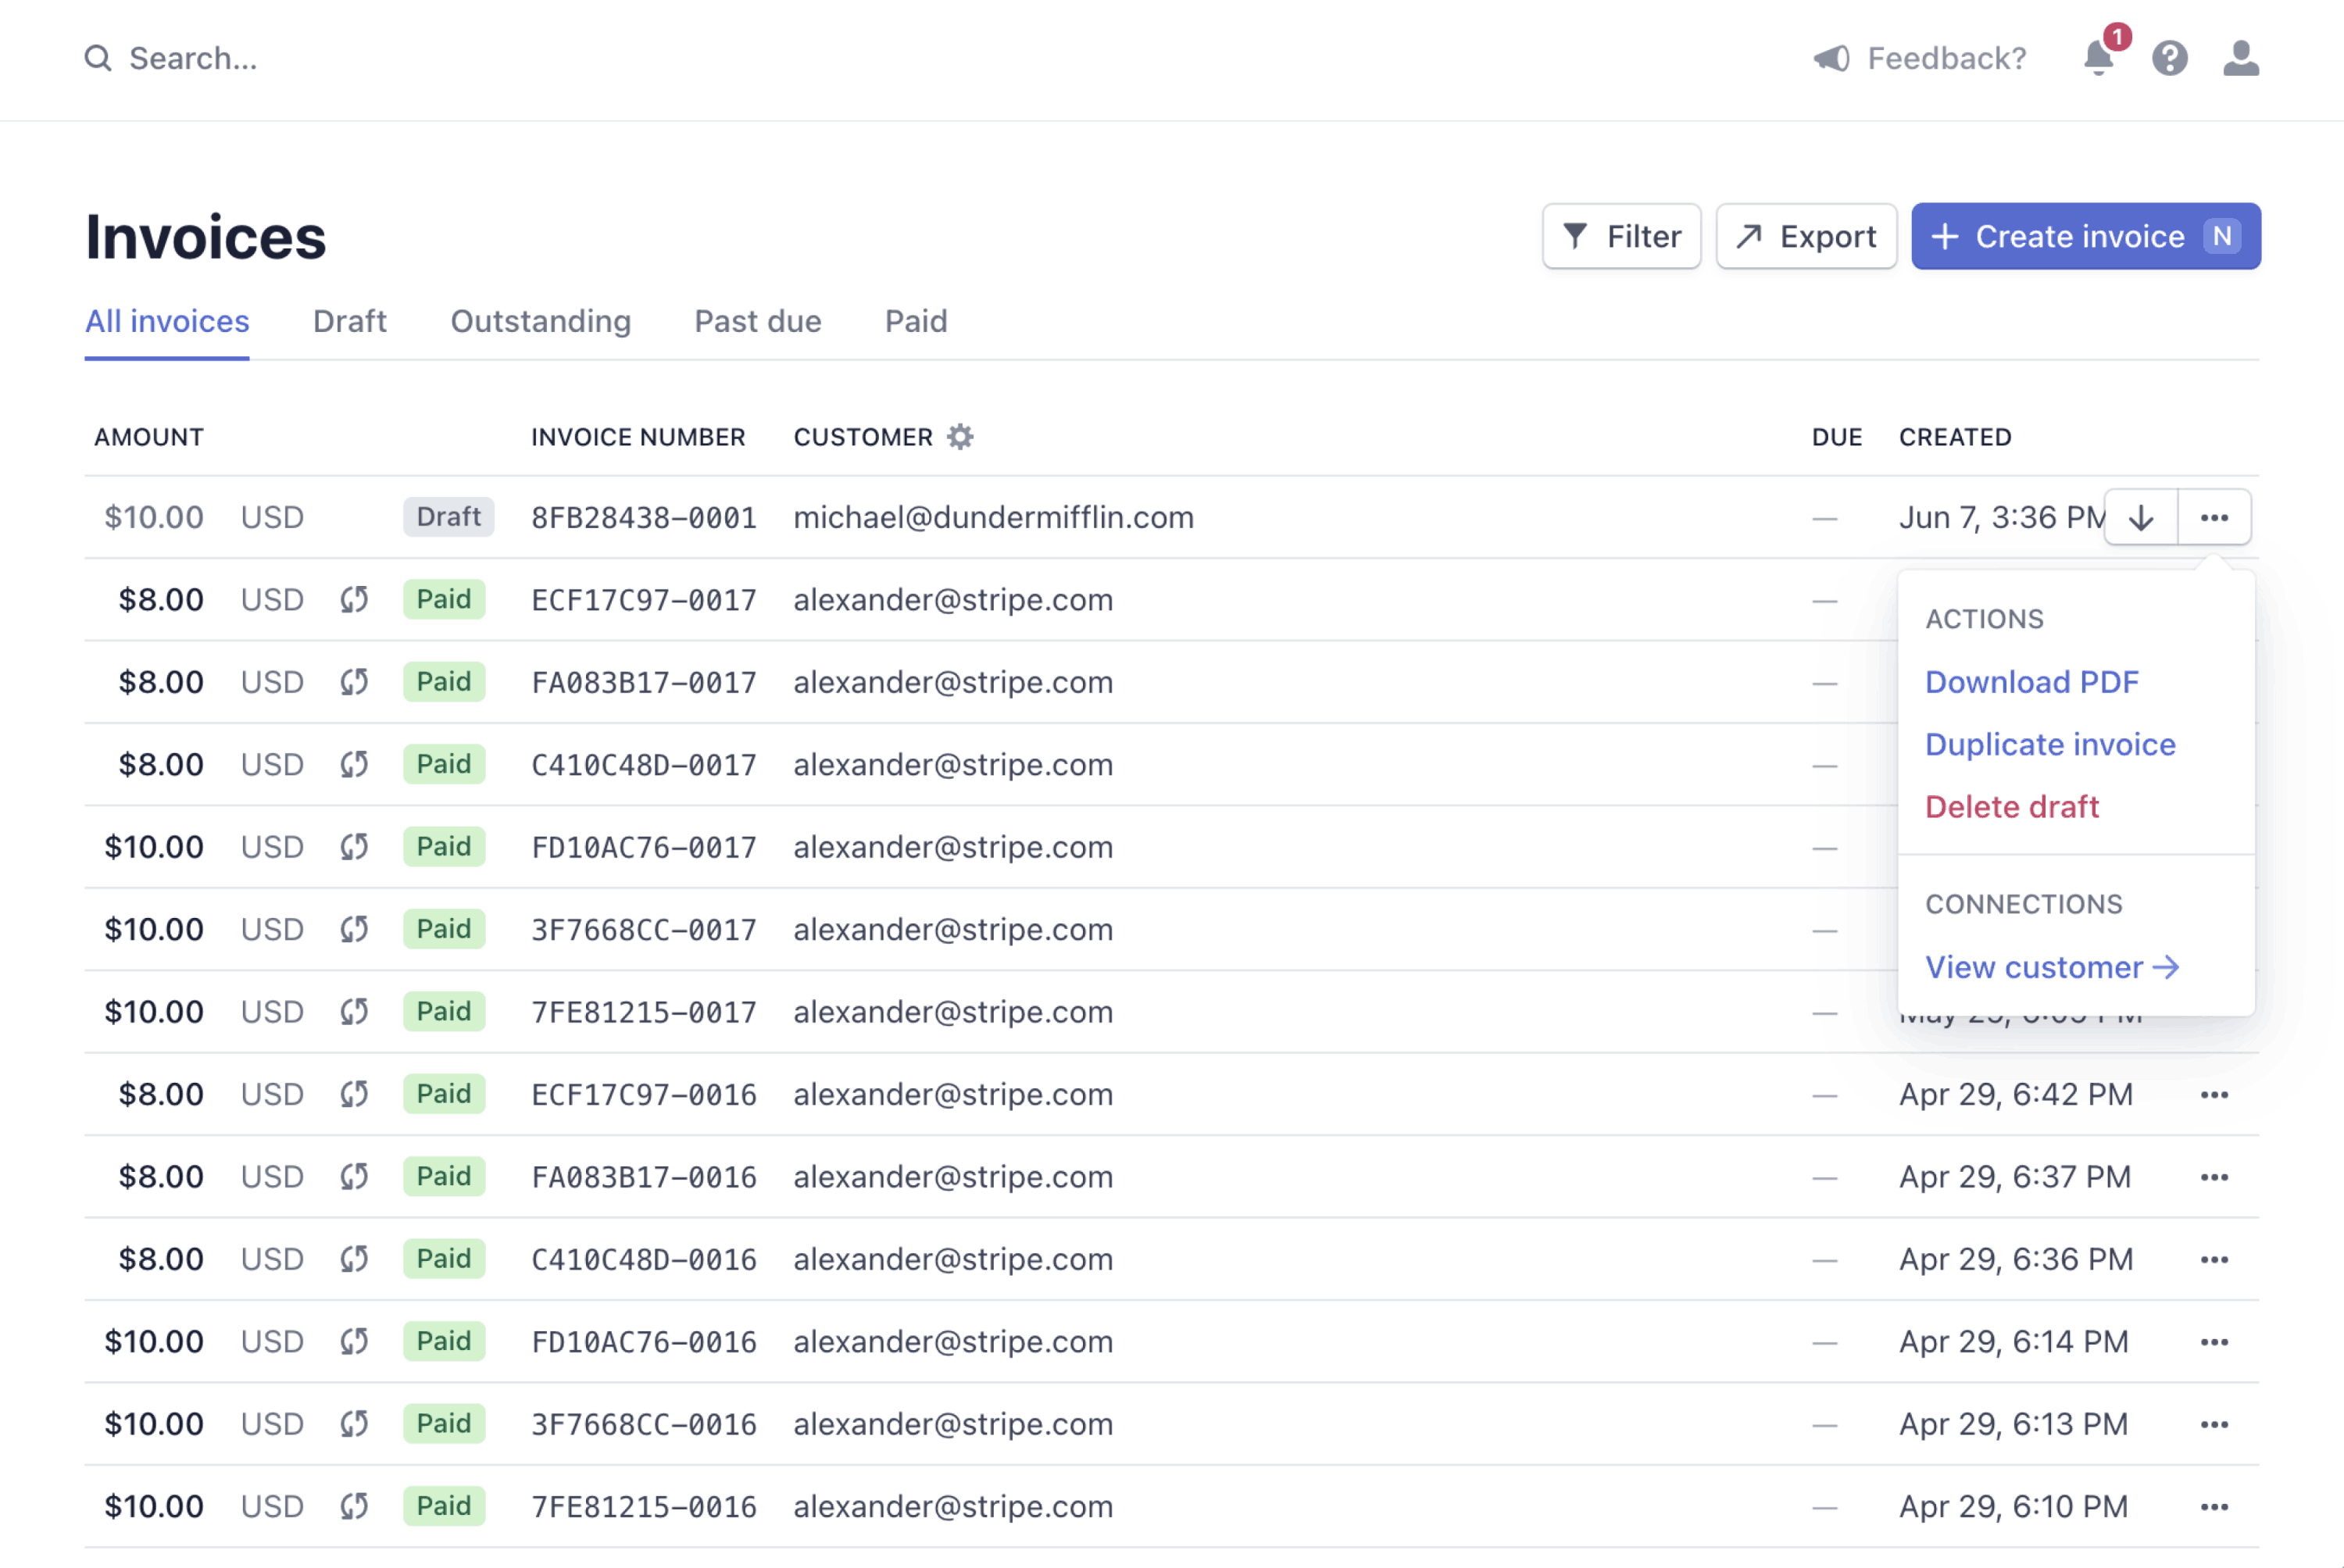
Duplicating an invoice with the Dashboard.

This guide describes how to create an invoice and collect payment. Invoices provide an itemized list of goods and services rendered, which includes the cost, quantity, and taxes. You can also use them as a tool to collect payment.

Businesses that aren’t subscription based but still need to send invoices to their customers commonly use one-off invoices. For example, a consulting business might send invoices for the time and resources that each consultation uses.

The Stripe Dashboard is the most common way to create one-off invoices but you can automate this process if you integrate with the API.

1 Set up Stripe Server-side

Use our official libraries for access to the Stripe API from your application:

Ruby Python PHP Java Node Go .NET
Terminal
# Available as a gem gem install stripe
Gemfile
# If you use bundler, you can add this line to your Gemfile gem 'stripe'
Terminal
# Install through pip pip install --upgrade stripe
PyPI
# Or find the Stripe package on http://pypi.python.org/pypi/stripe/
requirements.txt
# Find the version you want to pin: # https://github.com/stripe/stripe-python/blob/master/CHANGELOG.md # Specify that version in your requirements.txt file stripe>=2.48.0,<3.0
Terminal
# Install the PHP library via Composer composer require stripe/stripe-php
Source
# Or download the source directly: https://github.com/stripe/stripe-php/releases
build.gradle
/* For Gradle, add the following dependency to your build.gradle and replace {VERSION} with the version number you want to use from - https://mvnrepository.com/artifact/com.stripe/stripe-java or - https://github.com/stripe/stripe-java/releases/latest */ implementation "com.stripe:stripe-java:{VERSION}"
pom.xml
<!-- For Maven, add the following dependency to your POM and replace {VERSION} with the version number you want to use from - https://mvnrepository.com/artifact/com.stripe/stripe-java or - https://github.com/stripe/stripe-java/releases/latest --> <dependency> <groupId>com.stripe</groupId> <artifactId>stripe-java</artifactId> <version>{VERSION}</version> </dependency>
Other environments
# For other environments, manually install the following JARs: # - The Stripe JAR from https://github.com/stripe/stripe-java/releases/latest # - Google Gson from https://github.com/google/gson
Terminal
# Install via npm npm install --save stripe
Terminal
# Make sure your project is using Go Modules go mod init # Install stripe-go go get -u github.com/stripe/stripe-go/v71
app.go
// Then import the package import ( "github.com/stripe/stripe-go/v71" )
Terminal
# Install via dotnet dotnet add package Stripe.net dotnet restore
Terminal
# Or install via NuGet PM> Install-Package Stripe.net

2 Create a customer Server-side

The Customer object represents the customer purchasing your product and is required for creating an invoice.

curl Ruby Python PHP Java Node Go .NET
curl https://api.stripe.com/v1/customers \ -u sk_test_4eC39HqLyjWDarjtT1zdp7dc: \ -d name="jenny rosen" \ -d email="jenny.rosen@example.com" \ -d description="My First Test Customer (created for API docs)"
# Set your secret key. Remember to switch to your live secret key in production! # See your keys here: https://dashboard.stripe.com/account/apikeys Stripe.api_key = 'sk_test_4eC39HqLyjWDarjtT1zdp7dc' customer = Stripe::Customer.create({ name: 'jenny rosen', email: 'jenny.rosen@example.com', description: 'My First Test Customer (created for API docs)', })
# Set your secret key. Remember to switch to your live secret key in production! # See your keys here: https://dashboard.stripe.com/account/apikeys stripe.api_key = 'sk_test_4eC39HqLyjWDarjtT1zdp7dc' customer = stripe.Customer.create( name='jenny rosen', email='jenny.rosen@example.com', description='My First Test Customer (created for API docs)', )
// Set your secret key. Remember to switch to your live secret key in production! // See your keys here: https://dashboard.stripe.com/account/apikeys \Stripe\Stripe::setApiKey('sk_test_4eC39HqLyjWDarjtT1zdp7dc'); $customer = \Stripe\Customer::create([ 'name' => 'jenny rosen', 'email' => 'jenny.rosen@example.com', 'description' => 'My First Test Customer (created for API docs)' ]);
// Set your secret key. Remember to switch to your live secret key in production! // See your keys here: https://dashboard.stripe.com/account/apikeys Stripe.apiKey = "sk_test_4eC39HqLyjWDarjtT1zdp7dc"; CustomerCreateParams params = CustomerCreateParams.builder() .setName("jenny rosen") .setEmail("jenny.rosen@example.com") .setDescription("My First Test Customer (created for API docs)") .build(); Customer customer = Customer.create(params);
// Set your secret key. Remember to switch to your live secret key in production! // See your keys here: https://dashboard.stripe.com/account/apikeys const Stripe = require('stripe'); const stripe = Stripe('sk_test_4eC39HqLyjWDarjtT1zdp7dc'); const customer = await stripe.customers.create({ name: 'jenny rosen', email: 'jenny.rosen@example.com', description: 'My First Test Customer (created for API docs)', });
// Set your secret key. Remember to switch to your live secret key in production! // See your keys here: https://dashboard.stripe.com/account/apikeys stripe.Key = "sk_test_4eC39HqLyjWDarjtT1zdp7dc" params := &stripe.CustomerParams{ Name: stripe.String("jenny rosen"), Email: stripe.String("jenny.rosen@example.com"), Description: stripe.String("My First Test Customer (created for API docs)"), } cus, _ := customer.New(params)
// Set your secret key. Remember to switch to your live secret key in production! // See your keys here: https://dashboard.stripe.com/account/apikeys StripeConfiguration.ApiKey = "sk_test_4eC39HqLyjWDarjtT1zdp7dc"; var options = new CustomerCreateOptions { Name = "jenny rosen", Email = "jenny.rosen@example.com", Description = "My First Test Customer (created for API docs)", }; var service = new CustomerService(); var customer = service.Create(options);

This returns a Customer object:

{ "id": "cus_GBV60HKsE0mb5v", "object": "customer", "address": null, "balance": 0, "created": 1611199058, "currency": "usd", "default_source": null, "delinquent": false, "description": "My First Test Customer (created for API docs)", "discount": null, "email": null, "invoice_prefix": "373D533", "invoice_settings": { "custom_fields": null, "default_payment_method": null, "footer": null }, "livemode": false, "metadata": {}, "name": null, "phone": null, "preferred_locales": [], "shipping": null, "sources": { "object": "list", "data": [], "has_more": false, "url": "/v1/customers/cus_GBV60HKsE0mb5v/sources" }, "subscriptions": { "object": "list", "data": [], "has_more": false, "url": "/v1/customers/cus_GBV60HKsE0mb5v/subscriptions" }, "tax_exempt": "none", "tax_ids": { "object": "list", "data": [], "has_more": false, "url": "/v1/customers/cus_GBV60HKsE0mb5v/tax_ids" }, "tax_info": null, "tax_info_verification": null }
{ "id": "cus_GBV60HKsE0mb5v", "object": "customer", "address": null, "balance": 0, "created": 1611199058, "currency": "usd", "default_source": null, "delinquent": false, "description": "My First Test Customer (created for API docs)",
See all 46 lines "discount": null, "email": null, "invoice_prefix": "373D533", "invoice_settings": { "custom_fields": null, "default_payment_method": null, "footer": null }, "livemode": false, "metadata": {}, "name": null, "phone": null, "preferred_locales": [], "shipping": null, "sources": { "object": "list", "data": [], "has_more": false, "url": "/v1/customers/cus_GBV60HKsE0mb5v/sources" }, "subscriptions": { "object": "list", "data": [], "has_more": false, "url": "/v1/customers/cus_GBV60HKsE0mb5v/subscriptions" }, "tax_exempt": "none", "tax_ids": { "object": "list", "data": [], "has_more": false, "url": "/v1/customers/cus_GBV60HKsE0mb5v/tax_ids" }, "tax_info": null, "tax_info_verification": null }

After creating the customer, store the id value in your database so you can use it later. For example, the next step uses the customer ID to create an invoice.

3 Create the invoice Server-side

To create an invoice, pass the customer ID and a price:

curl Ruby Python PHP Java Node Go .NET
# Using the customer ID returned in step 2 curl https://api.stripe.com/v1/invoiceitems \ -u sk_test_4eC39HqLyjWDarjtT1zdp7dc: \ -d customer=cus_4fdAW5ftNQow1a \ -d price=price_CBb6IXqvTLXp3f curl https://api.stripe.com/v1/invoices \ -u sk_test_4eC39HqLyjWDarjtT1zdp7dc: \ -d customer=cus_4fdAW5ftNQow1a \ -d auto_advance=true
# Set your secret key. Remember to switch to your live secret key in production! # See your keys here: https://dashboard.stripe.com/account/apikeys Stripe.api_key = 'sk_test_4eC39HqLyjWDarjtT1zdp7dc' Stripe::InvoiceItem.create({ customer: 'cus_4fdAW5ftNQow1a', price: 'price_CBb6IXqvTLXp3f', }) invoice = Stripe::Invoice.create({ customer: 'cus_4fdAW5ftNQow1a', auto_advance: true, # auto-finalize this draft after ~1 hour })
# Set your secret key. Remember to switch to your live secret key in production! # See your keys here: https://dashboard.stripe.com/account/apikeys stripe.api_key = 'sk_test_4eC39HqLyjWDarjtT1zdp7dc' stripe.InvoiceItem.create( customer='cus_4fdAW5ftNQow1a', price='price_CBb6IXqvTLXp3f', ) stripe.Invoice.create( customer='cus_4fdAW5ftNQow1a', auto_advance=True # auto-finalize this draft after ~1 hour )
// Set your secret key. Remember to switch to your live secret key in production! // See your keys here: https://dashboard.stripe.com/account/apikeys \Stripe\Stripe::setApiKey('sk_test_4eC39HqLyjWDarjtT1zdp7dc'); \Stripe\InvoiceItem::create([ 'customer' => 'cus_4fdAW5ftNQow1a', 'price' => 'price_CBb6IXqvTLXp3f', ]); \Stripe\Invoice::create([ 'customer' => 'cus_4fdAW5ftNQow1a', 'auto_advance' => true, /* auto-finalize this draft after ~1 hour */ ]);
// Set your secret key. Remember to switch to your live secret key in production! // See your keys here: https://dashboard.stripe.com/account/apikeys Stripe.apiKey = "sk_test_4eC39HqLyjWDarjtT1zdp7dc"; InvoiceItemCreateParams invoiceItemParams = InvoiceItemCreateParams.builder() .setCustomer("cus_4fdAW5ftNQow1a") .setPrice("price_CBb6IXqvTLXp3f") .build(); InvoiceItem.create(invoiceItemParams); InvoiceCreateParams invoiceParams = InvoiceCreateParams.builder() .setCustomer("cus_4fdAW5ftNQow1a") .setAutoAdvance(true) // auto-finalize this draft after ~1 hour .build(); Invoice.create(invoiceParams);
// Set your secret key. Remember to switch to your live secret key in production! // See your keys here: https://dashboard.stripe.com/account/apikeys const Stripe = require('stripe'); const stripe = Stripe('sk_test_4eC39HqLyjWDarjtT1zdp7dc'); const invoiceItem = await stripe.invoiceItems.create({ customer: 'cus_4fdAW5ftNQow1a', price: 'price_CBb6IXqvTLXp3f', }); const invoice = await stripe.invoices.create({ customer: 'cus_4fdAW5ftNQow1a', auto_advance: true, // auto-finalize this draft after ~1 hour });
// Set your secret key. Remember to switch to your live secret key in production! // See your keys here: https://dashboard.stripe.com/account/apikeys stripe.Key = "sk_test_4eC39HqLyjWDarjtT1zdp7dc" params := &stripe.InvoiceItemParams{ Customer: stripe.String("cus_4fdAW5ftNQow1a"), Price: stripe.String("price_CBb6IXqvTLXp3f"), } ii, _ := invoiceitem.New(params) invParams := &stripe.InvoiceParams{ Customer: stripe.String("cus_4fdAW5ftNQow1a"), AutoAdvance: stripe.Bool(true), } in, _ := invoice.New(invParams)
// Set your secret key. Remember to switch to your live secret key in production! // See your keys here: https://dashboard.stripe.com/account/apikeys StripeConfiguration.ApiKey = "sk_test_4eC39HqLyjWDarjtT1zdp7dc"; var options = new InvoiceItemCreateOptions { Customer = "cus_4fdAW5ftNQow1a", Price = "price_CBb6IXqvTLXp3f", }; var service = new InvoiceItemService(); var invoiceItem = service.Create(options); var invoiceOptions = new InvoiceCreateOptions { Customer = "cus_4fdAW5ftNQow1a", AutoAdvance = true, }; var invoiceService = new InvoiceService(); var invoice = invoiceService.Create(invoiceOptions);

To simplify the example, auto_advance is set to true. This means Stripe automatically finalizes the invoice after a few hours, making the invoice ready for payment. In test mode, emails are not sent but you can verify the invoice was created by checking the Invoices section of the Dashboard. The invoice will have a Scheduled status until it’s automatically finalized.

If you set auto_advance to false, you can continue to modify the invoice until you finalize it. You can finalize a draft invoice using the Dashboard by sending it to the customer or paying it. You can also use the finalize API:

curl Ruby Python PHP Java Node Go .NET
curl https://api.stripe.com/v1/invoices/:id/finalize \ -u sk_test_4eC39HqLyjWDarjtT1zdp7dc: \ -X POST
# Set your secret key. Remember to switch to your live secret key in production! # See your keys here: https://dashboard.stripe.com/account/apikeys Stripe.api_key = 'sk_test_4eC39HqLyjWDarjtT1zdp7dc' invoice = Stripe::Invoice.finalize_invoice('in_18jwqyLlRB0eXbMtrUQ97YBw')
# Set your secret key. Remember to switch to your live secret key in production! # See your keys here: https://dashboard.stripe.com/account/apikeys stripe.api_key = 'sk_test_4eC39HqLyjWDarjtT1zdp7dc' invoice = stripe.Invoice.finalize_invoice('in_18jwqyLlRB0eXbMtrUQ97YBw')
// Set your secret key. Remember to switch to your live secret key in production! // See your keys here: https://dashboard.stripe.com/account/apikeys \Stripe\Stripe::setApiKey('sk_test_4eC39HqLyjWDarjtT1zdp7dc'); $invoice = \Stripe\Invoice::retrieve('in_18jwqyLlRB0eXbMtrUQ97YBw'); $invoice->finalizeInvoice();
// Set your secret key. Remember to switch to your live secret key in production! // See your keys here: https://dashboard.stripe.com/account/apikeys Stripe.apiKey = "sk_test_4eC39HqLyjWDarjtT1zdp7dc"; Invoice invoice = Invoice.retrieve("in_18jwqyLlRB0eXbMtrUQ97YBw"); invoice.finalizeInvoice();
// Set your secret key. Remember to switch to your live secret key in production! // See your keys here: https://dashboard.stripe.com/account/apikeys const Stripe = require('stripe'); const stripe = Stripe('sk_test_4eC39HqLyjWDarjtT1zdp7dc'); const invoice = await stripe.invoices.finalizeInvoice('in_18jwqyLlRB0eXbMtrUQ97YBw');
// Set your secret key. Remember to switch to your live secret key in production! // See your keys here: https://dashboard.stripe.com/account/apikeys stripe.Key = "sk_test_4eC39HqLyjWDarjtT1zdp7dc" inv, _ := invoice.FinalizeInvoice("in_18jwqyLlRB0eXbMtrUQ97YBw", nil)
// Set your secret key. Remember to switch to your live secret key in production! // See your keys here: https://dashboard.stripe.com/account/apikeys StripeConfiguration.ApiKey = "sk_test_4eC39HqLyjWDarjtT1zdp7dc"; var service = new InvoiceService(); service.FinalizeInvoice("in_18jwqyLlRB0eXbMtrUQ97YBw");

Optional Changing payment settings

Collecting payments for one-off invoices is commonly done by sending an email to customers. The emails include a link to a payment page hosted by Stripe where customers can enter their payment details. See the hosted invoice page documentation for a list of supported payment methods. You can also collect payment automatically but that requires collecting payment information from customers.

When using the API, collection_method is automatically set to charge_automatically. This means Stripe automatically charges the customer’s payment method on file. If the charge fails, Stripe automatically retries the payment.

Alternatively, you can set collection_method to send_invoice. This sends an email to the customer so they can initiate payment. When you use send_invoice you also have to specify days_until_due or due_date.

Optional Customizing invoices

There are several ways to customize invoices. These options allow you to add your own branding and to modify your invoices so that they comply in the jurisdictions that you operate it in.

See also

Congratulations! You’ve created an invoice on Stripe. Next, you might want to learn more about the invoicing workflow or how to add taxes.

  • How invoices work
  • Tax Rates on Invoices
Was this page helpful?
Questions? Contact us.
Developer tutorials on YouTube.
You can unsubscribe at any time. Read our privacy policy.
On this page
Create an invoice
Duplicate an invoice