Skip to content
Sign in
An image of the Stripe logo
/
Create account
Sign in
Home
Payments
Finance automation
Banking as a service
Developer tools
No-code
All products
Home
Payments
Finance automation
Home
Payments
Finance automation
Banking as a service
Developer tools
Overview
Building your integration
Developer tools
SDKs
API
Security
Sample projects
Videos
Stripe Apps
    Overview
    Get started
    Create an app
    How Stripe Apps work
    Sample apps
    Development
    Store secrets
    API authentication methods
    Authorization flows
    Server-side logic
    App settings page
    Build a UI
    Onboarding
    UI design
    Design your app
    Style your app
    Design patterns
    Components
      Accordion
      Badge
      Banner
      BarChart
      Box
      Button
      ButtonGroup
      Checkbox
      Chip
      ContextView
      DateField
      Divider
      FocusView
      FormFieldGroup
      Icon
      Img
      Inline
      LineChart
      Link
      List
      Menu
      Radio
      Select
      SettingsView
      SignInView
      Sparkline
      Spinner
      Switch
      Table
      Tabs
      TextArea
      TextField
      Toast
      Tooltip
    Share and distribute
    Distribution options
    Upload your app
    Versions and releases
    Test your app
    Publish your app
    Promote your app
    Add deep links
    Using install links
    Using roles in UI Extensions
    Post-install actions
    App analytics
    Reference
    App manifest
    CLI
    Extension SDK
    Permissions
    Viewports
    Extensions
    Migrate to Stripe Apps
    Building extensions
    Plugins and connectors
    Plugin authentication
Stripe Connectors
Partners
HomeDeveloper toolsComponents

SignInView

SignInView allows apps to render a sign in screen.

Use the SignInView component to display a graphic with your app’s icon next to Stripe’s, a short description of your sign in process, action buttons, and more. If your app requires users to sign in, the SignInView component is required to make sure users clearly understand that they’re connecting to Stripe.

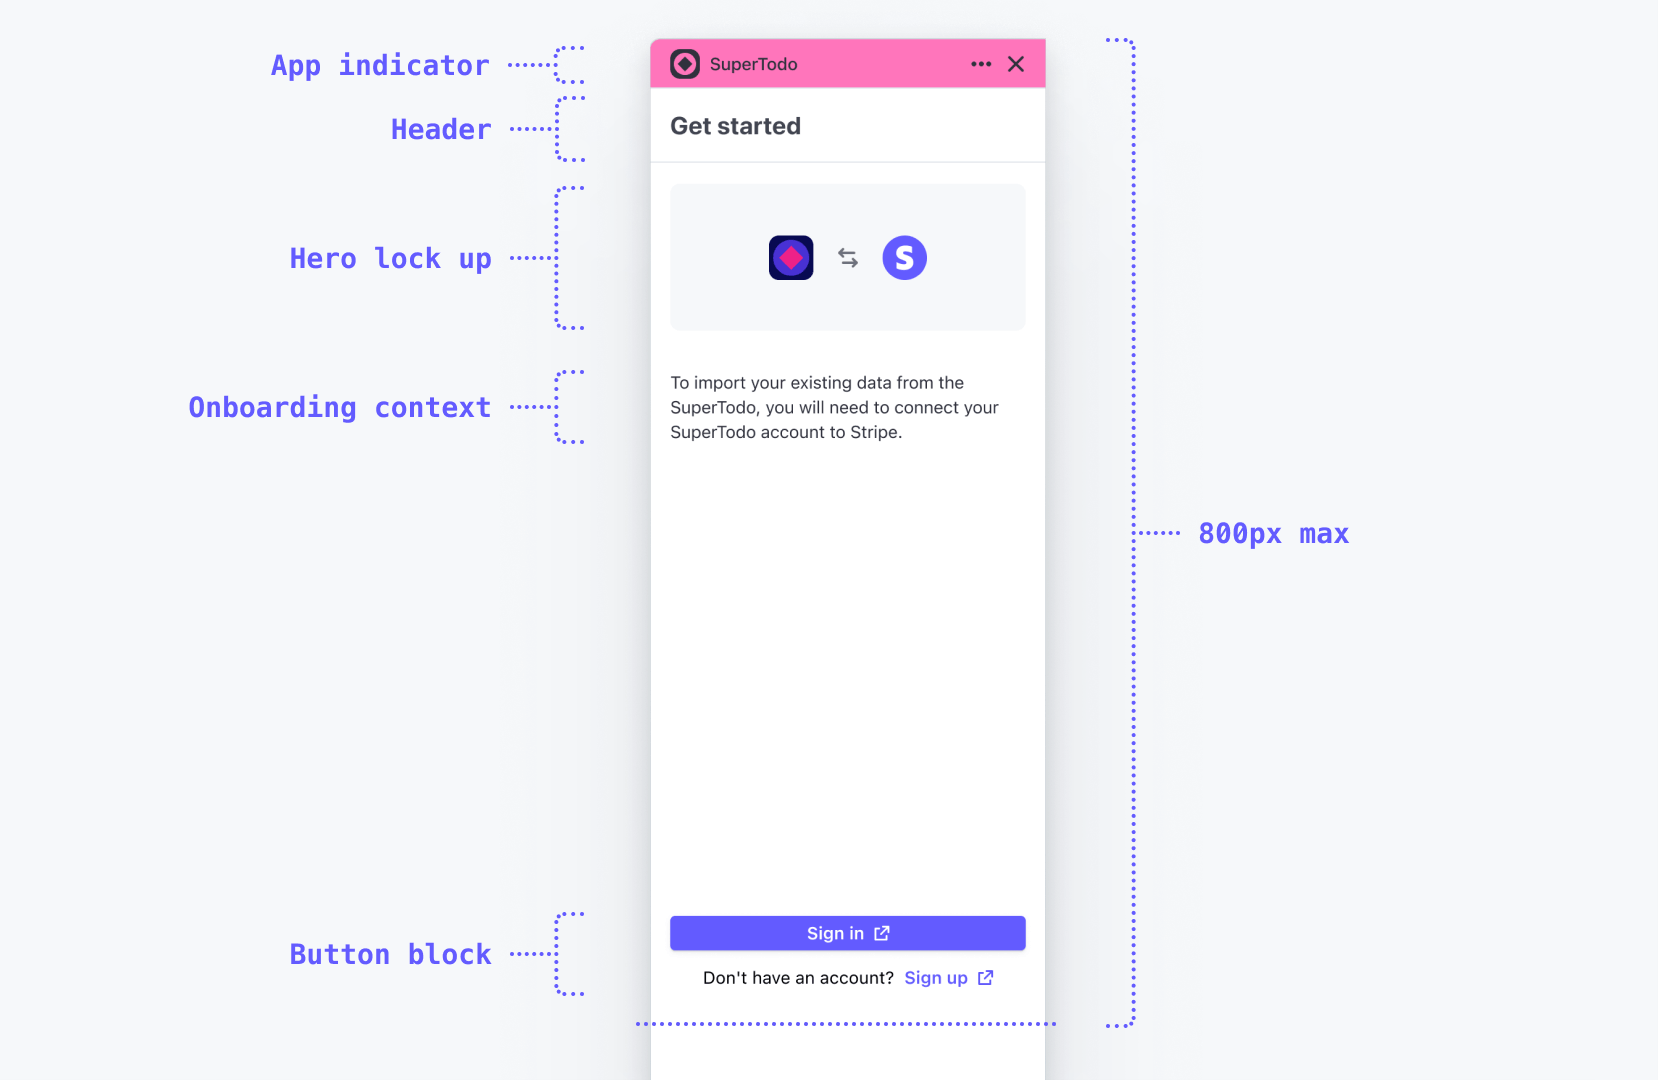
A SignInView example displayed in the drawer.

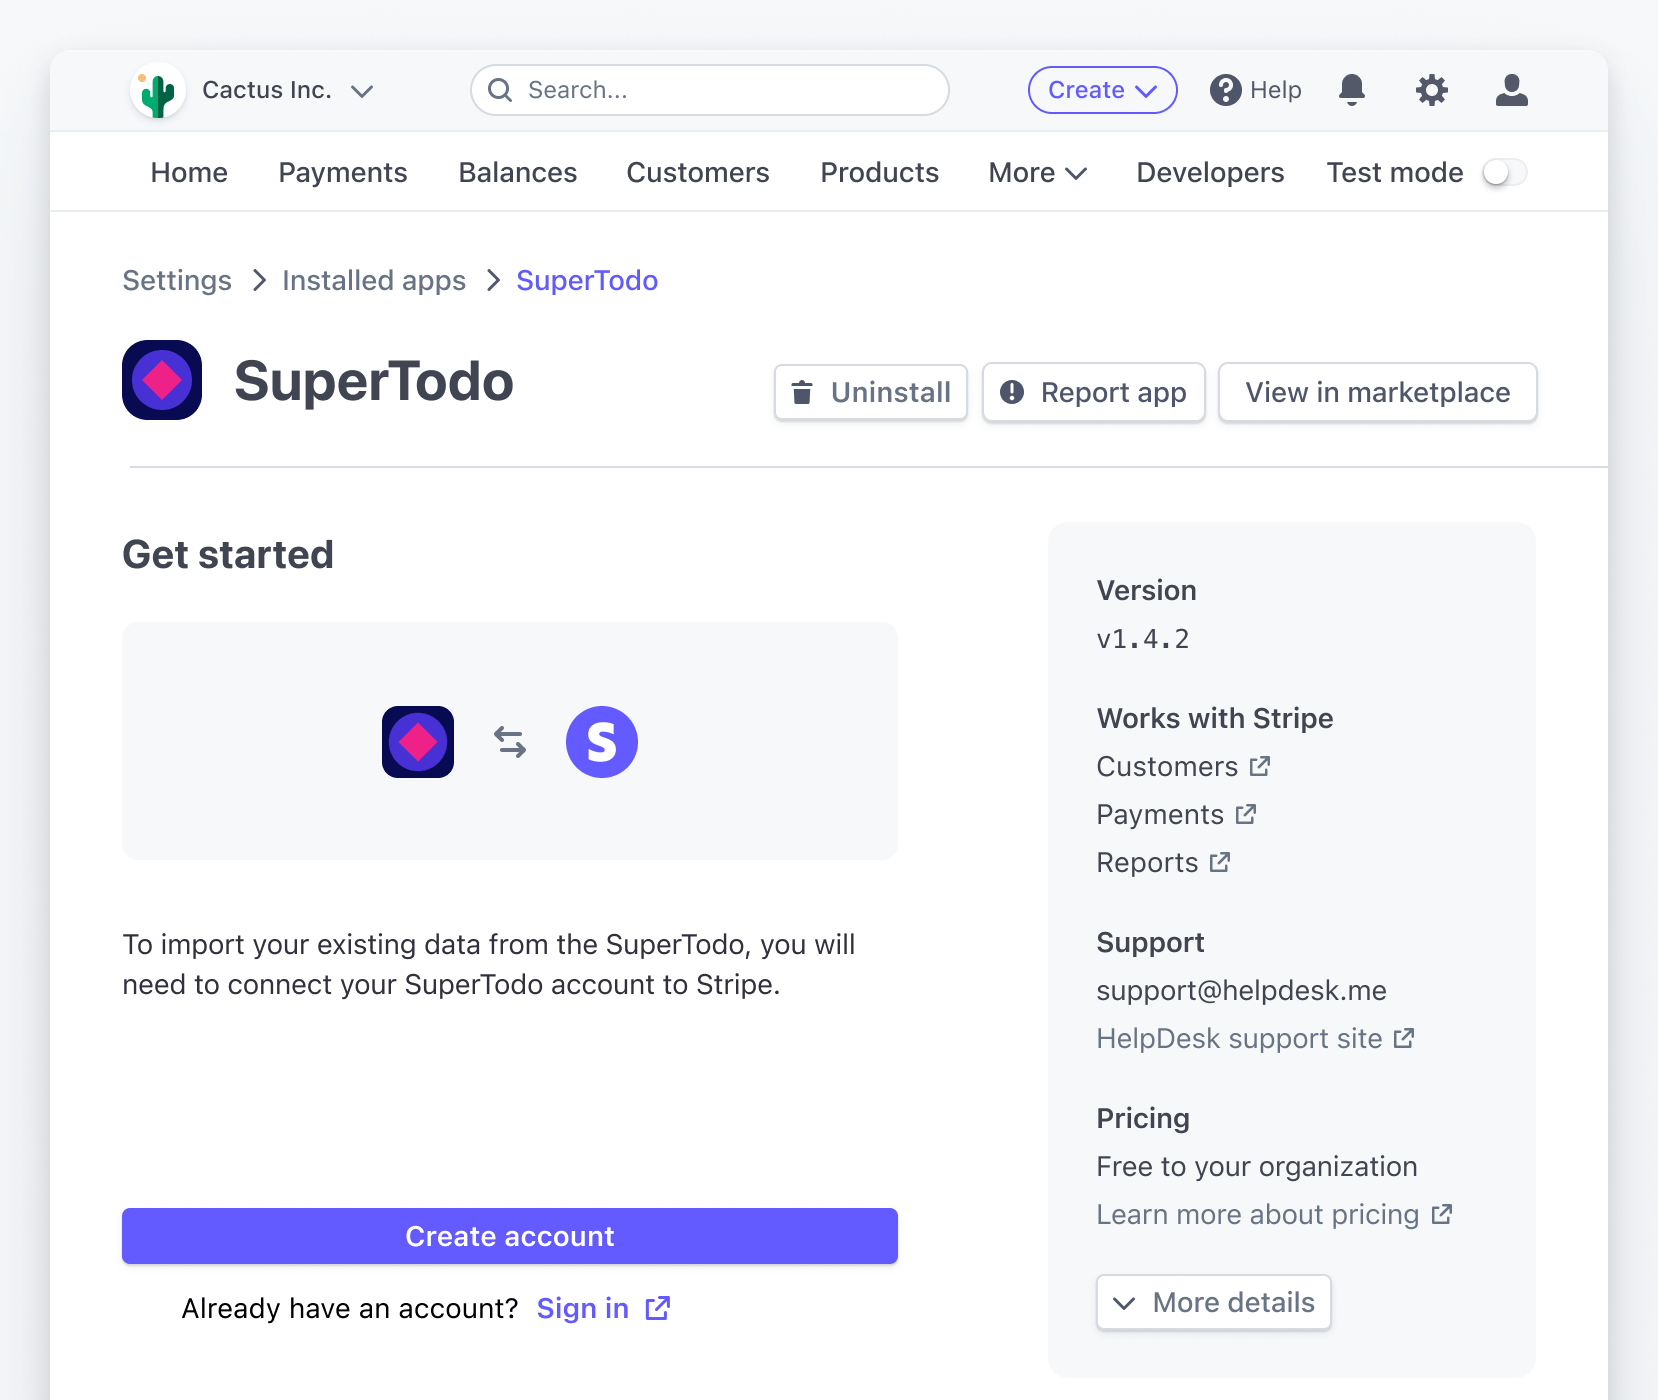
SignInView used on the settings page.

Props

Prop
Type
Description
brandColor
string
A CSS color that contrasts well with `brandIcon`.
brandIcon
string
A square, 1-color SVG that contrasts well with `brandColor`.
description
string
A paragraph description of the app and its features.
descriptionActionContents
ReactNode
Description action contents that open in a FocusView.
descriptionActionLabel
string
An action label ("Learn more" or "View demo", for example) below the description.
descriptionActionTitle
string
The title in the FocusView for the description action.
footerContent
ReactNode
React node below the primary action in the footer.
primaryAction
{ label: string; href: string; target?: string; onPress?: (() => void); } | { label: string; href?: string | undefined; target?: string | undefined; onPress: () => void; } | undefined
A primary call to action ("Sign in" or "Authenticate", for example) button placed in the footer.
secondaryAction
{ label: string; href: string; target?: string; onPress?: (() => void); } | { label: string; href?: string | undefined; target?: string | undefined; onPress: () => void; } | undefined
A secondary call to action ("Sign up", for example) link placed in the footer.

Example

import { Link, SignInView, } from '@stripe/ui-extension-sdk'; import appIcon from './icon.svg'; <SignInView description="Connect your SuperTodo account with Stripe." primaryAction={{label: 'Sign in', href: 'https://example.com'}} footerContent={ <> Don't have an account? <Link href="https://example.com">Sign up</Link> </> } brandColor="#635bff" brandIcon={appIcon} />
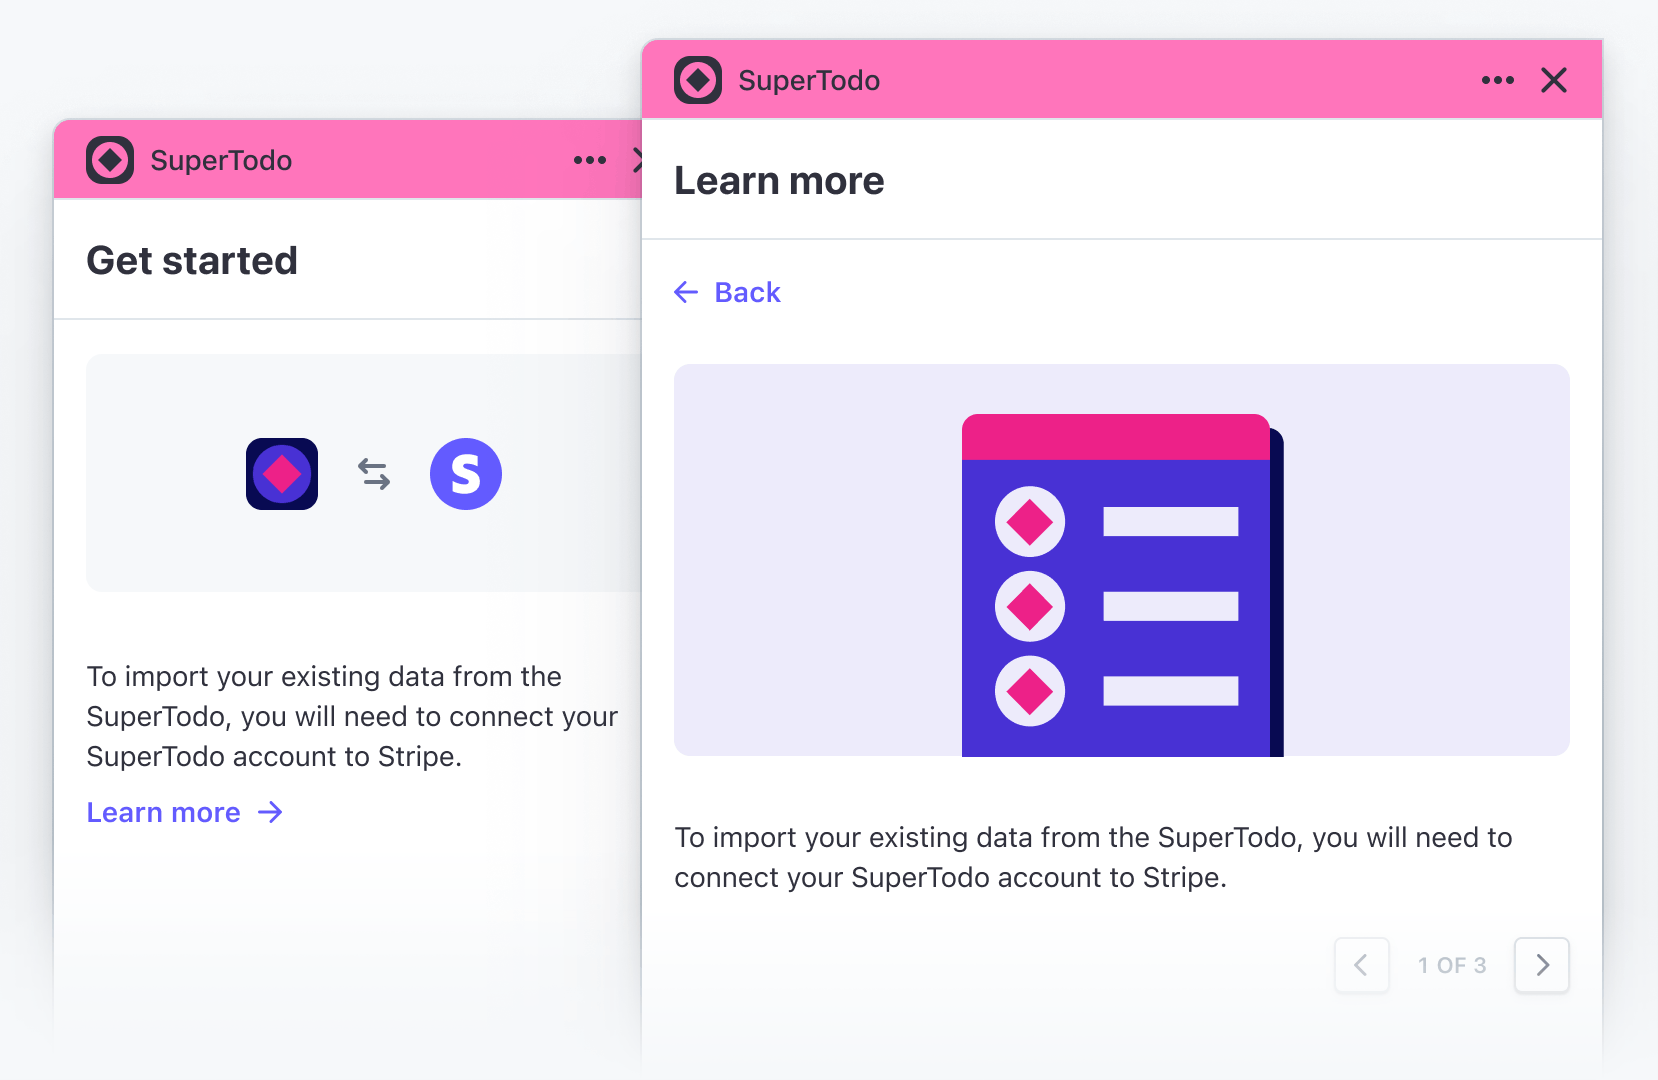
Additional context

Before a user signs in, you might want to display a demo, a detailed description of your app, or screenshots of the experience. Remember that at this point the user has already installed your app so they should be motivated to sign in, but if you want to show additional context, you can do it in a focused view using the descriptionActionLabel, descriptionActionTitle, and descriptionActionContents properties. For example:

import {Img, Link, SignInView} from '@stripe/ui-extension-sdk/ui'; import appIcon from './icon.svg'; const Onboarding = () => ( <SignInView description="Connect your SuperTodo account with Stripe." primaryAction={{label: 'Sign in', href: 'https://example.com'}} footerContent={ <> Don't have an account? <Link href="https://example.com">Sign up</Link> </> } brandColor="#635bff" brandIcon={appIcon} descriptionActionLabel="Learn more" descriptionActionTitle="Learn more" descriptionActionContents={ <> <Img href="https://example.com/screenshot.png" /> To import existing data from SuperTodo, you will need to connect your SuperTodo account to Stripe. </> } /> );

See also

  • Design patterns to follow
  • Style your app
  • UI testing
Was this page helpful?
Need help? Contact Support.
Watch our developer tutorials.
Check out our product changelog.
Questions? Contact Sales.
Powered by Markdoc
You can unsubscribe at any time. Read our privacy policy.
On this page
Additional context
See also
Stripe Shell
Test mode
Welcome to the Stripe Shell! Stripe Shell is a browser-based shell with the Stripe CLI pre-installed. Log in to your Stripe account and press Control + Backtick (`) on your keyboard to start managing your Stripe resources in test mode. - View supported Stripe commands: - Find webhook events: - Listen for webhook events: - Call Stripe APIs: stripe [api resource] [operation] (e.g., )
The Stripe Shell is best experienced on desktop.
$